
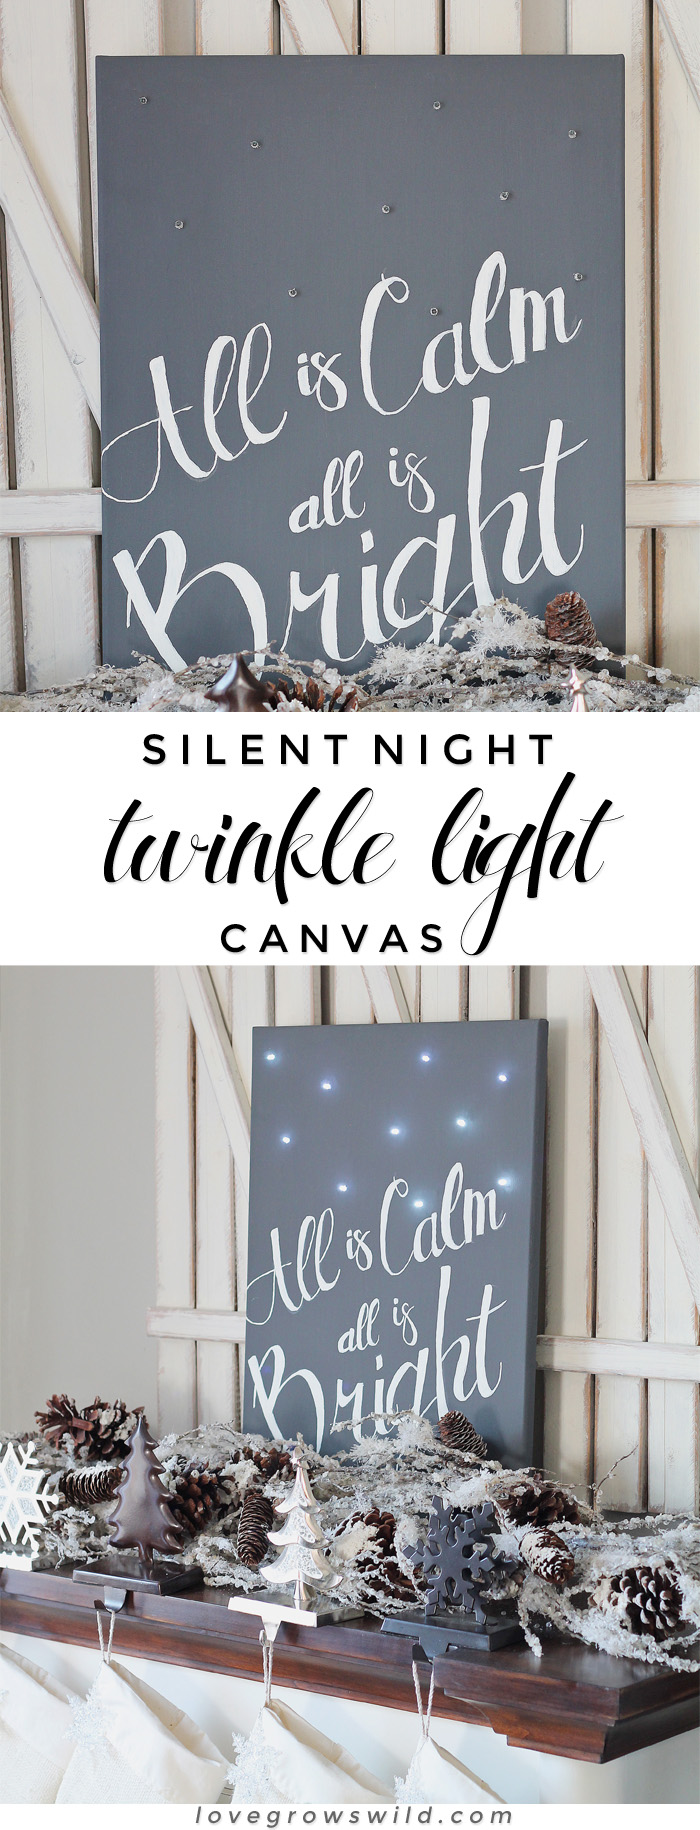
Learn how to make this festive canvas art that will light up your home for the holidays!
Sitting in my living room in the evening, the Christmas tree lighting up the room, a cozy blanket on my lap and a mug of hot chocolate in my hand, listening to our favorite Christmas carols on the radio while watching the snow fall outside…
If you could bottle that up and make it last all year long… I would be one very happy camper! There’s no better feeling than a warm and cozy home dressed up for the holidays, and I’m trying to soak up every last bit of it over the next few weeks before it all gets packed away until next year. Why can’t it be Christmas all year long? Oh, that’s right… I’d be broke. And about 100lbs. heavier. On second thought, I’ll just enjoy it while it lasts! 🙂
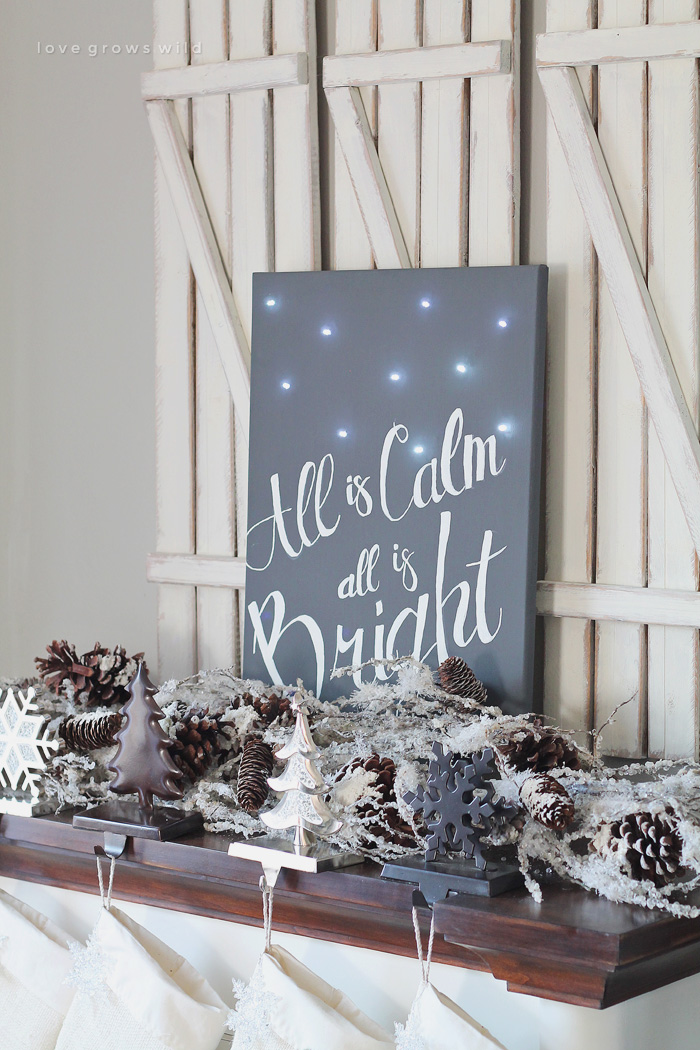
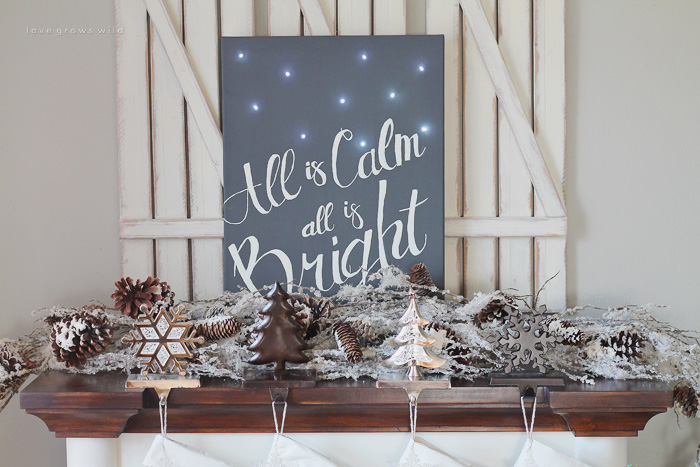
As I was re-arranging ornaments on the tree the other day (for the 100th time), I had an idea to re-create one of my favorite art pieces from our gallery wall with a Christmas theme, and I came up with this Silent Night Twinkle Light Canvas. LOVE!

The original version of this canvas art was a simple black and white “Happily Ever After” sign that hangs above our big couch on the gallery wall, and I used the same method to create this holiday version. But this time, my friends… I added some pretty twinkle lights! You can never… I repeat, NEVER have enough Christmas lights in your home for the holidays. It’s a fact. 🙂
Supplies:
– 16″ x 20″ canvas (from Michael’s)
– 2 paint colors (I used DecoArt Chalky Finish in Relic and Lace)
– paint brush
– projector
– pencil
– set of battery-powered twinkle lights (from Michael’s)
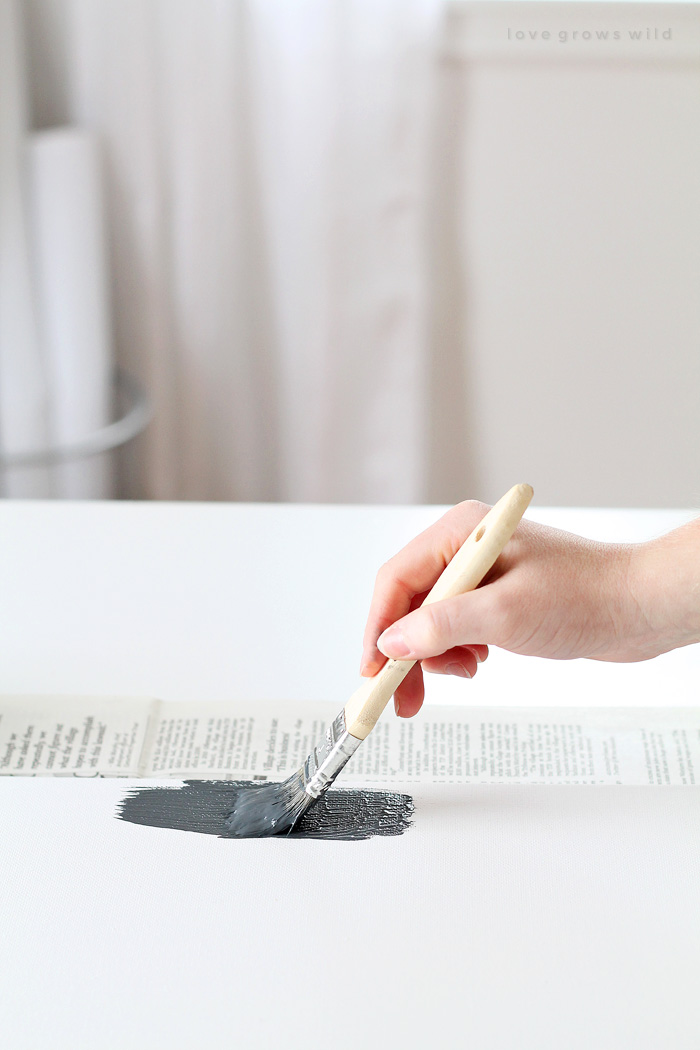
Since I wanted the canvas to look like a star-lit sky, I started by painting the background a dark charcoal gray. I used DecoArt’s Chalky Finish paint, which dries to a beautiful, soft, chalky finish that I just love. I first tested this paint on the inside of my refinished media console in the living room and fell in love with how smooth and silky the paint went on and how well it covered in even just one coat. If you guys haven’t tried this stuff yet, you need to! (P.S. there may just be a GIVEAWAY for you at the end of this post!)

I painted one coat of Relic, applied with a brush, on both the front and sides of the canvas.
Once that was dry, I added “All is Calm, All is Bright” from Silent Night to the bottom of the canvas. You can find detailed instructions for this process on my tutorial for the original canvas script art, but here’s the basics of it:
I created the design for my wording on the computer (Microsoft Word works well for this) using my favorite Antrokas font. Then I printed it out and used a projector to transfer the image onto my canvas. I first traced the letters with a pencil, then went back and filled them in with a creamy white paint, DecoArt’s Chalky Finish in Lace.
And because I already know what your next question is going to be… I’m offering my design as a free printable that you can download at the bottom of this post! Yahoo!
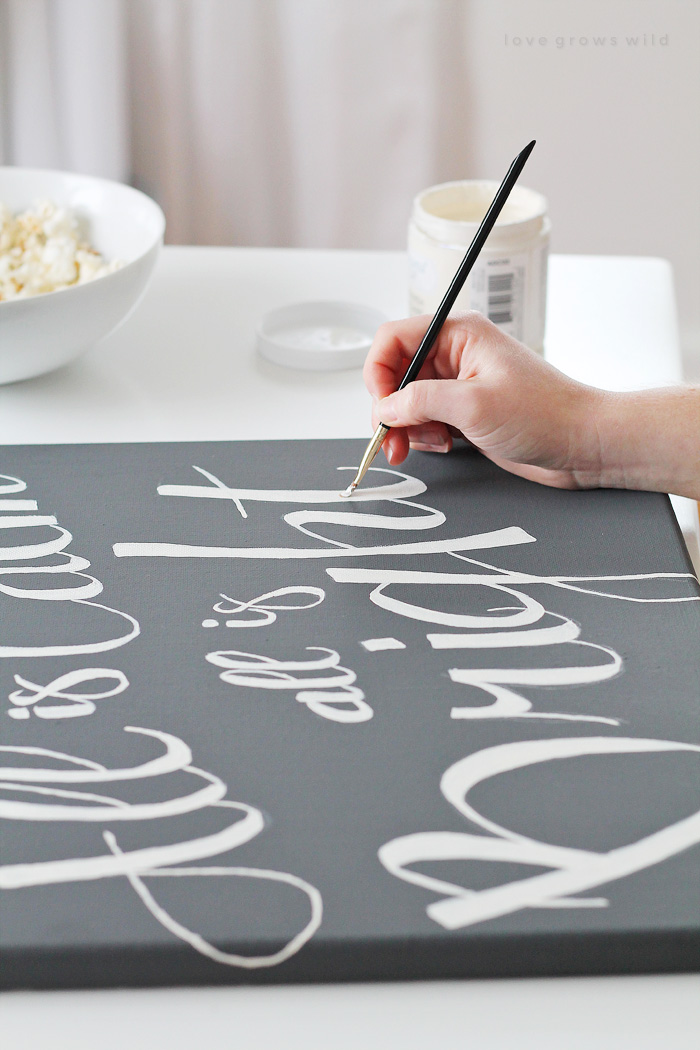
Side note from the above photo: Crafting munchies are a real thing. Keep a bowl of popcorn nearby to munch on while you paint. 🙂
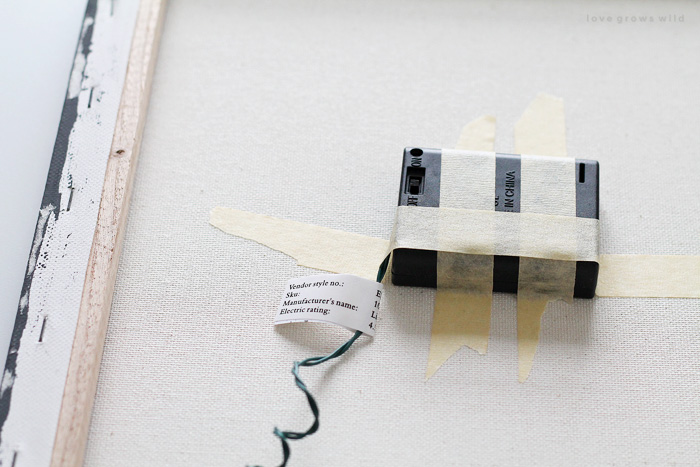
Now it’s time to add the twinkle lights to your canvas! This step is obviously optional, but I think it adds such a beautiful touch, and like I said before… you can NEVER have enough Christmas lights. The set of lights I picked up from Michael’s came with 10 twinkle lights, so I mapped out where I wanted each light to go on the canvas and marked the spots with a little sticker.
Using an X-Acto knife, I made a small cut in the canvas and threaded each light through from the back of the canvas. To make sure the lights stay in place, I used a super fancy, high-tech method also known as: tape. It may not be pretty, but it works! It’s on the backside of the canvas anyway, so no one but you will ever know the tape is back there holding everything together.
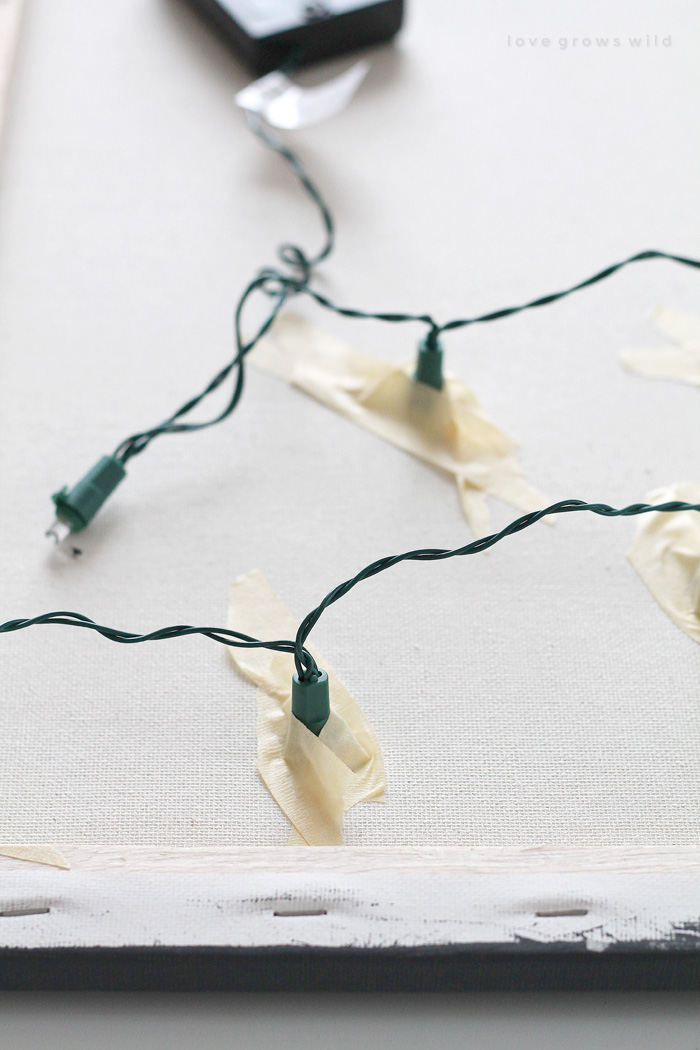
Once I had all the lights in place, I taped the battery pack to the back of the canvas as well. Just make sure not to cover up the on/off switch!
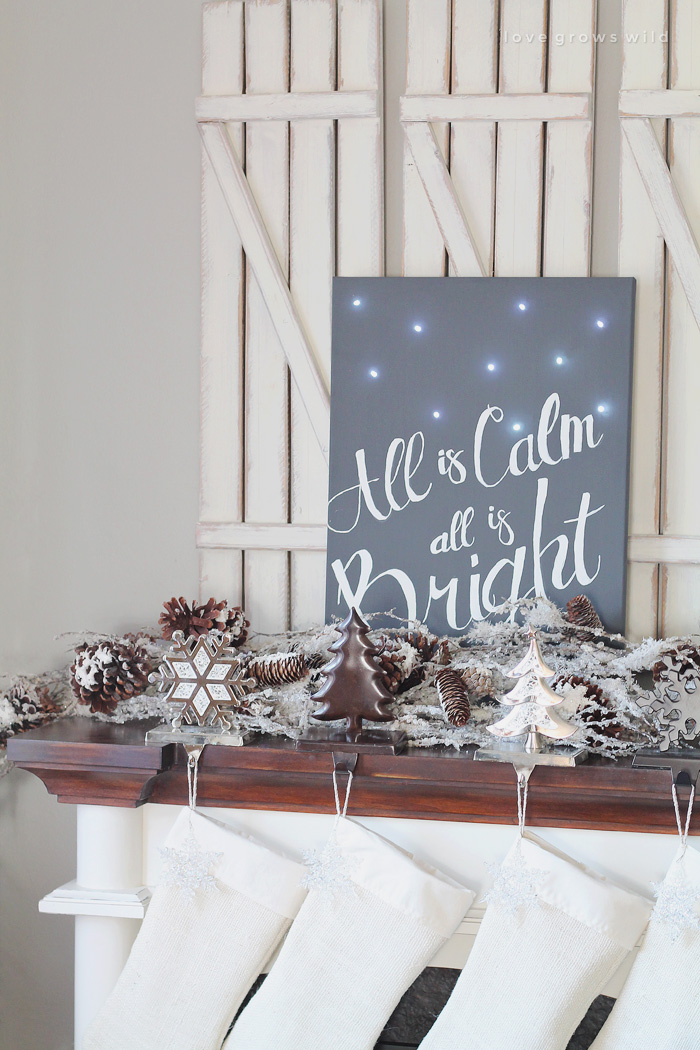
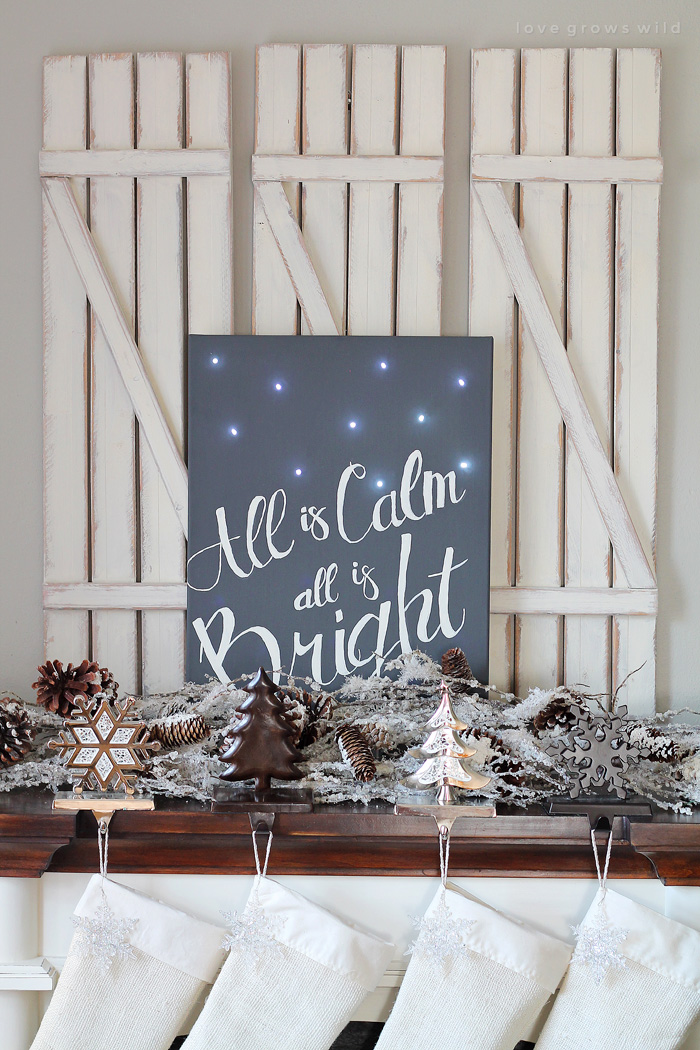
My mantel was looking a little bare, so I set the canvas resting against the DIY shutters I made earlier this year.
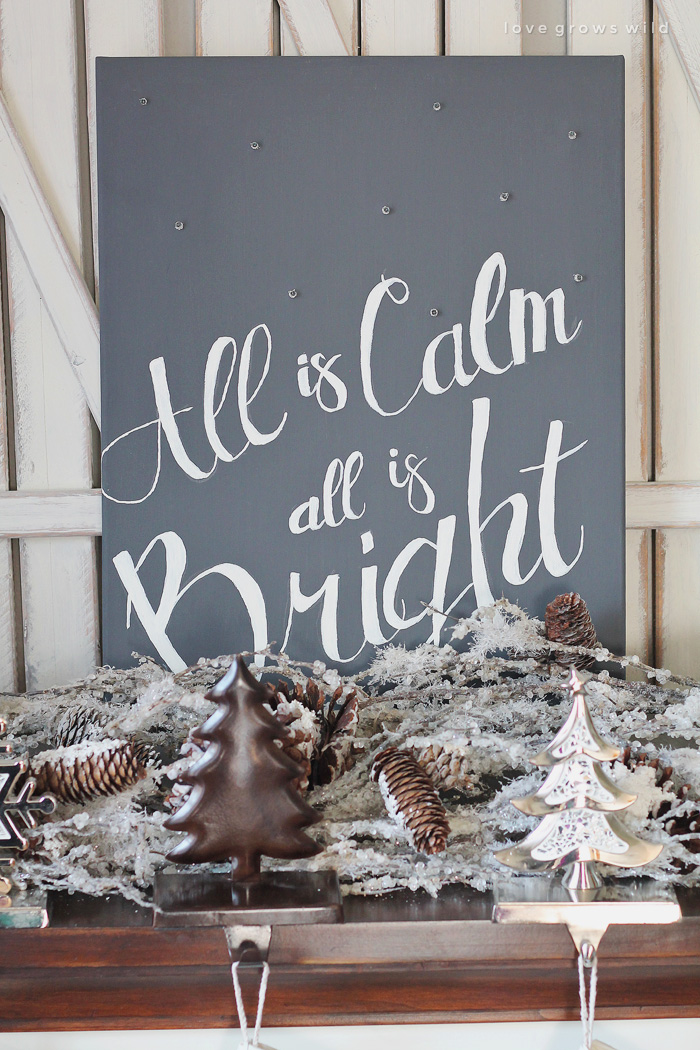
You don’t get the full effect of the twinkle lights all lit up in these pictures, but it was a little hard to photograph in the dark. They’re just beautiful! And since I taped the battery pack to the back of the canvas, I just have to reach behind to switch it on and off. No cords to plug in… nice and easy!
I’ll be revealing the rest of my decorations in a home tour next week, so you’ll have to wait till then to see the full space. I cannot wait to show you everything!
And as promised, I’m sharing the design I used for “All is Calm, All is Bright” as a FREE printable just for you guys! Print it out to make your own twinkle light canvas or just frame it as an easy holiday decoration!

*** This giveaway has ended and a winner has been contacted. Congratulations to Alice W! ***
Now who’s ready for a GIVEAWAY? I love DecoArt’s awesome Chalky Finish paints so much that I’m giving away a fabulous set to get you started:
8 Chalky Finish paints (in your choice of colors)
Clear and Dark Creme Waxes
Soft Touch Varnish
Waxing Brush
2 Stencils (your choice of design)
Just use the giveaway form below to enter!
This giveaway is sponsored by DecoArt and is not endorsed or affiliated with Pinterest or Instagram in any way. Giveaway begins on December 4th and ends at midnight EST on December 11th. Winner must be a United States resident, will be chosen at random by Rafflecopter, and notified by email.
Like what you see? Subscribe to Love Grows Wild so you’ll never miss a post!
Follow along on Pinterest, Google+, Instagram, and Facebook for more fun!
Are you making this project? I’d LOVE to see it! Post a photo of your creation on Instagram and use the hashtag #MyLGWProject. It may just get featured!
Don’t leave just yet! Check out these other holiday ideas:


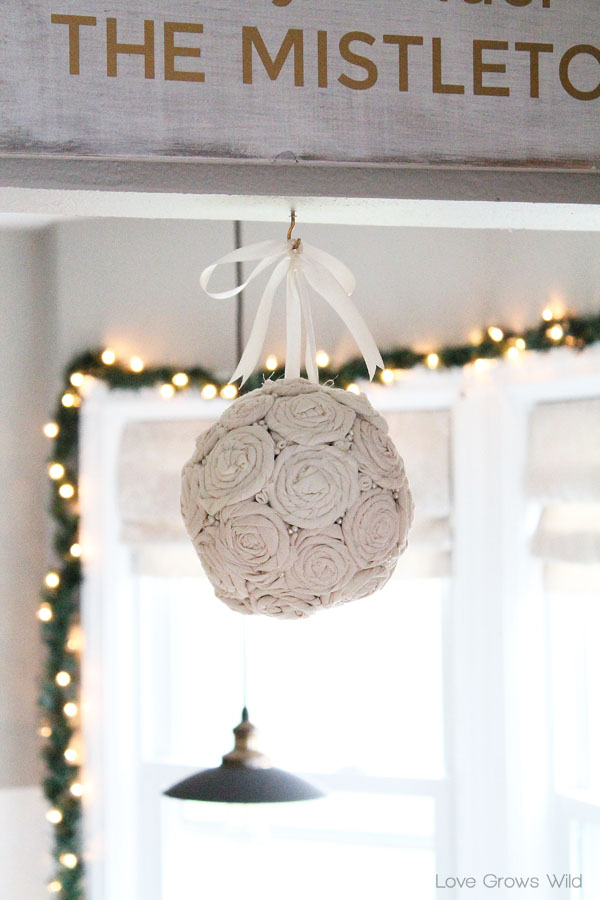
DIY Fabric Rosette Mistletoe Ball
Thank you to DecoArt for sponsoring this post! DecoArt provided the product for the giveaway along with product for me to review. I was compensated for my time, but all thoughts and opinions are 100% my own. I appreciate all of you for supporting the brands that make this blog possible!
LET’S KEEP IN TOUCH!
Subscribe to Blog | Browse my Shop | Follow on Facebook | Follow on Twitter
Follow on Google+ | Follow on Pinterest | Follow on Instagram

This is so stinkin’ cute! I’ve looked at that paint in the store a dozen times, but have yet to pull the trigger. I really want to try it on my coffee table.
I think you are going to LOVE this paint, Mindy! It’s definitely a keeper! 🙂
This is beautiful! I love everything about it.
Thank you so much, Emily! I really appreciate it! 🙂
I desperately need to update the base of my kitchen table!
Love your twinkle light canvas!!… I’d paint a small chair and a lamp base with the Chalky Finish paints. Thank you for hosting this great giveaway and the opportunity to win! 🙂
Thank you so much, Lauren! Best of luck! 🙂
This is just so cute and so simple! Using the masking tape is such a great idea too in case the batteries need to be changed. Can’t wait to try this now!
Exactly! Sometimes the good ol’ fashioned masking tape is the best way to do it! Thanks so much for stopping by to see my new project! 🙂
How lovely!! I was just thinking of making something with this very phrase 🙂
Great minds think alike, Jessica! 😉 I’m so glad you stopped by!
I love this! We had considered making something like this & couldn’t get around having to plug it in…didn’t even consider that they make the battery ones. Even though we have a few f I r my kid’s mini trees. 🙂
Not having a plug attached was a big plus for me! It gives me so many more options on where I can put my pretty new Christmas canvas around the house. Thanks so much for stopping by, Jennifer! 🙂
You have the best projects! Always find your posts so inspirational! I love to craft, but design challenged I am, thank goodness I found you!
You are SO sweet, Chris! Thank you for stopping by to see what I’m up to each week… it means a lot to me! 🙂 I feel design-challenged some days too, but I find that the more I do it… the easier it gets. Have fun creating, my friend!
I haven’t tried this paint, but I have a dozen craft projects lined up just waiting 🙂
Me too, girl! Too many ideas… so little time. 😉
I am new to DIY projects but your website is a total inspiration. Looking forward to using the chalky paint to make the twinkle light canvas. 🙂
I think you will really love the chalky finish paint! Best of luck!
I would love to make this. Silent Night is one of my favorite Christmas carols. This would be beautiful hanging over the mantle!
Mine too, Miranda! I’ve been listening to all my favorite Christmas songs for the last few weeks, and I’m already about to drive poor Jeremy crazy. Lol! Thanks for stopping by to see my new project!
I love it! I have a chair and a piano bench that need to be repainted. I’d love to try the paint on them. 🙂
I’ve been trying to convince Jeremy FOREVER to let me paint our piano, but so far it’s a no-go. Best of luck with the giveaway, Tammie! So glad you could stop by!
Funny. The piano the bench is with was painted by someone in the 70’s. Textured PINK. There are inlaid vines on the piano that were all colors of green. Fortunately it’s now mostly stripped, and we’ll be staining or oiling it…sometime. The bench was from another piano and is different wood & already painted, so it’s fair game.
Textured pink… whoa! Sounds like it could use a makeover! 🙂
Oooooh. Adding the lights is a super cool touch.
Thanks, Heather!! I thought it was a fun little addition. 🙂
Oh I just love this! I’m adding it to my project list for next Christmas! We are currently making signs for my childrens rooms so I would use it for that.
Thank you, Lauren! I really need to spruce up my boys’ bedroom decor too one of these days. Best of luck with the giveaway!! 🙂
Love the canvas! What a great idea. Want to go make one right now! I’ve used this paint several times already. Used it in a class I taught and just finished a dresser in “whisper”.
That’s awesome, Susan! They have so many gorgeous shades of the chalky finish paint… I could play around with it all day! Thanks for stopping by! 🙂
I love this! I have a small table I’d like to try it on. Thank you!
You’re welcome, Tammy! Best of luck! 🙂
I love when I open my email and there’s a new email from you! I know it’s going to be fun and have something I’m going to try for my family. I’m new to blogging and get so much inspiration from your posts! I tried a different brand of chalk paint and recently painted my knife block teal and I absolutely love it!!! Made my own with plaster of Paris and painted our nightstands and absolutely love them too! Now I’m noticing my walls are a little bare and need new signs and updated frames so I think that would be my first project if I won.
You have no idea how happy I am reading this, Tabitha! You’ve totally made my day. 🙂 And I totally agree, chalk paint is the way to go! Thanks so much for stopping by to chat! 🙂
I would make this beautiful picture first! Then I have some old small furniture pieces I’ve been dying to refinish but haven’t had the supples to start! I’m a newbie at it so really wasn’t sure exactly what was needed! This would be perfect, if you pick me!!! 😉
I’m in the same boat, Jennifer… so much furniture in my house that needs to be re-done! Best of luck!! 🙂
I would make something similar to this if I won. LOVE this idea!
Thanks, Melanie!! 🙂
I am in love with this! It is seriously adorable!! Thanks for sharing at Monday Funday Party. Pinning to our Pinterest board.
Thank you so much, Amy!! 🙂
I absolutely love the “All is Calm,” canvas painting. I’ve already started this project for my main Christmas room. I can’t wait to finish!
That’s awesome, Jessica! I bet it is going to look FAB-U-LOUS in your home! I so appreciate you stopping by to share this with me… I love when readers make my projects! Enjoy your new Christmas decor! 🙂
I would start out by painting a canvas so I can do a twinkle light scene and then I would work on my bureau which is old as dirt and needs LOTS of TLC!
I haven’t tried these paints yet due to financial reasons but am dying to! Winning this prize package would make a definite statement in my bedroom! Thank you for sharing this awesome creation and I can’t wait to see the whole reveal!! I am a new blog follower and am looking forward to seeing more of your posts!!!
Welcome to Love Grows Wild, Barb! I am thrilled to have you here! Fingers crossed the giveaway… I think you’re going to love this paint!
I think I will after all I have heard about it!
I have been wanting to try chalk paint for awhile. I keep finding and collecting small furniture peices to try it on! I need to get started! Love the canvas!
Thank you, Rhonda! Best of luck!! 🙂
Your blog is just awesome, so glad I “stumbled” upon it. I’m so inspired, can’t wait to get started on so many things! Thanks for sharing your creativity with me.
Welcome, Marshella!! I’m thrilled to have you here at Love Grows Wild! Looking forward to seeing you around more often. 🙂 Have fun checking everything out!
I am working on my spare room to make it a craft room as well I have several pieces of furniture that do not match so I am wanting to pain them this would make this so much easier
Best of luck, Tracy!! 🙂
So I just made your super cute silent night twinkle light canvas. Thx for the directions! It turned out great. Are your lights the bright LED ones or the softer white? When I turn off the lights in the room, the bright lights on the canvas almost take over power the words. Just wondering. Might try to find another strand in a softer white. Thx for the great idea!!! This just my style.
I bet this looks beautiful in your home, Katy! My lights are LED also, and they’re pretty bright, but don’t bother me too much. I think you’re right though, a softer white would be gorgeous! Thank you so much for stopping by to share this with me… Merry Christmas! 🙂
simple yet very beautiful.
Thank you, Maria! 🙂
I know this is an older post, but I saw this last year and fell in love with it, and am hoping to make this for our Family Room this year!
However I don’t have a projector – do you have any suggestions for how to get a good looking script on the canvas without one?
Thanks!
I’m just wondering how you used the projector to trace the letters? I’ve tried using one before to trace a picture but kept getting in the way of the light, which seemed a bit counterproductive :/