• Home
  • MEET LIZ
  • contact
  • Blog
  • E-DESIGN SERVICE

Love Grows Wild

  • Home
  • Liz Fourez Interiors
  • Our Home
    • bathroom
    • dining room
    • entryway
    • exterior
    • kids bedroom
    • kitchen
    • living room
    • master bedroom
    • office
    • playroom
  • Project Gallery
    • diy decor
    • decorating advice + inspiration
    • furniture makeover
    • woodworking
    • crafts
  • Seasonal
    • spring
    • summer
    • fall
    • winter
  • Recipes
    • appetizers/snacks
    • beverages
    • breakfast
    • dessert
    • meal ideas
    • side dishes
  • SHOP
    • My Book
    • Shop LGW Style
    • love grows wild market
Decorating and Home, Seasonal, Tutorials

Twine Ball Ornaments

November 20, 2014

Pin
Share
Tweet
Email
Print
These handmade Twine Ball Ornaments are perfect for adding a little rustic charm to your tree! See details at LoveGrowsWild.com

Let the holiday season begin! Much to my husband’s dismay, the Christmas tree went up in our house a few weeks ago so I could start getting things prepared for the blog. It wouldn’t be very helpful if I showed you some jazzy new ideas for your holiday decorating the day before Christmas, now would it? Don’t hate the player, dear husband… hate the game. 

We used to have just one tree in the house that had everything but the kitchen sink on it… Barbie ornaments from my childhood, the boys’ superhero ornaments, Jeremy’s John Deere tractor ornaments, and plenty of handmade ornaments from my Grandma Ginny. The past few years I’ve started putting up a second smaller tree in the boys’ bedroom that they can decorate with all their big, crazy, bright-colored ornaments and Momma can have a “pretty tree” in the living room. Best. Decision. Ever. The boys feel special getting their very own Christmas tree, and I get to decorate the living room tree MY style. Which doesn’t happen to include Captain America, Spongebob Square Pants, or Larry the Cable Guy.

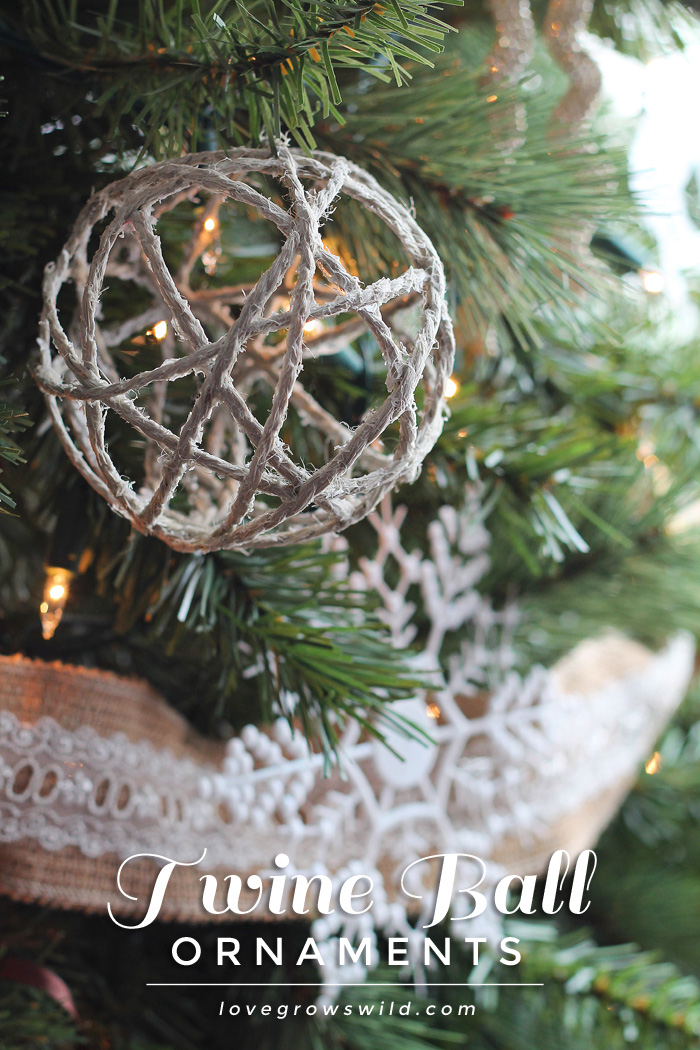
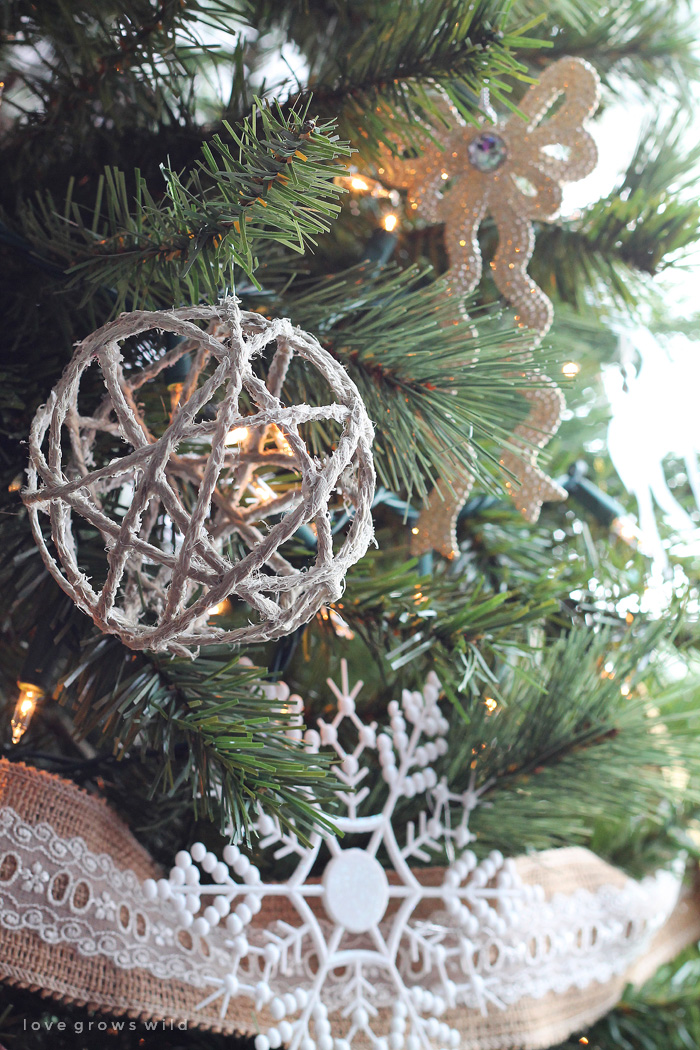
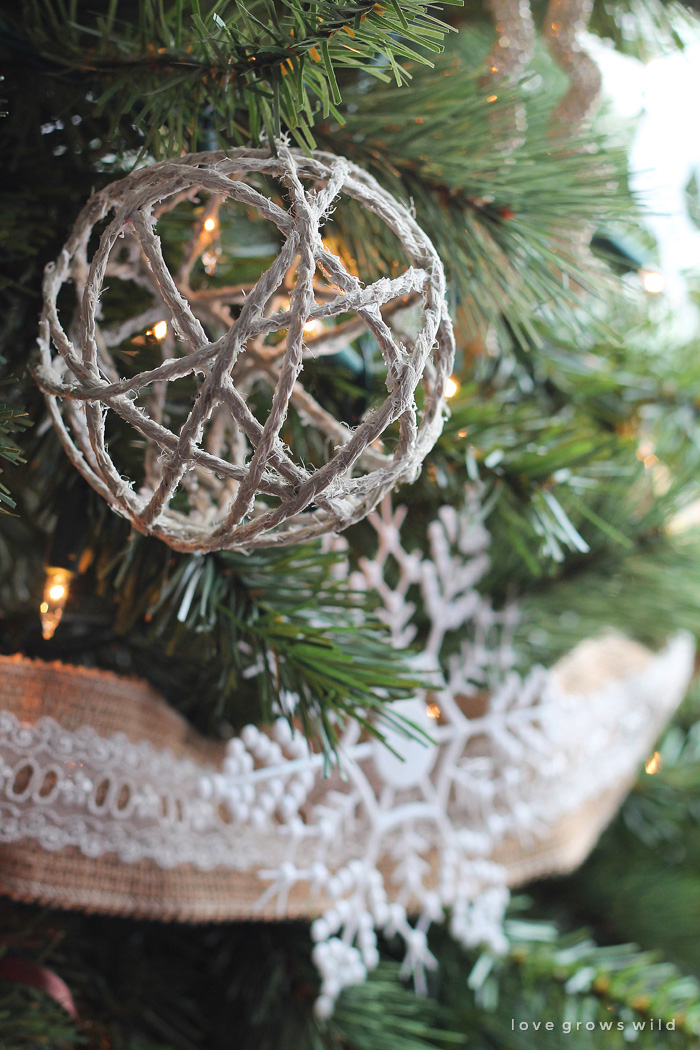
I’ve slowly been adding more ornaments to my “pretty tree”, and this year I felt like it needed a little rustic charm to balance out all the glitter and glam. These Twine Ball Ornaments were easy (and so fun!) to make and add a touch of simple, natural beauty to my tree. I’ll show you how I made them!

These handmade Twine Ball Ornaments are perfect for adding a little rustic charm to your tree! See details at LoveGrowsWild.com

Supplies:
  • glue
  • cornstarch
  • water
  • bowl and whisk
  • balloon
  • plastic wrap
  • jute twine
  • tape
  • paintbrush
  • ornament hanger

Step 1:

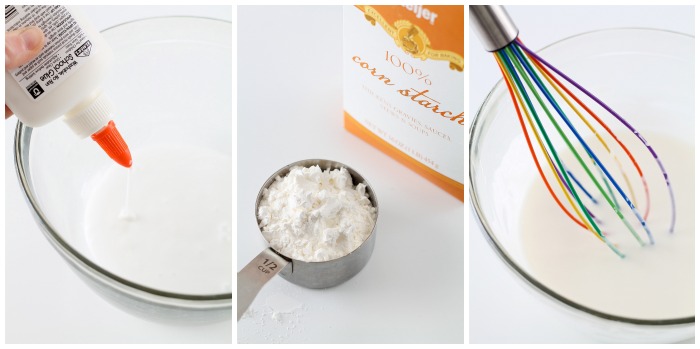
Mix together 4 ounces of regular ol’ school glue, 1/2 cup of cornstarch, and 1/4 cup warm water in a bowl. Whisk the mixture until it’s thick and smooth. Then go wash your whisk so you don’t end up with hunks of glue in your next batch of pancakes. I used this mixture when I made the “EAT” rope letters for my kitchen last year, and it held up very well over time. You could possibly get away with only using glue or even Mod Podge, but I find that the cornstarch adds a little extra stiffness that these ornaments need to keep their shape. If the mixture gets too thick on ya, just add a little extra water.

These handmade Twine Ball Ornaments are perfect for adding a little rustic charm to your tree! See details at LoveGrowsWild.com

Step 2:

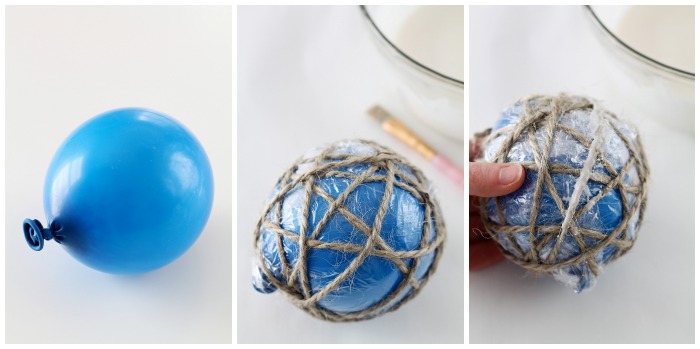
Grab a balloon, blow it up just a little, and tie a knot. The size of your balloon will dictate how large or small your finished ornament will be, so keep that in mind. Now wrap your balloon in a layer of plastic wrap. This will keep the balloon from sticking to the glue and make your life much easier. Wrap the twine around your balloon in a random pattern, keeping the twine taut as you go. I used a small piece of tape to hold the twine in place while I wrapped the balloon. Then cut the twine and tuck the end underneath another section of twine.

Now it’s time to get messy! Use a paintbrush to paint the glue over all the twine. I painted on a thick layer at first, making sure every bit was covered in glue, then went back and brushed away any extra.

These handmade Twine Ball Ornaments are perfect for adding a little rustic charm to your tree! See details at LoveGrowsWild.com

Step 3:

Let the balloon dry overnight. Once dry, use a pin or knife to pop the balloon. Pull the deflated balloon and plastic wrap through one of the larger openings in your twine ball, and you have yourself a twine ball ornament! I did have little bits of glue left in between the twine pieces after popping the balloon, but they were easy to remove with my fingers.

I just love the way these look on my tree! For the most part, the glue dries clear, but any areas that were heavily coated may have a slight white appearance. I’m okay with that though, because I want these babies to hold their shape over time. I don’t want to open up my box of ornaments next year to find them all smushed! One Christmas project down… lots more to go!

These handmade Twine Ball Ornaments are perfect for adding a little rustic charm to your tree! See details at LoveGrowsWild.com

Tell me what YOU think! Do you like these rustic twine ball ornaments? Do you have any handmade ornaments on your tree?

I’ll be sharing more holiday projects and a full tour of my home all decorated over the next few weeks, so stay tuned!


Are you making this project? I’d LOVE to see it! Post a photo of your creation on Instagram and use the hashtag #MyLGWProject. It may just get featured!


These handmade Twine Ball Ornaments are perfect for adding a little rustic charm to your tree! See details at LoveGrowsWild.com

Like what you see? Subscribe to Love Grows Wild so you’ll never miss a post!
Follow along on Pinterest, Google+, Instagram, and Facebook for more fun!


Check out these other holiday ideas:

Homemade Hot Chocolate Mix - a great gift in a jar idea for the holidays!

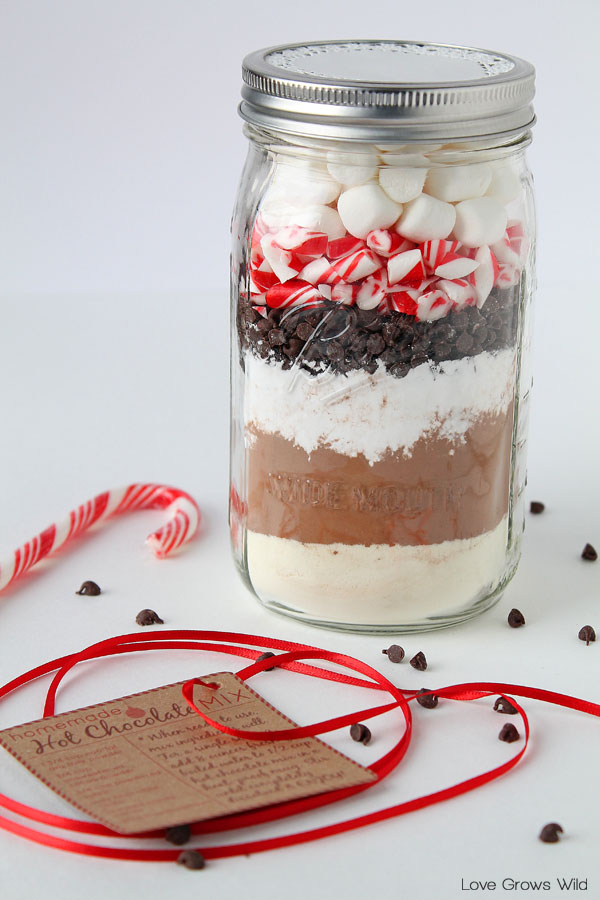
5 Easy Gift Ideas in a Mason Jar!

DIY Polar Bear Pillow Cover

DIY Polar Bear Pillow Cover

Create this fun Under The Mistletoe Wall Art to spice up your holiday decor!

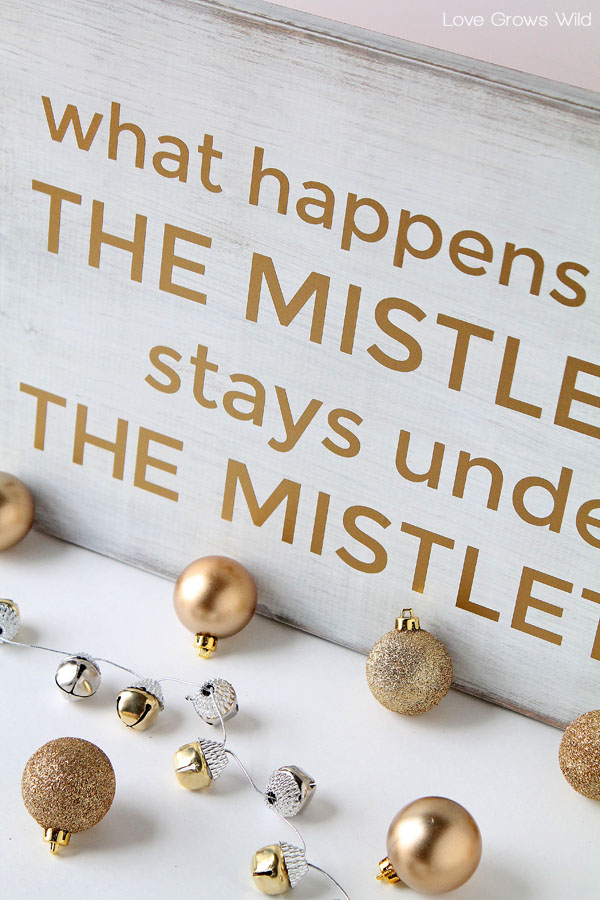
What Happens Under The Mistletoe Sign

DIY Fabric Rosette Mistletoe Ball

Fabric Rosette Mistletoe Ball


LET’S KEEP IN TOUCH!

Subscribe to Blog | Browse my Shop | Follow on Facebook | Follow on Twitter
Follow on Google+ | Follow on Pinterest | Follow on Instagram

Pin
Share
Tweet
Email
Print
Crafts DIY Decor Winter
by Liz Fourez 
33 Comments

About Liz Fourez

View all posts by Liz Fourez

Related Posts

  • Home blogger and interior decorator Liz Fourez shows how easy it is to add lighting to any bookcase for a sophisticated and elegant look!Living Room Bookcase Lighting
  • Interior decorator and home blogger Liz Fourez shares her beautiful Christmas tree and living roomChristmas Living Room 2020
  • Interior decorator and home blogger Liz Fourez shares her beautiful mantel decorated for Christmas. Find out how you can build this exact mantel on LoveGrowsWild.comChristmas Mantel
  • 3 super easy cookie creations using pre-packaged sugar cookie mix that are SO yummy! Perfect for baking with kids or when you need a quick sweet treat! Get all 3 recipes for Snickerdoodle Bars, Salted Caramel Thumbprints, and Nutella Cookie Cups on LoveGrowsWild.com3 Easy Sugar Cookie Recipes
PREVIOUS: Pumpkin Apple Butter Snickerdoodles
NEXT: Time to Sparkle Link Party #88

Comments

  1. Sami says: November 20, 2014 at 9:44 am

    These are adorable and would look perfect on my tree. Thanks for the plastic wrap tip. I made something similar for Easter and they DID stick to the balloon. It would be fun to put stuff inside too. I’m thinking about making one for each of the people in my family and then putting little handwritten notes inside. Maybe we could pull them all out after Christmas and read them together.

    Reply
    • Liz Fourez says: November 20, 2014 at 10:45 pm

      The plastic wrap was a perfect solution for that! Worked like a charm. 🙂 I think your idea of putting little notes inside the twine balls is just darling! Happy Holidays! 🙂

      Reply
  2. Dea says: November 20, 2014 at 3:33 pm

    Love those ornaments! I would never have thought to add cornstarch, but come to think of it, that’s what teachers used to do (back in the 50’s) to make what we called Library paste. Made it thicker (and stickier — imagine 25 little six-year-olds coated with Library paste from head to foot!). Wonder if you could use colored yarn and then roll it in glitter?… Ooooo… Imagine the mess THAT would make! LOL! You have created a monster, Ms. Frankenstein!

    Reply
    • Liz Fourez says: November 20, 2014 at 10:39 pm

      Haha, I can picture it now! Major kudos to those teachers who braved Liberty paste with all those 6 year olds! I think you’re onto something with the glitter, Dea. That would be very cute! I’m not sure if yarn is thick/sturdy enough to hold a nice shape, but you’ll have to let me know how it turns out if you try it! Have a wonderful weekend. 🙂

      Reply
    • Kerri says: November 21, 2014 at 8:17 pm

      Colored yarn may not work, but you could dye the twine. I think that might work.

      Reply
      • Liz Fourez says: December 1, 2014 at 10:16 pm

        Great idea, Kerri! Love that!

        Reply
  3. Kerri says: November 20, 2014 at 7:45 pm

    I love the twine ball ornament and I plan to make a few of them over the Thanksgiving weekend. Thank you for all the hard work you put into your blog. I’m new here and I’ve been on your blog “oohing and aahing” for an hour now! I’m also going to make the cauliflower gratin!
    Kerri

    Reply
    • Liz Fourez says: November 20, 2014 at 10:31 pm

      I think you’re going to love adding these to your tree, Kerri! I want you to know that your kind words really mean so much to me. I truly appreciate it! Enjoy the cauliflower gratin! I’m definitely making it again for the holidays. 🙂

      Reply
  4. Gigi Harlan says: November 21, 2014 at 1:08 pm

    I love your twine ball ornaments! Thanks for sharing!

    Reply
    • Liz Fourez says: December 1, 2014 at 9:06 pm

      You are welcome, Gigi! I’m so happy you like them!

      Reply
  5. Kyla @HouseOfHipsters says: November 21, 2014 at 10:57 pm

    I love these! Thanks for sharing! Also wanted to invite you to the “Found & Foraged” linky party tomorrow (Saturday) at 8pm. Can’t wait to party with you at http://www.houseofhipsters.com

    Reply
    • Liz Fourez says: December 1, 2014 at 9:13 pm

      Thank you, Kyla!!

      Reply
  6. darrielle tennenbaum says: November 23, 2014 at 10:52 am

    Love this idea and I think I will be stealing it! Thanks!

    Reply
    • Liz Fourez says: December 1, 2014 at 9:17 pm

      Steal away, Darrielle! I bet these would look beautiful on your tree!

      Reply
  7. Paula says: November 24, 2014 at 7:19 am

    Love these!

    Reply
    • Liz Fourez says: December 1, 2014 at 9:31 pm

      Thanks, Paula!!

      Reply
  8. [email protected] says: November 24, 2014 at 8:36 am

    LOVE these fun ornaments! My kiddos would love helping me make these for our Christmas tree! Thank you for sharing! PINNED!

    Reply
    • Liz Fourez says: December 1, 2014 at 9:33 pm

      You are so very welcome, Michelle! I bet the kiddos will LOVE helping you with these! Thank you for pinning. 🙂

      Reply
  9. Michelle P. says: November 26, 2014 at 6:43 am

    They are fabulously perfect!! I will try to make them at some point 🙂
    The only ornaments I’ve made were empty glass ornaments that I filled with Christmas potpourri and they were beautiful, but we don’t even put a tree up anymore

    Reply
    • Liz Fourez says: December 1, 2014 at 9:43 pm

      I love filling simple glass ornaments with things like pearls, feathers, strips of paper, etc. I have a few of those on my tree as well! I bet the potpourri smelled lovely. 🙂 Thanks for stopping by, Michelle!

      Reply
  10. Melissa Knox says: November 26, 2014 at 5:38 pm

    I absolutely love this ornament! So excited to try this with my daughter. If all goes well, I would like to do this with my 3rd grade class. I’m thinking…let them choose a color of yarn. Then, put their school pic inside when finished. 9-10 year olds are much better with the glue mixture than 6 year olds

    Reply
    • Liz Fourez says: December 1, 2014 at 9:48 pm

      I would imagine those couple years of age and maturity make a big difference when it comes to projects like this! 🙂 I hope you all have as much fun making them as we did!

      Reply
  11. Kimber Selfaison says: December 8, 2014 at 5:08 am

    I absolutely love the twine ball ornament and thank you for easy to understand directions. I like your feedback of sharing what worked for you. I’m also in love with your mistletoe sign. This is the first time I have seen it and I laughed when I read it. Sooooooo true! Keep the great ideas coming!!! =)

    Reply
    • Liz Fourez says: December 8, 2014 at 10:00 pm

      I’m so glad you liked my ornaments, Kimber! And that mistletoe sign is one of my favorite decorations to pull out every year. It just makes me smile. 🙂 Thanks for stopping by!!

      Reply
  12. Ashley says: December 8, 2014 at 12:04 pm

    Your twine ball ornaments are gorgeous! I’ve featured them on my blog as part of a DIY Christmas tree ornament roundup here if you’d like to take a look. Merry Christmas to you! 🙂

    Reply
    • Liz Fourez says: December 8, 2014 at 9:51 pm

      Thank you so much, Ashley!! (high five!) Merry Christmas to you, too! 🙂

      Reply
  13. barb macaskill says: December 10, 2014 at 1:56 am

    LOVE these!! The rustic look rocks!! TFS!

    Reply
    • Liz Fourez says: December 10, 2014 at 10:49 pm

      I agree, Barb! Thanks so much for stopping by! 🙂

      Reply
  14. shelia Sheffield says: November 18, 2015 at 12:35 am

    These are adorable…did u have a pattern of winding the twine around the balloon? I have made a few and mine just arent as pretty……. 🙁

    Reply
    • Liz Fourez says: November 20, 2015 at 8:30 am

      Hey Shelia! I didn’t have a pattern, just tried to wrap the twine wherever it had a bare spot. I bet they’ll look beautiful on your tree though!

      Reply
  15. Karen Kemmet says: January 20, 2016 at 7:48 am

    I love these twine ball ornaments; they are such a rustic, natural element. You said some may have a whitish look if there is excess glue mixture – I thought that might give them a frosty look and make them even more attractive, especially if this “frost” was random on the ornament.

    Reply
  16. PDCW says: February 9, 2016 at 8:00 am

    These are a brilliant idea. I may spray some of them lightly and unevenly with ‘snow’ spray, glitter or a little colour and put them on a leafless tree outside. Thanks for such a pretty suggestion.

    Reply
  17. Lisa says: May 24, 2016 at 9:00 am

    I used Mod Podge and the plastic wrap stuck to the twine

    Reply

Leave Your Comments Cancel reply

Your email address will not be published. Required fields are marked *

W E L C O M E

W E L C O M E

Welcome, sweet friends! My name is Liz, and I started Love Grows Wild in 2012 with a passion for interior design and homemaking and a dream to help others create a home they love.
Here you’ll find simple project tutorials, holiday and entertaining ideas, and my journey renovating a 1940’s farmhouse that I live in with my two boys and French bulldog.
Read more about Liz >>

LET’S CONNECT

FOLLOW ALONG

POPULAR POSTS

RECIPES

TUTORIALS

Categories

Recent Posts

  • The best way to hang curtains to make your windows appear larger and more luxurious! See tips from home blogger and interior decorator Liz Fourez of LoveGrowsWild.com
    The Best Way to Hang Curtains
    Decorating and Home, Our Home, Tutorials
  • A small rental home decorated in a cozy beachy cottage style on a budget! Get all the details from home blogger and interior decorator Liz Fourez
    The Armstrong House Kitchen Reveal
    Decorating and Home
  • Home blogger and interior decorator Liz Fourez adds new chairs in her dining room for a simple and stylish update.
    Look for Less – New Dining Room Chairs
    Decorating and Home, Our Home
  • A full month of delicious dinner ideas plus 6 bonus recipes!
    February Monthly Menu
    Recipes
  • Home blogger and interior decorator Liz Fourez shows how easy it is to add lighting to any bookcase for a sophisticated and elegant look!
    Living Room Bookcase Lighting
    Decorating and Home, Our Home, Tutorials

Liz Fourez started Love Grows Wild in 2012 with a passion for interior design and homemaking and a dream to help others create a home they love.  From simple project tutorials, to holiday and entertaining ideas, to her journey renovating a 1940’s farmhouse, Liz demonstrates how to create a beautiful and inviting home with a handmade touch. She turned her signature cozy, neutral style into a best-selling book in 2016 and continues to inspire readers with her captivating photography and easy decorating ideas. Read more about Liz > > > >

  • contact
  • MEET LIZ
  • advertise
  • privacy policy/disclosure
  • Blog
Did you know that I started blogging almost 9 year Did you know that I started blogging almost 9 years ago? It’s crazy to think I started building this little brand of mine almost a decade ago, but in 2017 I began wanting to share more than just online inspiration and reach people in a more personal way. 

That summer I opened a small retail shop in my favorite antique store in my home state of Indiana and filled it with items that I love and decorate my own home with.  Opening this little shop has been a natural extension of what I create on my blog and in my home and allows people to find my favorite things and decorating ideas all in one place.

My hope is that one day I can offer online shopping & ship items to your door all over the country, but for now if you are ever in the Midwest, I would love for you to come visit this beautiful historic building and browse the many items I handpicked for your home.

We are open Monday-Saturday 10-5 pm & Sunday 12-5 pm inside @originaltreasuremart at 1201 E. Vaile Avenue in Kokomo, IN. You can call (765) 459-3148 for more information. 

I’d love to hear from you... have you visited @lovegrowswildmarket before, and what was your favorite purchase? Thank you from the bottom of my heart for supporting small businesses like mine. 🤍
We made it to Friday, friend 🙌🏻 I’m curio We made it to Friday, friend 🙌🏻

I’m curious... what’s your big cleaning/catch up day around the house? The day when you typically catch up on dishes and all those piles of laundry, grocery shop, etc? I like to get up on Saturday mornings and get it done so I can enjoy a clean house for the rest of the weekend because honestly... I literally CANNOT relax when the house is a mess. I physically can’t do it. What’s your cleaning day of the week and why? 🧼🧹

KITCHEN DETAILS: link in my profile 

https://lovegrowswild.com/2020/02/kitchen-curtains-counter-styling/
Who wants to go shopping with me?! Well, virtuall Who wants to go shopping with me?!

Well, virtually... but I promise it will still be fun! I took a trip to a store I've never been to before and found some of the prettiest decor for such a good deal at @tuesdaymorning. #ad After all the snow we've had the last few weeks, getting out of the house and putting real clothes on for a solo shopping trip felt like such a treat!

A few of my favorite finds were: an extra-long lumbar pillow for my sofa, beautiful black textured bowls that I can't decide if I want to actually use in my kitchen or decorate with, a bouquet of dried greenery, and a new dog bed for Remington. I will be sharing how I styled these items on the blog next week, so stay tuned!

Swipe to see video of my shopping trip and all that you can find at a Tuesday Morning near you! Do you have a store close to you? Have you been before? Let me know in the comments!

#TuesdayMorningFinds #TuesdayMorning #shopwithme #shoppinghaul
This photo feels like spring weather and sandals, This photo feels like spring weather and sandals, and I am here 👏🏻 for 👏🏻 it 👏🏻

16 more days, sweet friend. We’re so close... can you feel it??

ENTRYWAY DETAILS: link in my profile 

https://lovegrowswild.com/2019/07/creating-simple-entryway-in-small-space/
So many ideas... so little time 🙃 Later this w So many ideas... so little time 🙃

Later this week: sharing a home decor shopping trip to a store I’ve never been to before, photographing my office (just wait till you see how big of a difference adding some shelves in here made), unboxing tons of new spring items for @lovegrowswildmarket, and adding some artwork to this blank wall!

Which are you most excited to see? P.S. still absolutely obsessed with the new dining chairs 😍

DINING ROOM SOURCES: link in my profile 

https://lovegrowswild.com/2021/02/look-for-less-new-dining-room-chairs/
Yesterday I had a design meeting with one of my to Yesterday I had a design meeting with one of my toughest clients yet... my teenage son. 😂 Actually, he is probably the easiest person to please, and his requests for the upcoming bedroom makeover we are planning were pretty simple:

• blackout curtains so he can sleep in on weekends
• a new darker paint color
• somewhere to charge all his devices

I think I can handle that! This room is quite a challenge with the small size & layout, but I think we’ve come up with a game plan to make it more functional and much more “him”. 

Once I catch up on all my current projects and design work, I’m excited to dive into making this space perfect for him! P.S. where did my little boy go that wanted Thomas the Train as the theme in his bedroom? 🥺

BOYS BEDROOM: link in my profile

https://lovegrowswild.com/2018/11/boys-bedroom-makeover-part-1/
S E E M O R E F O L L O W O N I N S T A G R A M

Copyright © 2021 · Prima Donna theme by Georgia Lou Studios

COPYRIGHT © 2017 · DESIGN + BRAND: BLISS AND TELL BRANDING COMPANY