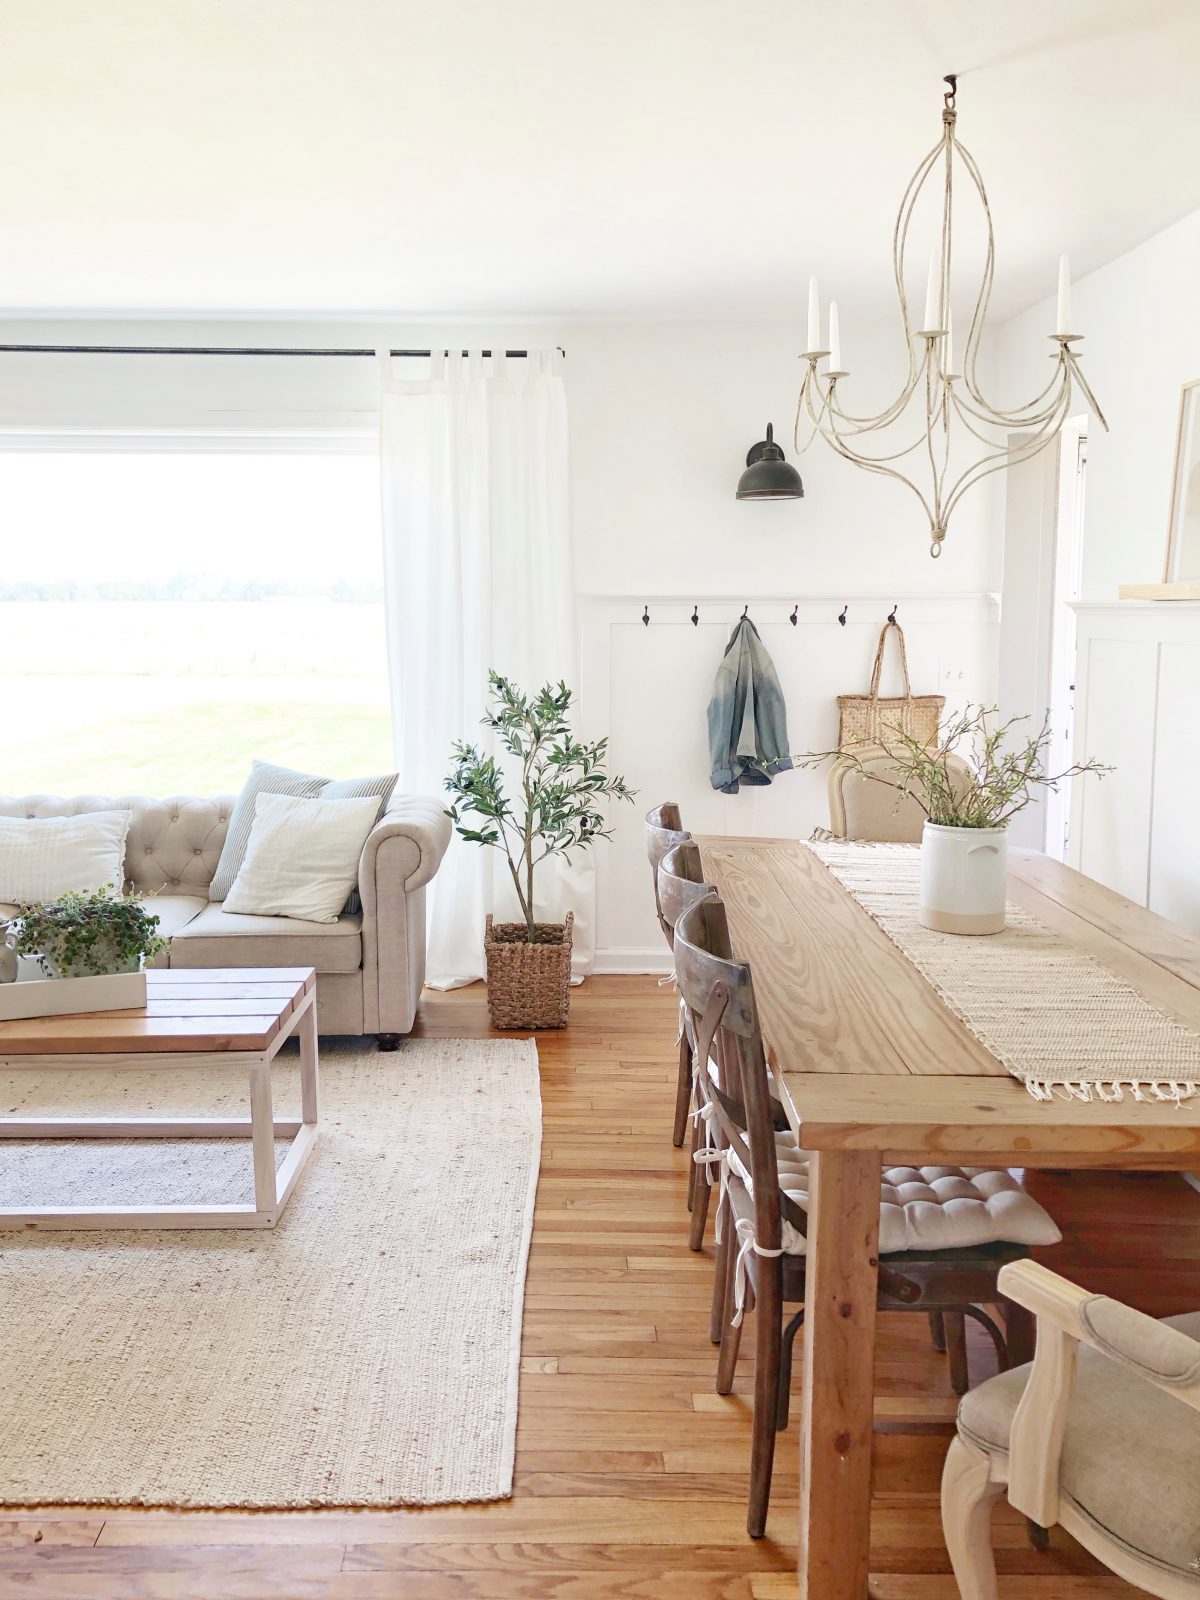
One of the questions I get asked most is about photography. What camera do I use? How do I edit photos? Do I use presets? How did I learn? The answer is that I taught myself over the last 7 years of blogging how to take pretty photos that capture the eye, and today I am sharing a HUGE post demonstrating all of my biggest and best secrets for taking beautiful photos with just your PHONE! Cameras on smartphones have come such a long way, and even though I still use my big camera for all my blog photography, I do use my phone’s camera for all the everyday pictures of my kids, dog, vacations, sports, and all the million other photos I fill my camera roll with! I hope this post inspires you to capture and document more moments and memories in your life and shows you how to turn any ordinary photo into something extraordinary.
In this post you’ll find photos I recently took before any editing and after editing with my favorite photo app, a full demonstration of how I use the app, including several videos where you can actually watch me editing the photos on my phone, tips for taking the best quality photos, and a few other photography apps I use often! It’s a big post with lots of information, so let’s dive right in!

General tips:
Clean your phone’s camera lens before taking a photo. You would be surprised how dirty it can get so quickly! This will help make sure you are getting the clearest, most crisp details in your photos.
Look for the best lighting and try not to use your phone’s flash. If you are in your house, go next to a window, or go outside, but not directly in the sun for the most natural lighting.
Do not use the zoom on your camera unless absolutely necessary. Using the zoom lessens the photo quality, so it is much better to step closer to the subject you’re shooting instead of just using the camera zoom.
Try to make sure you are as straight and level as possible when holding your phone. You can rotate the photo when editing, but that crops out some of the image you may want to stay.
Tap your phone screen to focus on a specific subject. I often use this trick when photographing people to make sure their face is in perfect focus.
Use portrait mode on your phone’s camera to get a beautiful blurred background behind your main subject. This works best in good natural lighting, as dark images in portrait mode are usually pixelated and not great quality. You can also use the lens blur option in editing that I demonstrate in a photo below.
Your phone’s camera takes better quality photos than any app you have like Snapchat, Instagram, etc. So always use the camera on your phone and then upload photos to whatever apps you desire.
If the photo you shot is very busy, colorful, and chaotic, editing the image to a black and white photo helps calm the busyness and allows your eye to see the subject easier. See my black and white photo below for an example.
Editing:
I use an app called Snapseed to edit my photos. It is free to download, available for both iOS and Android, easy to use, and has a lot of great editing tools. I’m going to walk you through every step I take when editing my photos and have several examples below where you can watch a screenshot straight from my phone of me editing each photo.
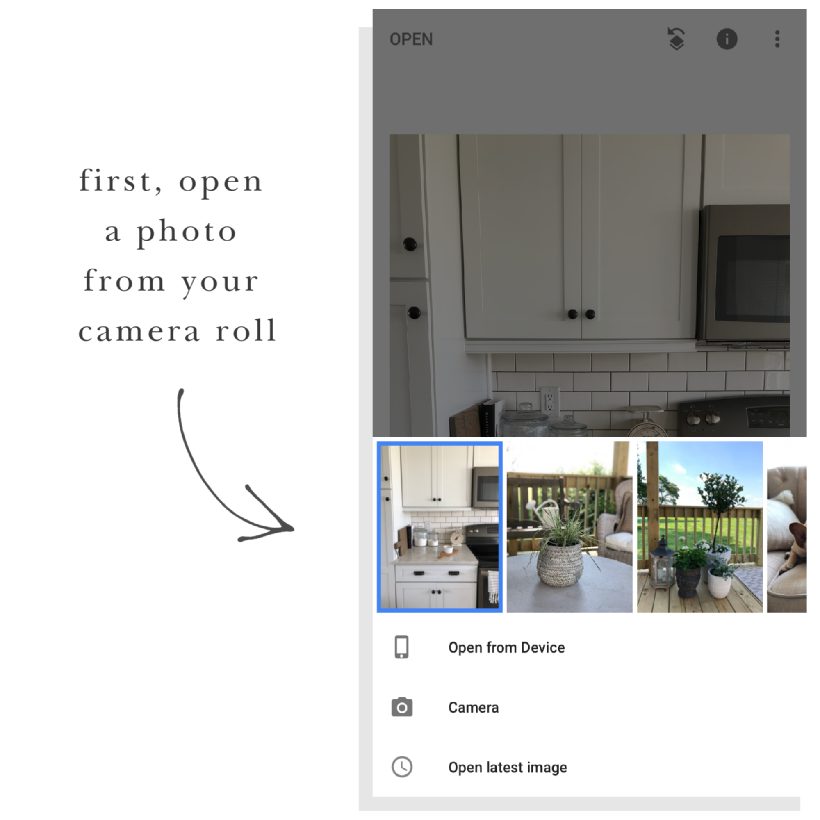
First, in Snapseed open a photo from your camera roll. Your phone’s camera is generally better than the camera in any app, so I always recommend taking the photo first, then uploading it into Snapseed.
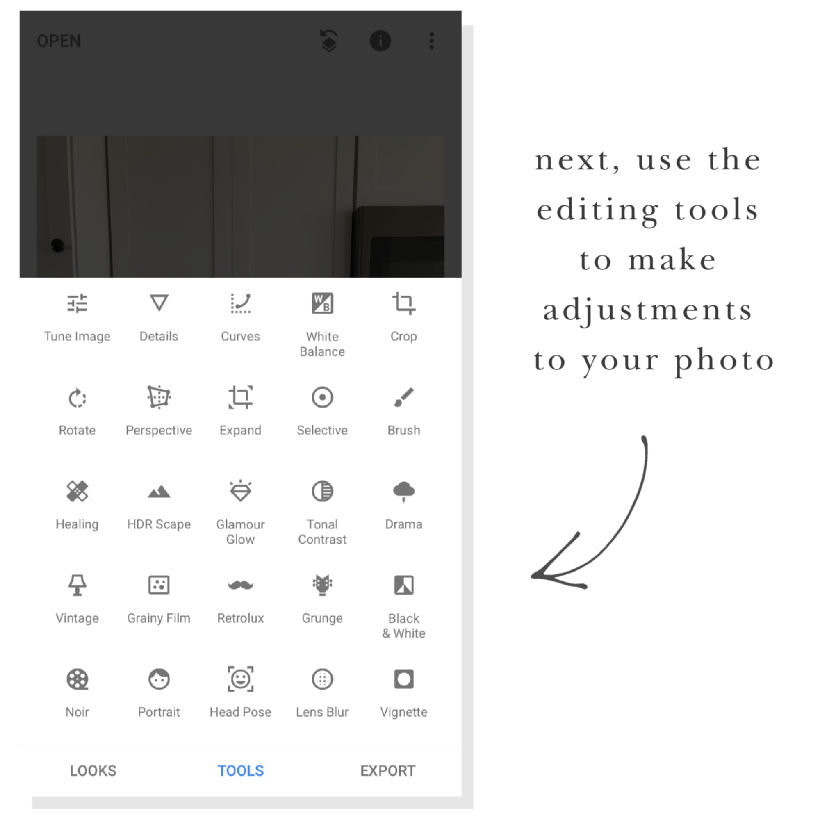
Next, use the editing tools to make adjustments to your photo. Every photo is different, whether I’m shooting a room in my house, a photo of the kids, a selfie, something outdoors, etc. So I always prefer to manually edit each photo individually rather than just adding a filter or preset. This gives me better control of the finished photo, and here are the tools I use most often:
White Balance – I always start by using the auto white balance tool on the left to see where it automatically adjusts to, and then I will use the sliders to fine tune the white balance myself. Sometimes auto will be spot on, and depending on what I’m shooting sometimes I’ll have to adjust quite a bit. Temperature adjusts how warm or cool the photo is, and tint adjusts the coloring to lean more pink or more green. You can also use the little dropper tool to select a neutral base (such as white or gray), and that will help find the correct white balance. Note: I generally lean towards a cooler, more pink toned white balance.
Details – This tool gives your photo more clarity and sharpness, but be careful not to go overboard with adjusting the structure or your photo will begin to look unnatural. I usually keep my sharpness between 20-40 and my structure half of that or less.
Crop – This allows you to adjust the size or focus of your photo, and you can move the edges manually or use the standard size presets they provide (16:9 ratio I use often for IG stories).
Rotate – I always try to take photos as straight as possible, but sometimes if I’m in a rush the balance may be off. When you select the rotate tool, it will automatically adjust to what it thinks straight is, but you can slide left or right to adjust the rotation yourself.
Portrait – I use this on almost any photo that has faces in it. This tool can smooth your skin, lighten up dark shadows on your face, and give your eyes a little bit of a glimmer. The first time you use this tool it is easy to go overboard when you see all your wrinkles and pores starting to disappear, but you want to look like just a more awake, vibrant version of your natural self, not like a doll! I select the Smooth 1 option and make these adjustments: turn up the face spotlight if there are shadows on the face, adjust the skin smoothing anywhere from 0-30 (30 and up starts to look fake), and leave the eye clarity at 10 (again, more than that looks fake). If it is just kids in the photo, I don’t use the skin smoothing tool at all, but I do like to lighten up the faces with the face spotlight tool, especially if they are wearing a hat.
Selective – The selective tool is great for when just one area of the photo needs adjusting. You tap the area that you want to adjust, swipe up/down to select either brightness, contrast, saturation, or structure, and then swipe right/left to adjust your selection. I use this a lot on photos in my house where the wood floors end up looking bright orange by turning the saturation down and also on walls in the background that are dark and shadowy and need a bit of brightness.
Healing – If there’s a pimple on your face or a dust bunny on the floor that you don’t want in the photo, use this tool to remove any unwanted items.
Pro Tip – If you are editing multiple photos from the same time/place where the lighting, background, etc. is similar, use the LOOKS toolbar and select “last edits” to apply the same settings you used on the previous photo to the current photo. There are also several good filters in this toolbar to give your photos a unique look.
Examples:
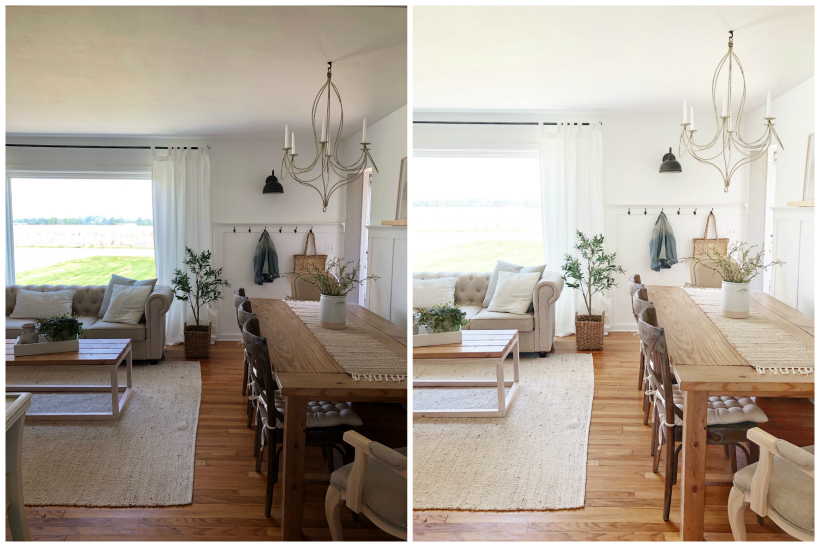
edits:
white balance: temp +2 | tint -3
details: sharpening +24 | structure +5
tune image: brightness +89 | saturation -4 | highlights +15 | shadows +44 | warmth +1
selective saturation tool -20 on the wood floor
crop image smaller
rotate: +0.20
healing tool to remove spot on floor
watch how I edited this photo:
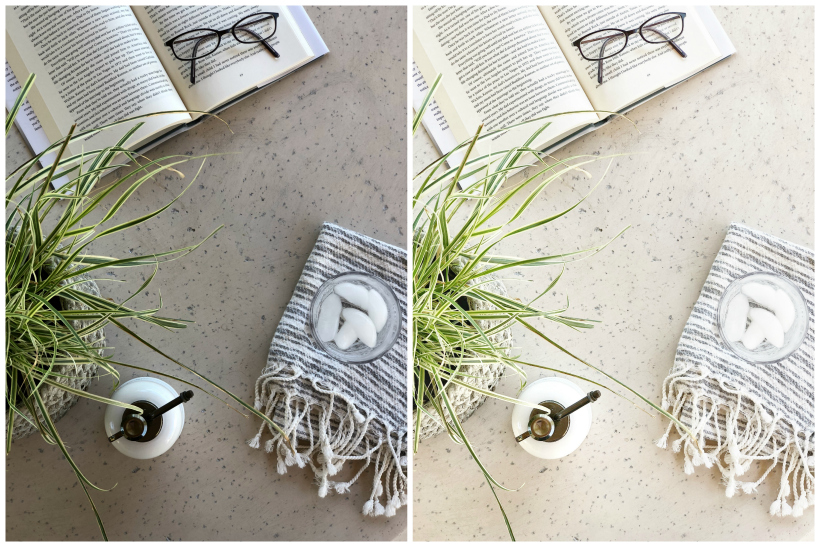
edits:
white balance: temp +7 | tint -2
details: sharpening +28 | structure +5
tune image: brightness +93 | contrast +4 | saturation -6 | ambiance +3 | highlights -44 | shadows +35
selective tool +40 brightness | -33 saturation on bottom left corner
watch how I edited this photo:

edits:
portrait: smooth 1 – face spotlight +12 | skin smoothing +25 | eye clarity +10
white balance: temp +3 | tint +4
details: sharpening +26
tune image: brightness +35 | contrast +1 | ambiance +4 | highlights +1 | shadows +30 | warmth -2
healing tool to remove cord on floor
watch how I edited this photo:

edits:
white balance: temp +12 | tint +7
black & white: bright
tune image: brightness -5 | contrast +7 | ambiance +17 | highlights -6 | shadows +21 | warmth +4
rotate: -1.50
details: sharpening +23 | structure +9
crop image smaller
watch how I edited this photo:
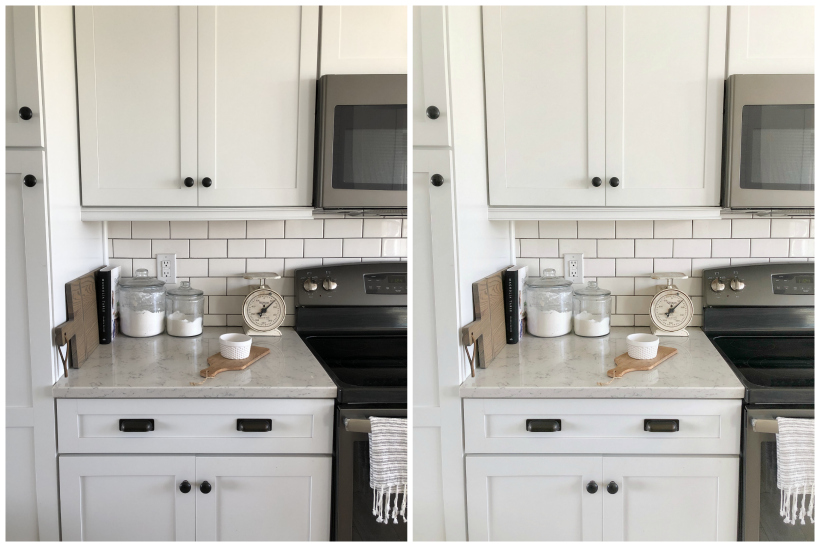
edits:
white balance: temp +0 | tint +0
details: sharpening +27 | structure +4
tune image: brightness +54 | highlights -29 | shadows +13 | contrast -5
rotate: -0.11
vignette: outer brightness +18
healing tool to remove spot on counter
watch how I edited this photo:

edits:
white balance: temp +6 | tint +1
details: sharpening +33 | structure +14
tune image: brightness +88 | contrast -23 | saturation +14 | ambiance +4 | highlights -41 | shadows +13 | warmth +1
curves: brighten
watch how I edited this photo:
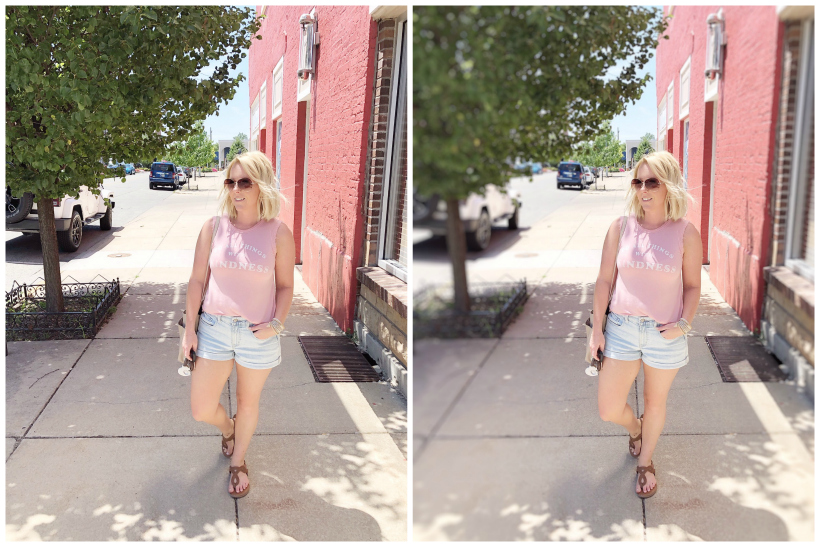
edits :
lens blur: blur strength +30 | transition +70 | vignette strength +0
watch how I edited this photo:
Other apps I love:
A Color Story for iOS and Android – fantastic filters that can lighten, brighten, and add color to your photos, plus you can add effects like sun flares, bokeh, texture, and more.
Airbrush for iOS and Android – tons of filter options, plus tools to smooth your face, adjust your makeup, whiten your teeth, get rid of dark circles, etc. As I mentioned before, it can be very easy to get carried away with these tools! Start with very small adjustments to make sure you maintain a beautiful, natural look, while feeling like your best self.
_________________________
I hope this post is super helpful for you guys and inspires you to start taking more photos! Photography is a creative outlet for me where I get to capture memorable and everyday moments and express myself in a unique, personal way. I love being able to look back on when my kids were little, moments in my career, progress I’ve made on my house, and even progress I’ve made on myself. Take the photos, sweet friend. You will never regret it!

Thank you soo much! What a fabulous post! As a 66 year old woman, I am lost on my iPhone camera. Now I think I’m an expert, thanks to you. Can’t wait to fix those sweet pictures of my grand babies. Thanks again, Grandma Lolly
This makes my heart happier than I can even begin to tell you. Thank you so much for sharing!! Enjoy those photos of your sweet grand babies!
This is the best photography advice I am sure I have ever seen. I am going to Pin it so I can use it in the future. Thank you so much. I have one question – What do you recommend we use to clean the smart phone lens?
*Smiles*
I usually just use my shirt to quickly clean fingerprints or makeup off the lens, but when you have time to give your phone a good cleaning, use a microfiber cloth or a lens cleaning spray that you would use on your glasses! I’m so glad you enjoyed this post!
Thank you for sharing this information . I tried it and found it fun and easy to use.
What an excellent post Liz! SUPER helpful – I can’t wait to try out all your great tips! Thanks! ?
I’ve had Snapseed for years and never used quite enough. Thanks for this tutorial because it helped so much. I do digital scrapbooking and this is going to be a tremendous help!!! Again thank you thank you thank you!!!!
Awesome post! Very clear and helpful! Thanks for sharing!