• Home
  • MEET LIZ
  • contact
  • Blog
  • E-DESIGN SERVICE

Love Grows Wild

  • Home
  • Liz Fourez Interiors
  • Our Home
    • bathroom
    • dining room
    • entryway
    • exterior
    • kids bedroom
    • kitchen
    • living room
    • master bedroom
    • office
    • playroom
  • Project Gallery
    • diy decor
    • decorating advice + inspiration
    • furniture makeover
    • woodworking
    • crafts
  • Seasonal
    • spring
    • summer
    • fall
    • winter
  • Recipes
    • appetizers/snacks
    • beverages
    • breakfast
    • dessert
    • meal ideas
    • side dishes
  • SHOP
    • My Book
    • Shop LGW Style
    • love grows wild market
Decorating and Home, Tutorials

DIY Mantel Tutorial

March 19, 2019

Pin
Share
Tweet
Email
Print
Home and lifestyle blogger Liz Fourez shows how to make a simple, yet stunning mantel that would be perfect in a living room or bedroom. Follow her easy step-by-step photo tutorial to create this beautiful DIY mantel!

I have SUCH an exciting and highly-requested tutorial for you today, sweet friends! Ever since I found the faux mantel that now lives in my bedroom, so many of you have asked where you might be able to find something similar. The mantel I bought was handmade and a very simple design, so I knew that I could come up with a plan to build something close that would be much less expensive than some of the real mantels you’ll occasionally come across at antique stores. They can get outrageously pricey!

I built this DIY Mantel using only 1x pine lumber, which is very affordable and easy to work with, and it has such a beautiful, simple farmhouse look that would work well in any style of home. I’m so excited to share this tutorial with you guys, so let’s get started!

Home and lifestyle blogger Liz Fourez shows how to make a simple, yet stunning mantel that would be perfect in a living room or bedroom. Follow her easy step-by-step photo tutorial to create this beautiful DIY mantel!link to mirror above

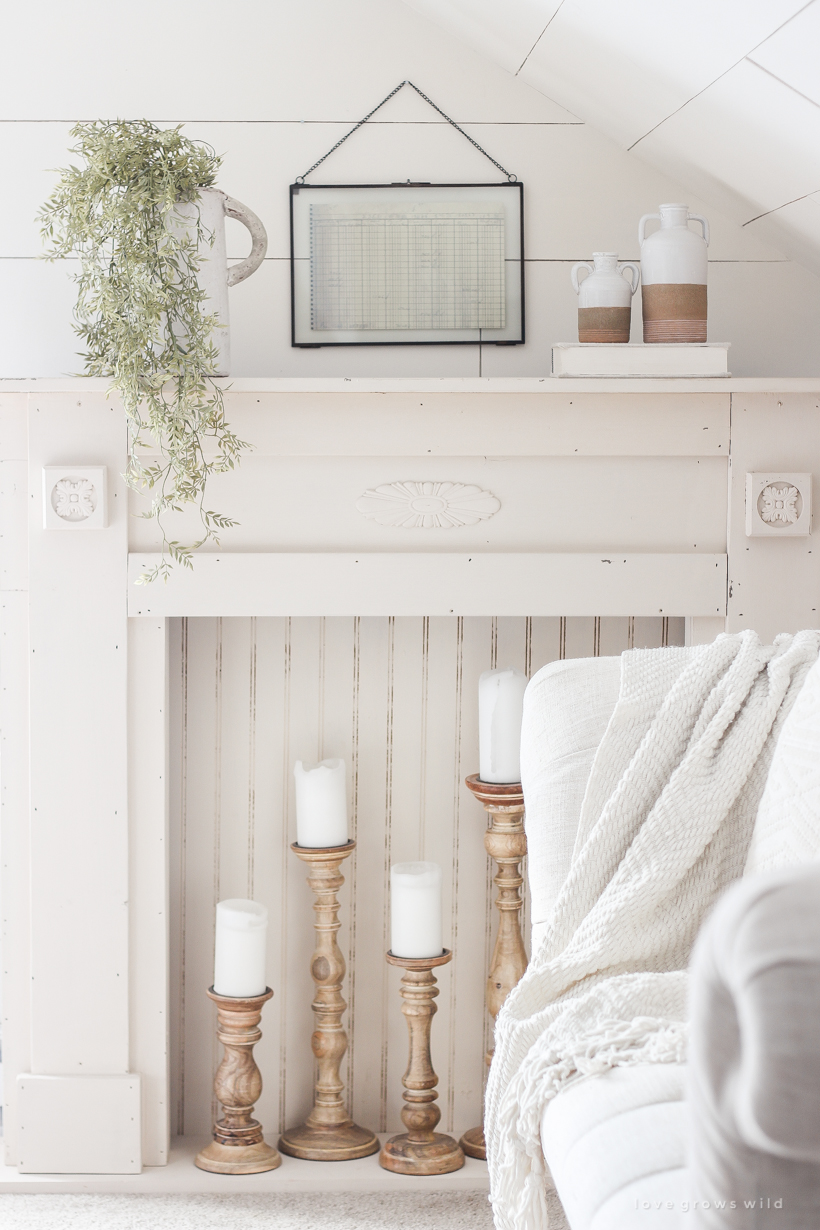
So first, funny story… I originally built this mantel with the intention of selling it at my shop, Love Grows Wild Market. But as I was styling it for photos, I realized it literally was the PERFECT piece for this space in my living room. I’m SO happy with how it turned out and fell in love with how this made my living room look and feel, so now I get to build another one because this beauty has to go to the shop this week!

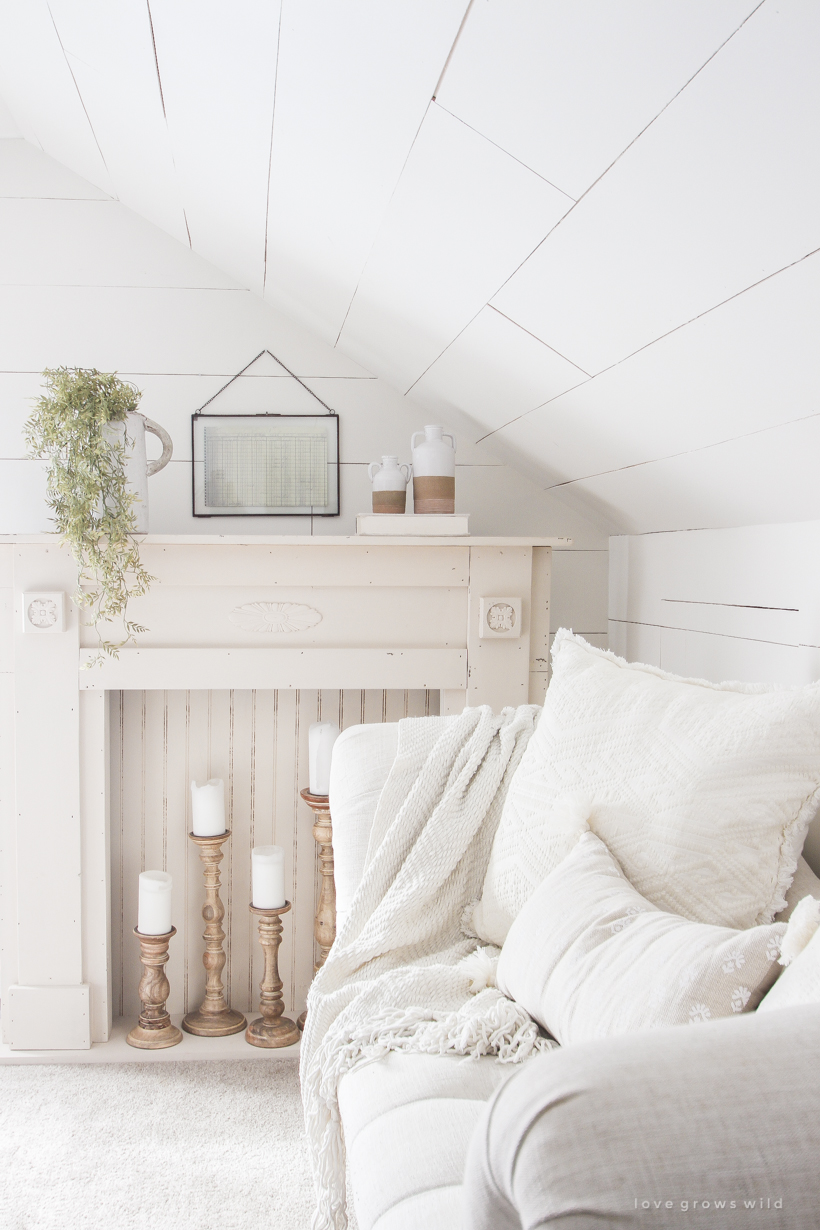
The photo below shows the mantel in my bedroom that inspired this tutorial. As you can see, the finish is a little more rustic because they used a nail gun to attach all the boards from the front, leaving small holes where nails were inserted into the wood. I actually don’t mind the holes on this piece because it just adds to the character and charm. But for the mantel I built, I wanted a more clean and polished look, so I used the method of creating pocket holes so all of the boards could be attached from the back with hidden screws. Not only does using pocket holes make your woodworking projects look more professional, but they also create a much more strong and sturdy joint between boards. (I’ll explain more on this in the tutorial)

The shape and structure of both mantels are the same, but the one in my bedroom just has a few more decorative elements that are optional and very easy to add if you like this look. The decorative pieces on top can be found either in the wood trim section of your hardware store or in a craft store. And I also added a piece of bead board to the back painted in the same color as the mantel, which adds a little bit of pattern and more of a farmhouse feel.

Step inside home and lifestyle blogger Liz Fourez's charming master bedroom with gorgeous farmhouse details and neutral color palette.

DIY Mantel Tutorial

As always, I sincerely appreciate you shopping through the links I share, which allows me to make a small commission from your purchase while your purchase price stays the same. When you use my affiliate links, I’m better able to create content for this blog as well as support my family, and I thank you from the bottom of my heart for supporting what I do!

SUPPLIES:

tape measure
saw
drill
brad nail gun
Kreg Jig pocket hole system
wood glue

1 ¼” pocket hole screws
1 ¼” brad nails
1” wood screws
wood filler
sander
stain/paint finish of choice

Cut List:

2 – 1×10 cut to 32 ¾” (main frame legs)
1 – 1×12 cut to 48” (main frame top)
2 – 1×6 cut to 44” (face frame legs)
2 – 1×4 cut to 33 ¼” (top + middle face frame)
4 – 1×6 cut to 44” (back depth)
1 – 1×10 cut to 51” (mantle top)
2 – 1×6 cut to 7” (front bottom trim)
4 – 1×6 cut to ¾” (side bottom trim)

STEP 1

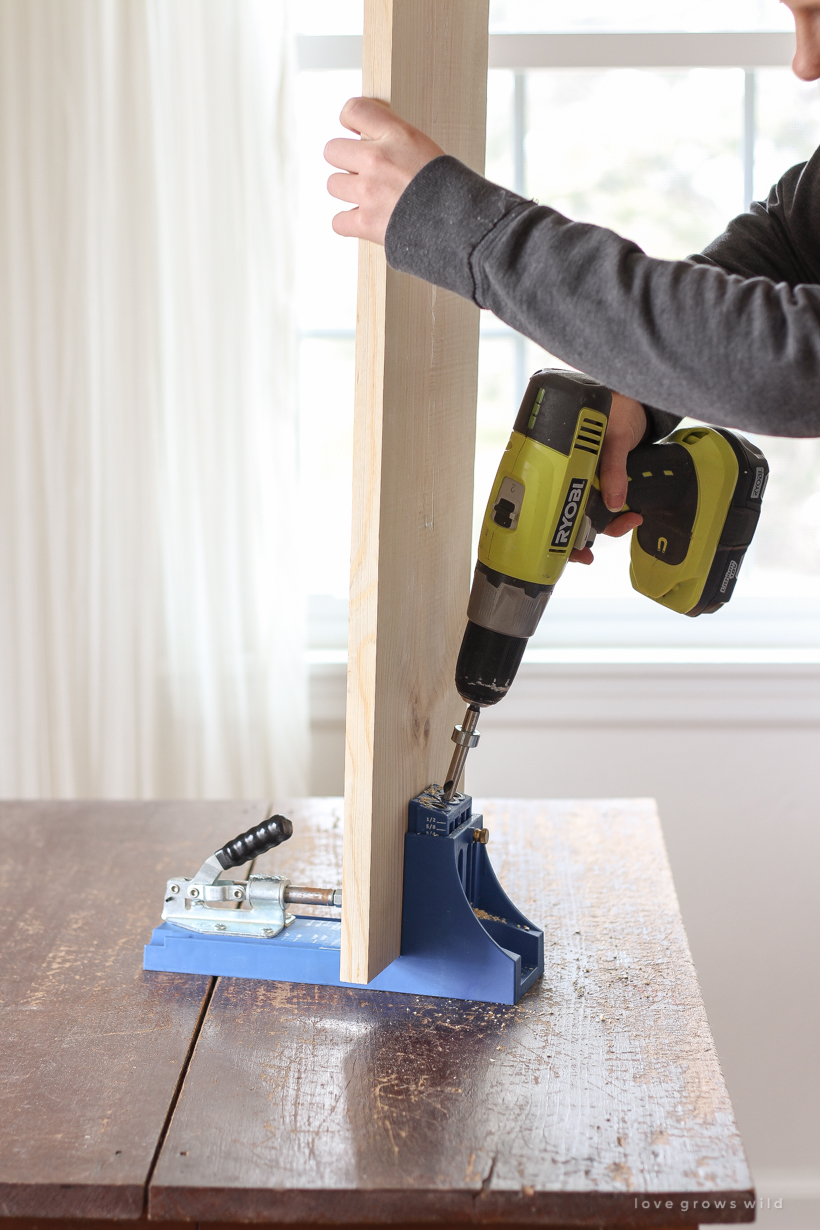
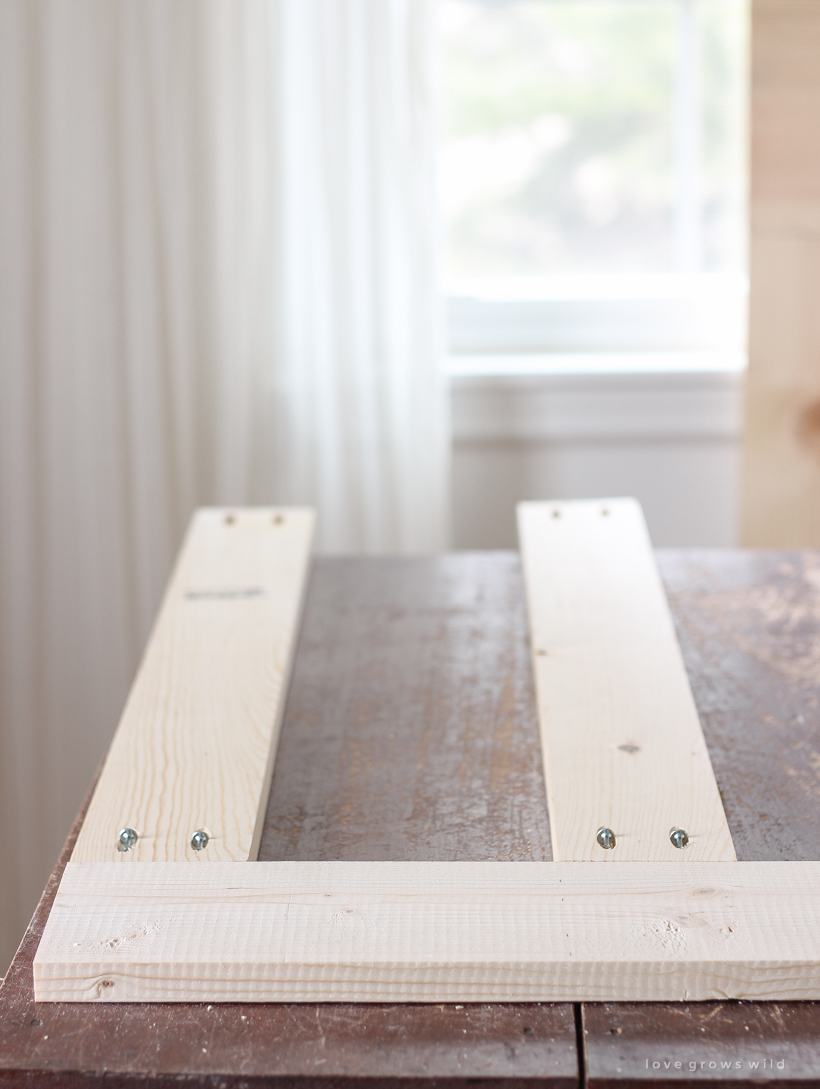
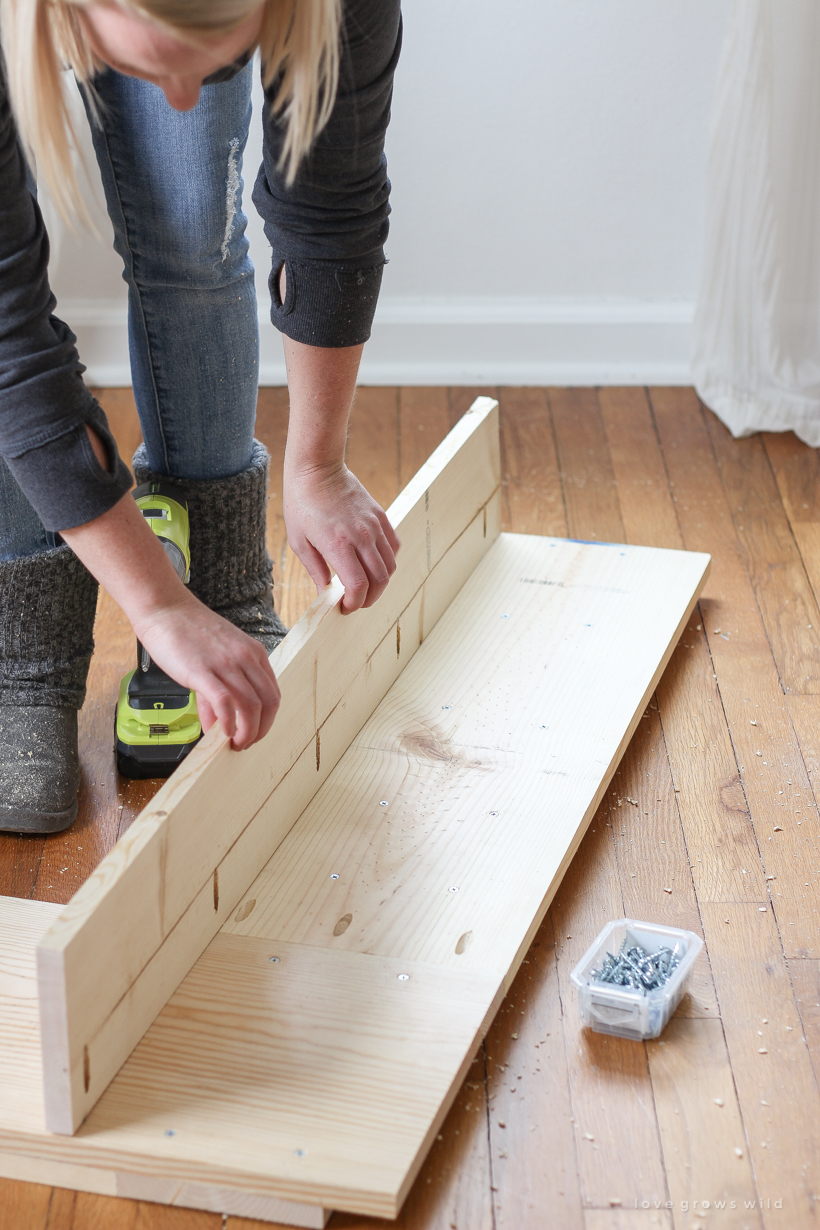
Drill ¾” pocket holes in one end of both 1×10 main frame legs. On a large flat surface, lay out the 1×12 main frame top and both main frame legs and use wood glue and 1 ¼” pocket hole screws to attach the 1×10’s to the 1×12. The outer edge of the 1×10’s should be flush with the ends of the 1×12.

Home and lifestyle blogger Liz Fourez shows how to make a simple, yet stunning mantel that would be perfect in a living room or bedroom. Follow her easy step-by-step photo tutorial to create this beautiful DIY mantel!

STEP 2

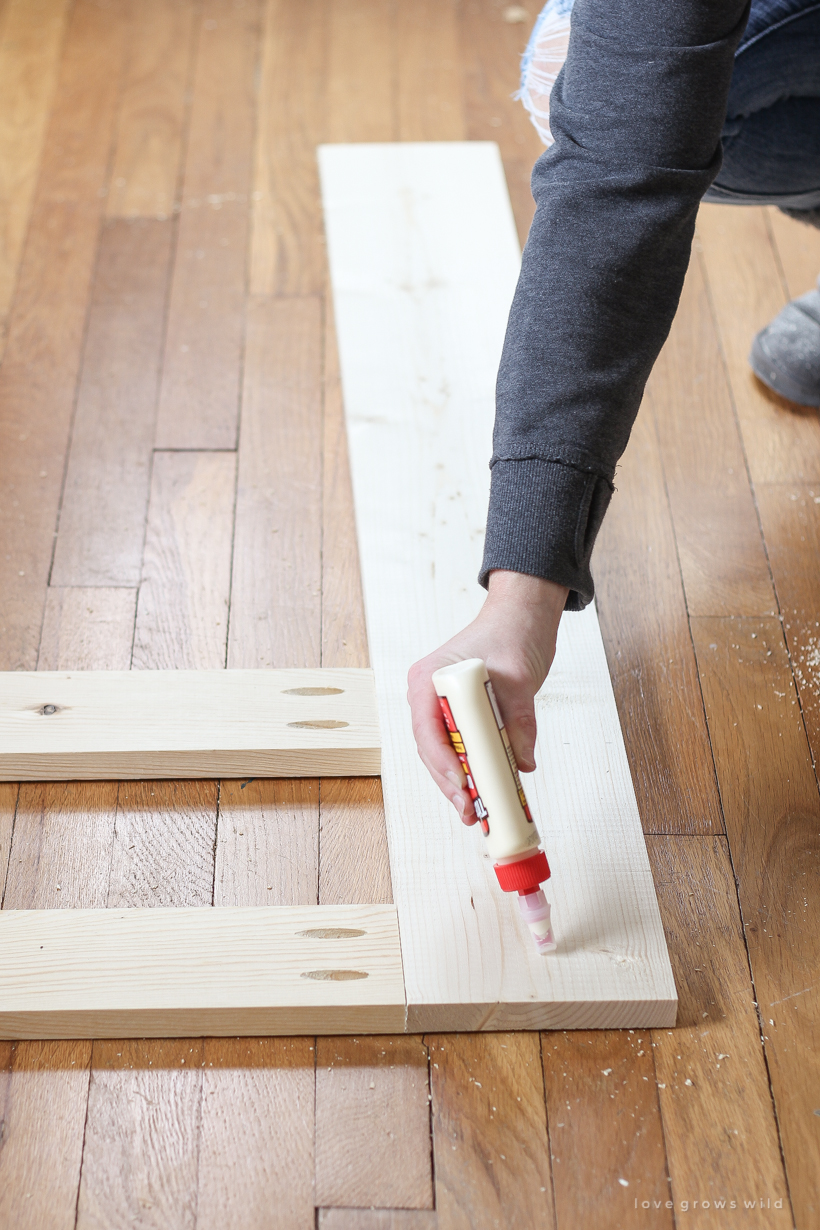
To build the face frame, first drill ¾” pocket holes in both ends of both 1×4’s. On a large flat surface, lay out the two 1×6 face frame legs with the 1×4 top face frame board running horizontally in between. The outer edge of the 1×4 should be flush with the ends of the 1×6’s. Measure 6” down from the bottom of the 1×4, and make a mark. Position the top of the other 1×4 at that mark (it should cover the seam between the 1×10 legs and 1×12 top on the main frame). Use wood glue and 1 ¼” pocket hole screws to attach the 1×4’s to the 1×6’s.

Home and lifestyle blogger Liz Fourez shows how to make a simple, yet stunning mantel that would be perfect in a living room or bedroom. Follow her easy step-by-step photo tutorial to create this beautiful DIY mantel!

STEP 3

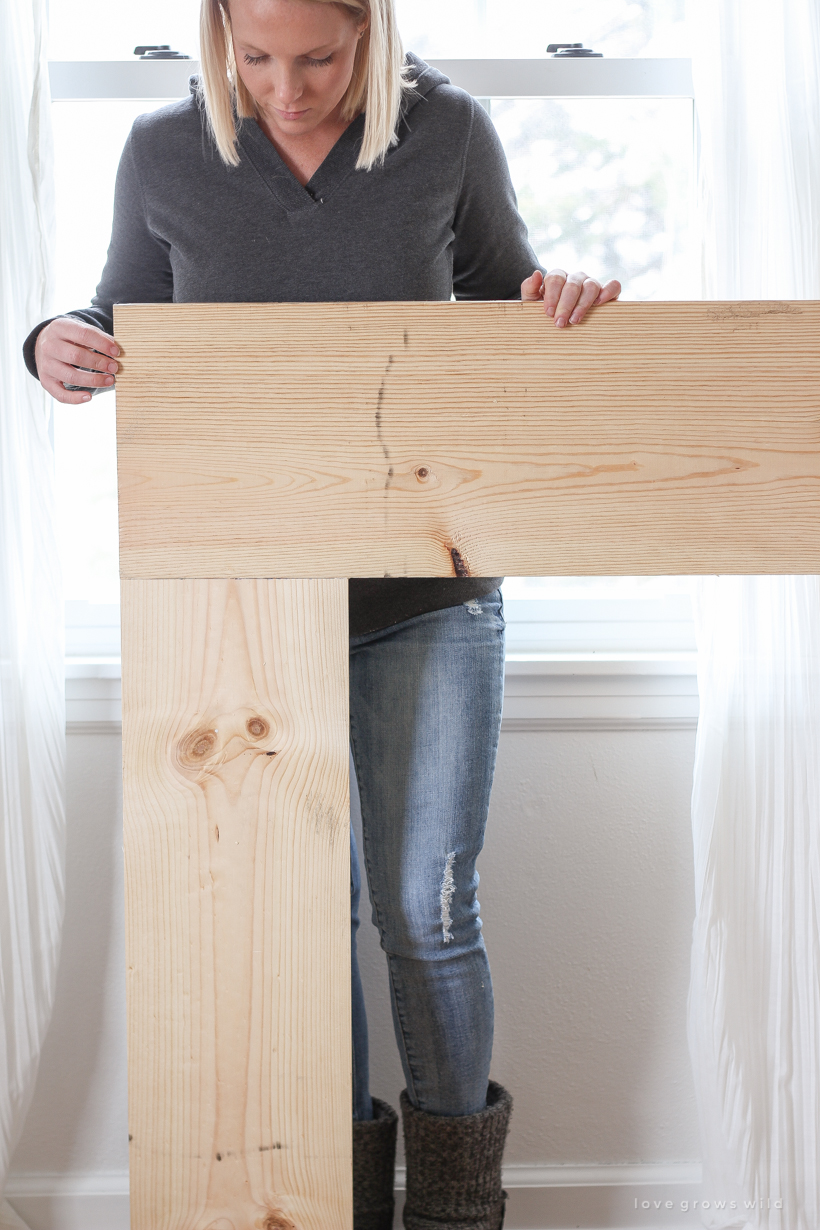
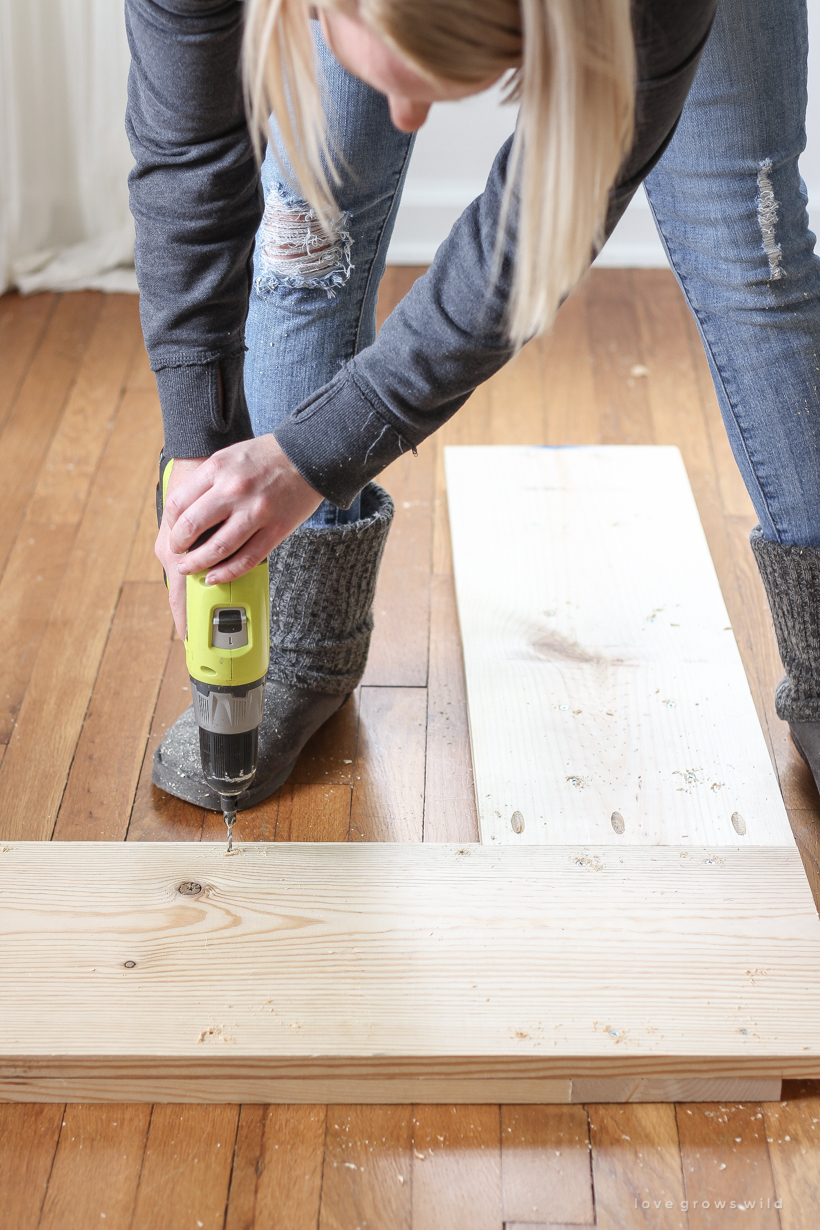
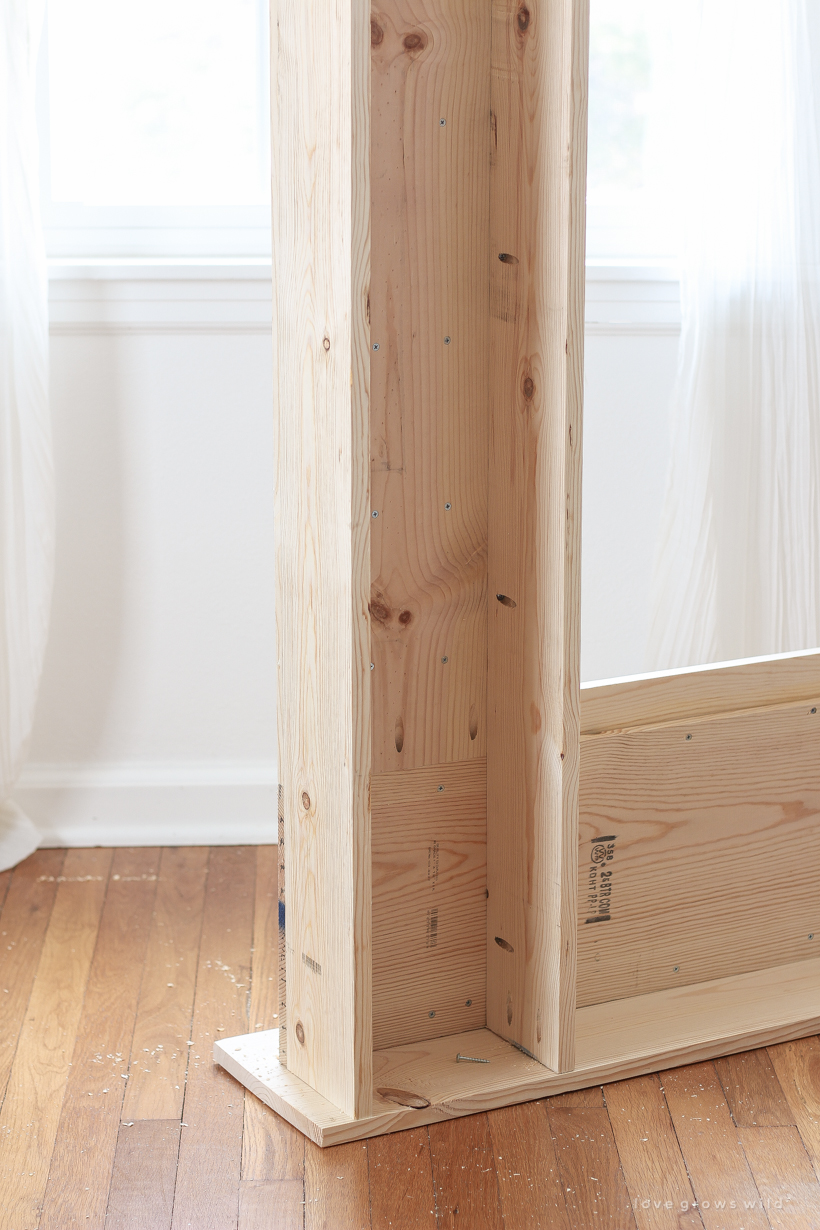
Attach the face frame to the front of the main frame (the side without the pocket holes) using wood glue and regular 1” wood screws inserted from the back of the mantle. Make sure the face frame legs are centered on the 1×10’s.

Home and lifestyle blogger Liz Fourez shows how to make a simple, yet stunning mantel that would be perfect in a living room or bedroom. Follow her easy step-by-step photo tutorial to create this beautiful DIY mantel!

STEP 4

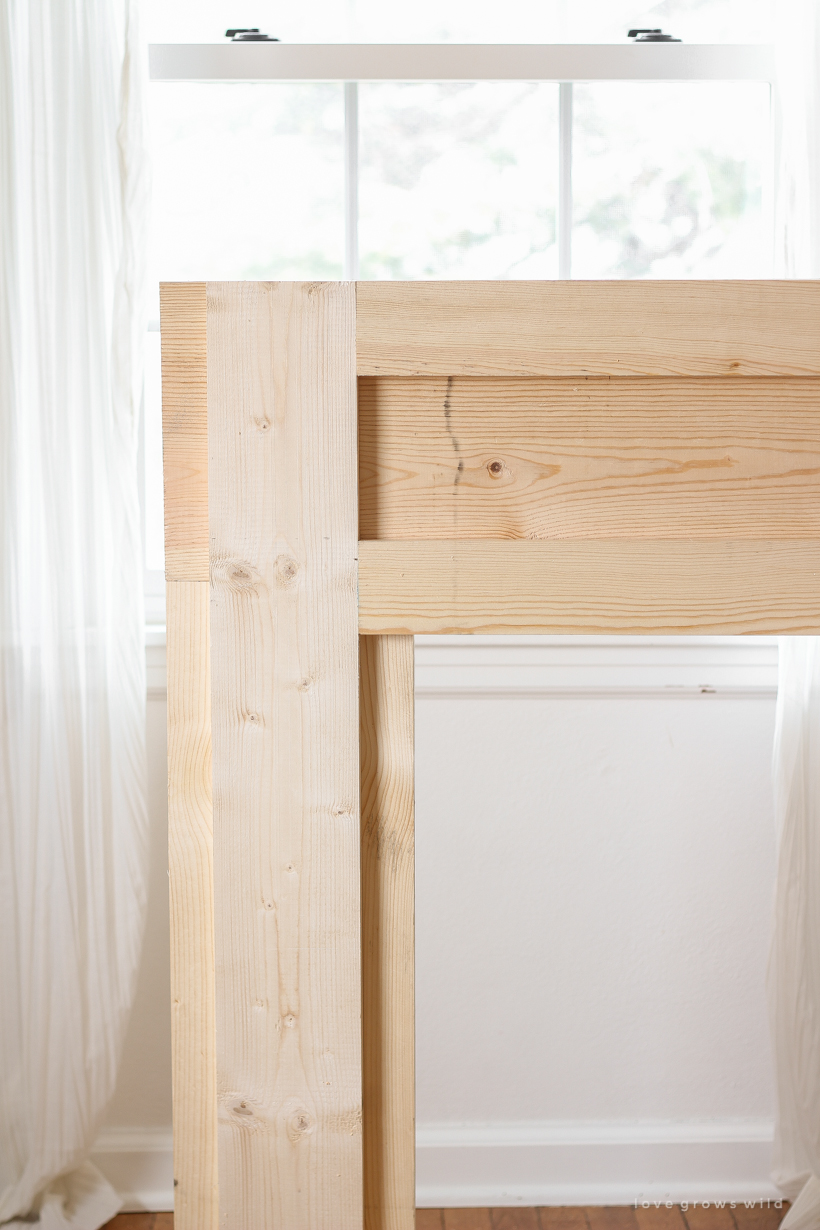
To add depth to the mantle, attach four 1×6 boards to the back (the side where the pocket holes and screws are showing). Start by drilling ¾” pocket holes along one long edge and along the top of all four 1×6 boards. The pocket holes on the top short edge will be for attaching the mantle top in the next step. Be sure to drill all the pocket holes so they will be facing inward on the back of the 1×10 legs. Attach the four 1×6’s to the back of the mantle as shown using wood glue and 1 ¼” pocket hole screws.

Home and lifestyle blogger Liz Fourez shows how to make a simple, yet stunning mantel that would be perfect in a living room or bedroom. Follow her easy step-by-step photo tutorial to create this beautiful DIY mantel!

STEP 5

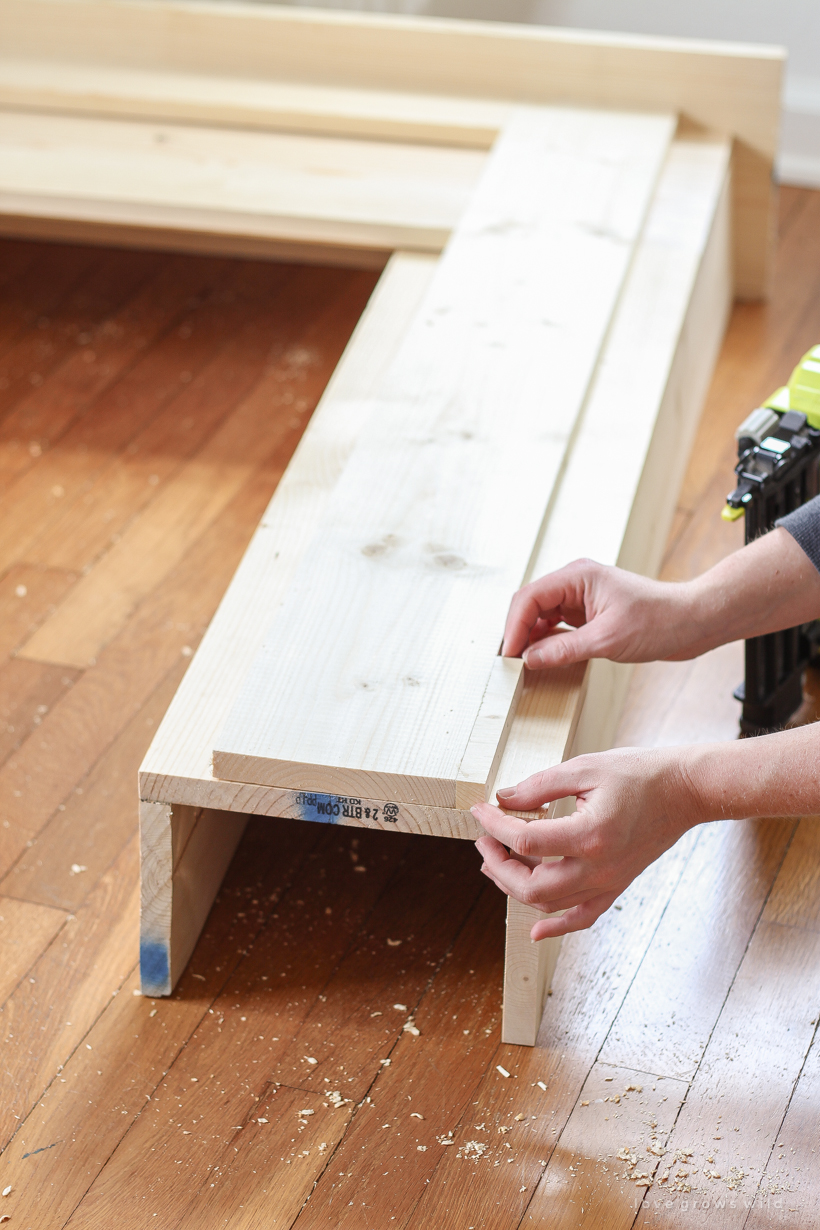
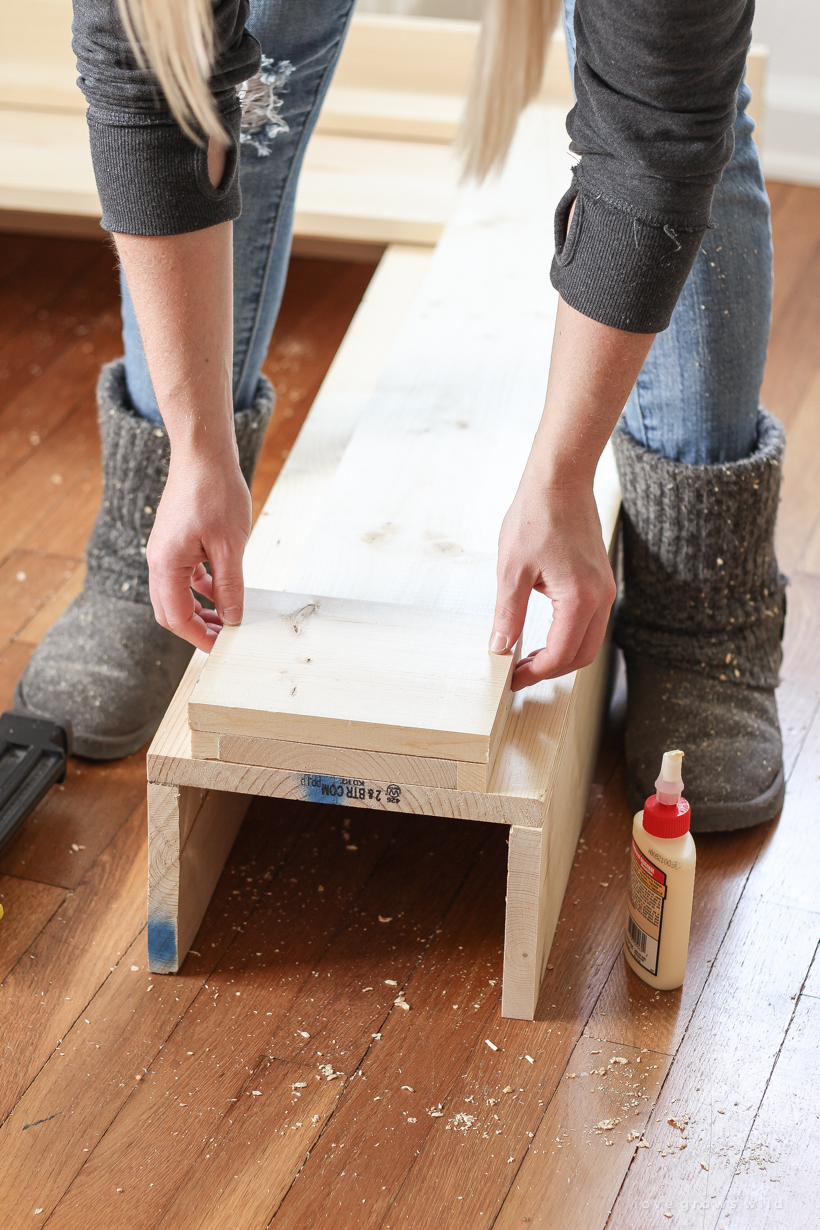
To attach the top mantle board, carefully flip the entire mantle upside down and position the 1×10 board underneath. There should be an equal overhang on both sides, and the back of the board should be flush with the back of the 1×6’s. Attach the mantle top with 1 ¼” pocket hole screws going through the holes you drilled in the back 1×6’s in the previous step.

Home and lifestyle blogger Liz Fourez shows how to make a simple, yet stunning mantel that would be perfect in a living room or bedroom. Follow her easy step-by-step photo tutorial to create this beautiful DIY mantel!

STEP 6

To trim out the bottom of the face frame, first add a ¾” 1×6 trim piece on either side of the 1×6 legs. Since these pieces are so small, just use wood glue and 1 ¼” brad nails to avoid splitting the wood. Then place the 7” 1×6 trim pieces on top of the face frame legs flush with the bottom of the mantel. Again, just use wood glue and 1 ¼” brad nails here.

Home and lifestyle blogger Liz Fourez shows how to make a simple, yet stunning mantel that would be perfect in a living room or bedroom. Follow her easy step-by-step photo tutorial to create this beautiful DIY mantel! Home and lifestyle blogger Liz Fourez shows how to make a simple, yet stunning mantel that would be perfect in a living room or bedroom. Follow her easy step-by-step photo tutorial to create this beautiful DIY mantel!

Step 7

Fill any nail holes or gaps with wood filler and allow to dry completely. Sand the entire mantle, making sure that the bottom is completely smooth and even so it will not wobble. (I would still recommend securing it to the wall once you get it into place). Clean the wood well using a vacuum and damp rag to make sure all the sawdust is removed before finishing. Either stain or paint the mantle and finish with a sealant such as wax or a matte poly.

Note: I used Dutch Boy paint in the color Swan White on this mantel and sealed it with my #1 go-to, Varathane Clear Matte Interior Poly, which dries crystal clear and matte and will not yellow. For the mantel in my bedroom, I painted it with Miss Mustard Seed’s Milk Paint in a mixture of equal parts Marzipan and Linen.

Step inside home and lifestyle blogger Liz Fourez's charming master bedroom with gorgeous farmhouse details and neutral color palette.

Thank you so much for stopping by today to check out this tutorial, and I hope you’re as excited as I am about this! Remember, you can always find more of our past projects and tutorials in the Project Gallery (found at the top of this page). And sure to tag me in your DIY mantel photos on IG so I can see your beautiful work! xoxo Liz

SHOP THE POST


LET’S KEEP IN TOUCH!

Subscribe to Blog | Follow on Instagram 
Follow on Pinterest | Follow on Facebook

Pin
Share
Tweet
Email
Print
DIY Decor Woodworking
by Liz Fourez 
5 Comments

About Liz Fourez

View all posts by Liz Fourez

Related Posts

  • Interior decorator and home blogger Liz Fourez shares how to make these beautiful winter planters for the holidays with fresh or faux greens!Christmas Front Porch & a Winter Planter Tutorial
  • Decorating tip: Frame a scrap piece of fabric for a simple and inexpensive piece of artwork. Home + lifestyle blogger Liz Fourez shares her advice for the best fabric options to use.Fabric: A Simple Idea for Inexpensive Framed Wall Art
  • Learn how to make beautiful floral-inspired artwork on a budget with this simple Paper Mache Pressed Flower tutorialPaper Mache Pressed Flower Art
  • A simple 3 ingredient air dry clay recipe that you can use to make homemade ornaments, garlands, and more3 Ingredient Air Dry Clay
PREVIOUS: One Pan Roasted Shrimp and Asparagus
NEXT: Casual Affordable Spring Fashion

Comments

  1. Dawn says: March 19, 2019 at 4:21 pm

    Just besutiful! Thank you.
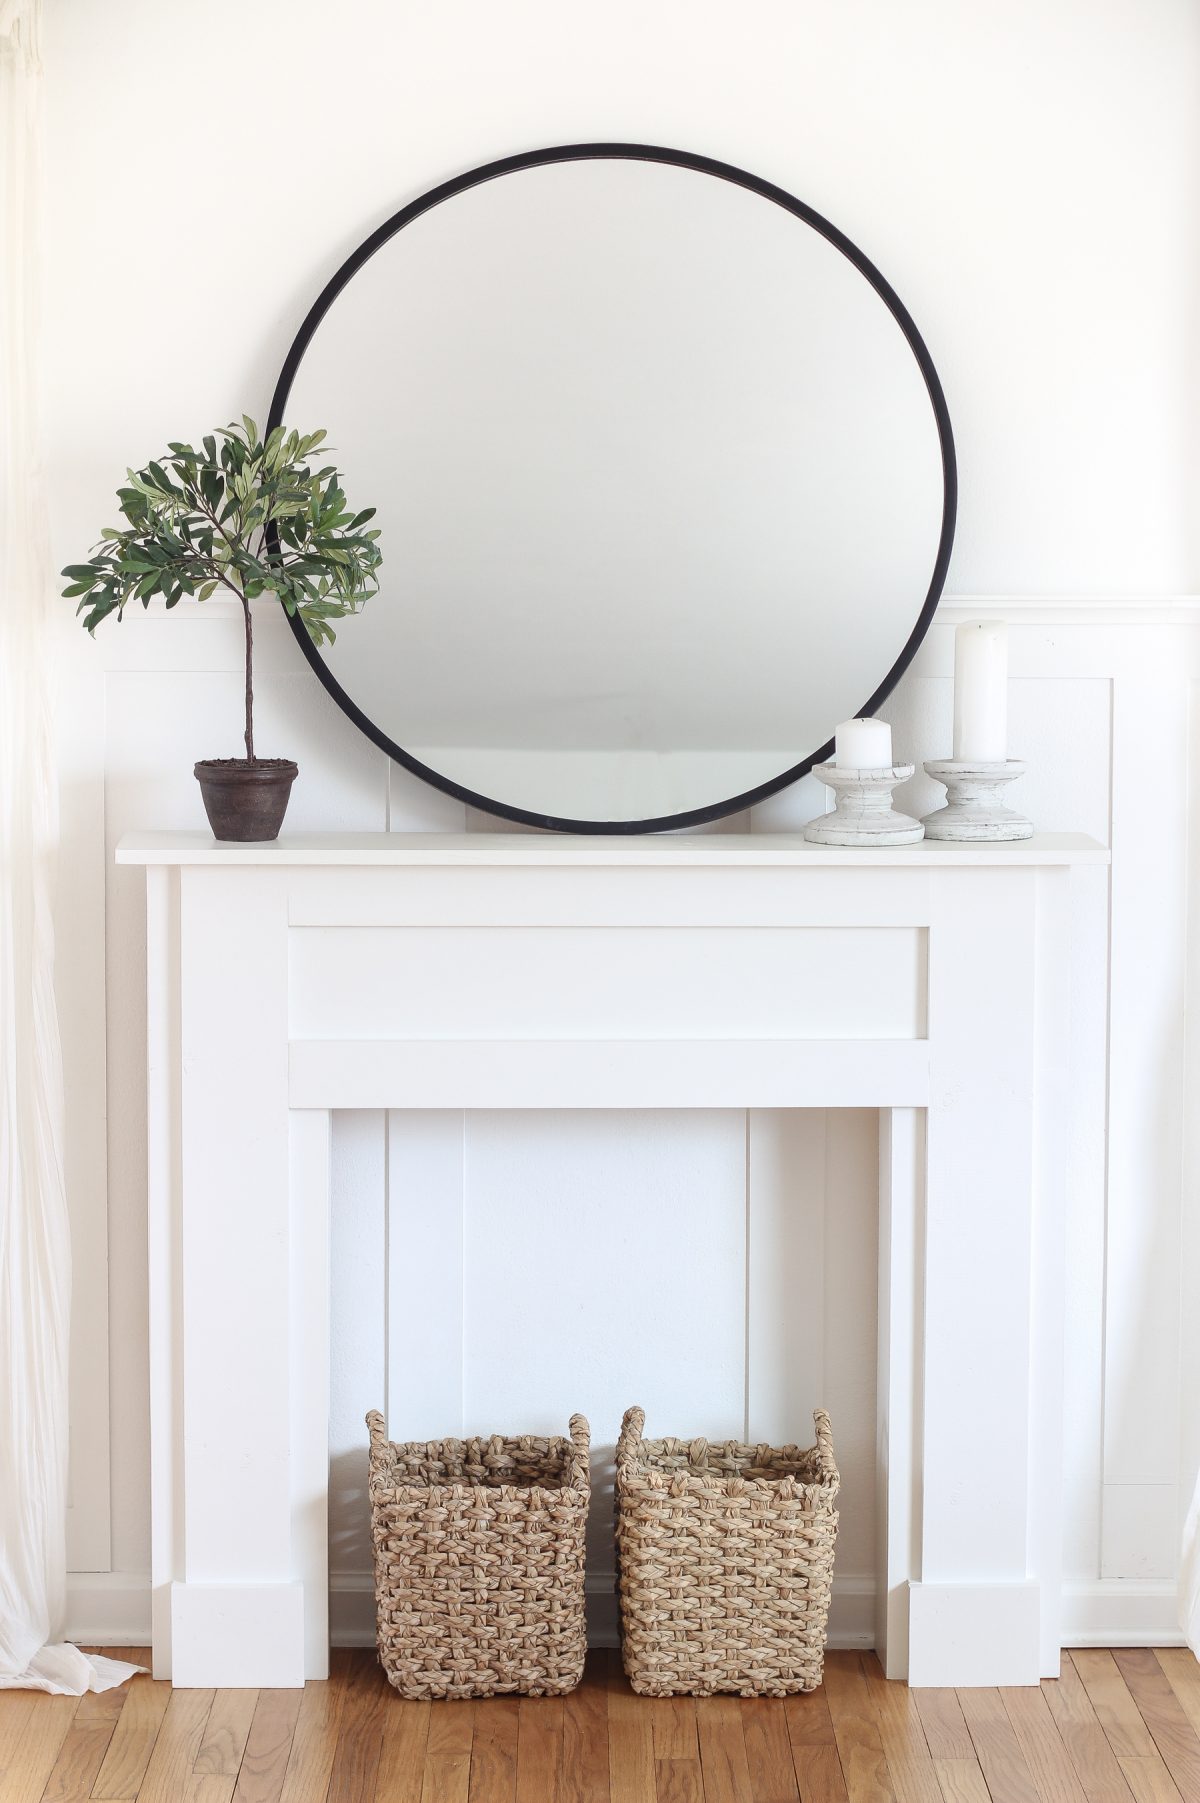
    Can you please tell me where your large round mirror is from?

    Reply
    • Liz Fourez says: March 19, 2019 at 8:47 pm

      Of course! I purchased the mirror HERE and love it!

      Reply
  2. Sam says: March 20, 2019 at 6:42 am

    Hi, I have a faux mantel too in my bedroom. My difficulty is about how to decorate, fill it inside, nicely! If youc ould give us some decoration ideas/possibilities it will be greatly appreciated!!! šŸ™‚

    Reply
  3. Kristy says: March 20, 2019 at 2:10 pm

    What about the plant. Where was that purchased

    Reply
    • Liz Fourez says: March 23, 2019 at 10:34 am

      The plant came from Pottery Barn a few years ago!

      Reply

Leave Your Comments Cancel reply

Your email address will not be published. Required fields are marked *

W E L C O M E

W E L C O M E

Welcome, sweet friends! My name is Liz, and I started Love Grows Wild in 2012 with a passion for interior design and homemaking and a dream to help others create a home they love.
Here you’ll find simple project tutorials, holiday and entertaining ideas, and my journey renovating a 1940’s farmhouse that I live in with my two boys and French bulldog.
Read more about Liz >>

LET’S CONNECT

FOLLOW ALONG

POPULAR POSTS

RECIPES

TUTORIALS

Categories

Recent Posts

  • The Simple Pillow Formula for Your Sofa! Unsure how many, what size, and what kind of pillows should go on your sofa? Check out my simple formula for a perfectly styled sofa!
    The Simple Pillow Formula for your Sofa
    Decorating and Home, Our Home, Tutorials
  • A small rental home decorated in a cozy beachy cottage style on a budget! Get all the details from home blogger and interior decorator Liz Fourez of lovegrowswild.com
    The Armstrong House Living Room
    Decorating and Home
  • The easiest way to keep your home free of clutter and tidy! Learn more about this helpful tip from home blogger and interior decorator Liz Fourez.
    The Easiest Way to Keep Your Home Tidy
    Decorating and Home, Our Home, Tutorials
  • Get inspired to eat better with this menu of healthy recipes for January!
    Healthy Meal Plan for January
    Recipes
  • Kitchen Curtains + Counter Styling
    Top Blog Posts of 2020
    Decorating and Home

Liz Fourez started Love Grows Wild in 2012 with a passion for interior design and homemaking and a dream to help others create a home they love.  From simple project tutorials, to holiday and entertaining ideas, to her journey renovating a 1940’s farmhouse, Liz demonstrates how to create a beautiful and inviting home with a handmade touch. She turned her signature cozy, neutral style into a best-selling book in 2016 and continues to inspire readers with her captivating photography and easy decorating ideas. Read more about Liz > > > >

  • contact
  • MEET LIZ
  • advertise
  • privacy policy/disclosure
  • Blog
I hope you had a wonderful, restful weekend! I wan I hope you had a wonderful, restful weekend! I wanted to kick the week off with one of my favorite winter decorating tips. Once all the holiday decor is gone, I always crave clean & simple spaces. But soon the house goes from feeling soothing to slightly boring, and I need something to breathe a little life back into our home. Do you ever feel the same?

The easy answer: PLANTS. Faux, real... whatever works for you. It’s the perfect detail to get us through the dreariness of winter and ready for spring. I’m always a fan of faux because they’re just easier, but I do really love this sweet little angel vine I’ve had for several years now!

What’s your favorite house plant? And also,  how easy is it to keep alive? 🌿

LIVING ROOM DETAILS:
link in my profile 

https://lovegrowswild.com/2020/02/living-room-dining-room-swap/
Starting the weekend with a clean (ish) house is t Starting the weekend with a clean (ish) house is the best feeling. Also, going to bed at 9 on a Friday night and that first sip of coffee on a Saturday morning. It’s the little things that are bringing me joy today. šŸ˜“ā˜•ļøā˜€ļø

Happy weekend! 

HOW I STORE & ORGANIZE MY HOME DECOR:
link in my profile

https://lovegrowswild.com/2019/01/organize-store-home-decor/
NEW BLOG POSTā•Raise your hand if you’ve ever b NEW BLOG POSTā•Raise your hand if you’ve ever been frustrated trying to find the right combination of pillows for your sofa… šŸ‘‹šŸ»

how many pillows?
what size pillows?
what color pillows?
too much pattern or not enough pattern?
do these colors even go together?
but wait… how many pillows are TOO MANY pillows??

Yep, I’ve been there too!

I hesitate calling what I’m about to share a ā€œformulaā€ because I truly believe there are no right or wrong ways to decorate your home. It’s all about what YOU love. But if you’ve ever gotten stuck or frustrated, here is one of my favorite easy tricks to make styling your sofa a breeze…

>> SIMPLE PILLOW FORMULA FOR YOUR SOFA <<
link in my profile

https://lovegrowswild.com/2021/01/the-simple-pillow-formula-for-your-sofa/
neutral timeless simple a little bit vintage cl neutral  timeless  simple
a little bit vintage  clean

Guess which of those my house is NOT right now 😳🧐

KITCHEN DETAILS
link in my profile: 

https://lovegrowswild.com/2020/02/kitchen-curtains-counter-styling/
Hello, my favorite beach hat. I’ll wear you in t Hello, my favorite beach hat. I’ll wear you in the warm sunshine again one day! My suitcases are looking awfully lonely lately, and I’m getting the itch to take the boys somewhere... ANYwhere. I’d take a road trip and some sunshine and a change of scenery in a heartbeat. Anyone else feeling ready for spring and getting that travel bug?

Share some ideas for safe travel destinations that we can follow all the distancing rules, but feel just a little bit of normalcy again. ā¬‡ļø Where would you love to go this year? (even if all we can do right now is dream about it šŸ˜‰)

HOW TO PAINT WICKER FURNITURE:
link in my profile

https://lovegrowswild.com/2019/06/how-to-paint-wicker/
The perfect example of design on a budget. I feel The perfect example of design on a budget. I feel like kids go through so many phases of what they do and don’t like as they get older, and we’re often changing the boys’ bedrooms to make them function better as they grow out of each phase (way too quickly, I might add 🄺).

I’m a big believer in teaching kids to be mindful of taking care of their belongings and their home from the time they are little, which is why I don’t worry so much about light colored couches in the living room or white walls throughout the house. BUT kids are also kids, and I design their bedrooms with a much more frugal budget so that if anything gets old & worn or needs to be replaced/repurposed... I don’t sweat the money that was spent!

In this room we used inexpensive pieces from IKEA, Target and Walmart to create a cozy teenage boy’s room, but it definitely doesn’t skimp on style. We’re planning a little makeover again in this room soon, and I’m excited to show you what we have up our sleeves for my now 15 year old... good grief, where does the time go?

You can find all the details of this room here:
link in my profile

https://lovegrowswild.com/2018/11/boys-bedroom-makeover-part-1/
S E E M O R E F O L L O W O N I N S T A G R A M

Copyright © 2021 · Prima Donna theme by Georgia Lou Studios

COPYRIGHT Ā© 2017 Ā· DESIGN + BRAND: BLISS AND TELL BRANDING COMPANY