• Home
  • MEET LIZ
  • contact
  • Blog
  • E-DESIGN SERVICE

Love Grows Wild

  • Home
  • Liz Fourez Interiors
  • Our Home
    • bathroom
    • dining room
    • entryway
    • exterior
    • kids bedroom
    • kitchen
    • living room
    • master bedroom
    • office
    • playroom
  • Project Gallery
    • diy decor
    • decorating advice + inspiration
    • furniture makeover
    • woodworking
    • crafts
  • Seasonal
    • spring
    • summer
    • fall
    • winter
  • Recipes
    • appetizers/snacks
    • beverages
    • breakfast
    • dessert
    • meal ideas
    • side dishes
  • SHOP
    • My Book
    • Shop LGW Style
    • love grows wild market
Decorating and Home, Our Home, Tutorials

Farmhouse Window Trim

September 4, 2015

Pin
Share
Tweet
Email
Print
Learn how to bulk up the trim around your windows for a beautiful farmhouse look! Such an easy and inexpensive upgrade! | LoveGrowsWild.com

Learn how to bulk up the trim around your windows for a beautiful farmhouse look! Such an easy and inexpensive upgrade!

Learn how to bulk up the trim around your windows for a beautiful farmhouse look! Such an easy and inexpensive upgrade! | LoveGrowsWild.com


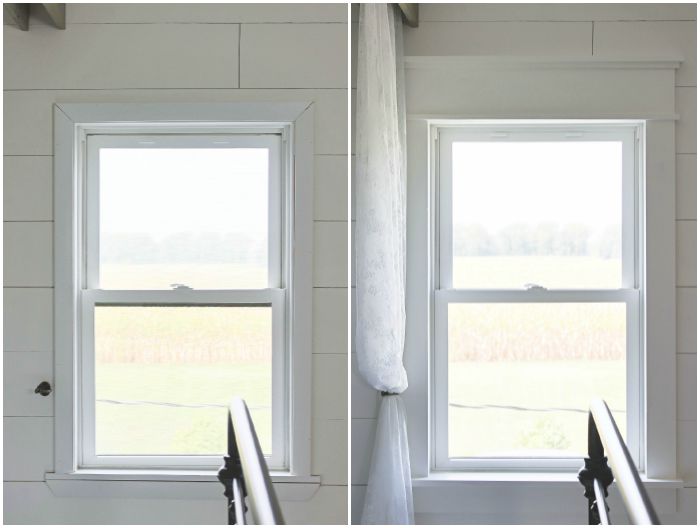
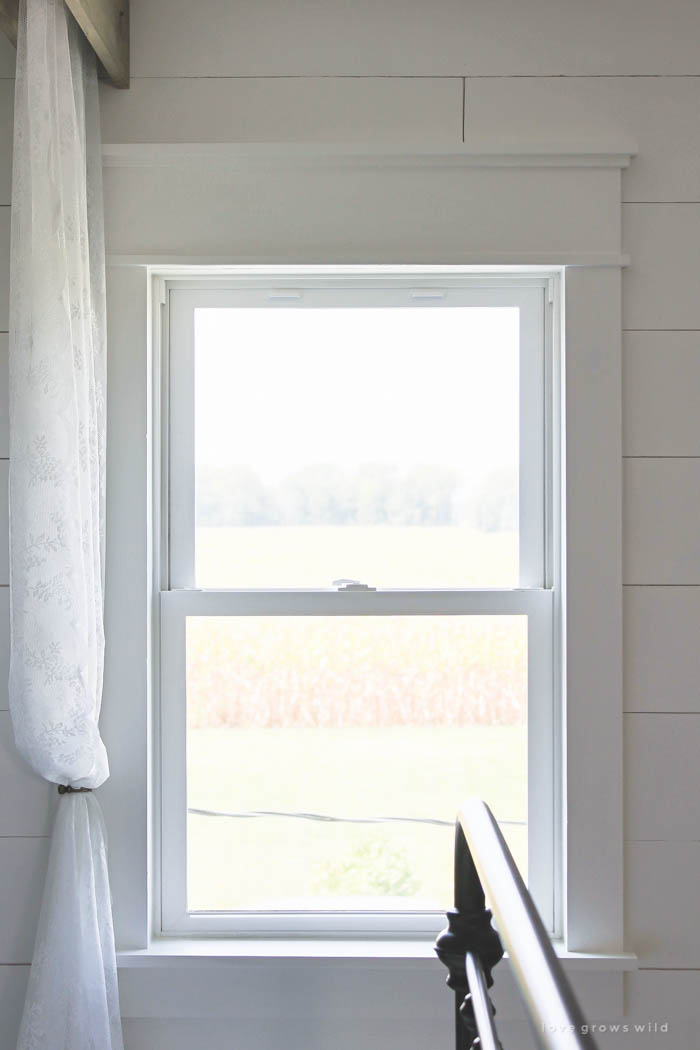
Wow, you guys… what a huge difference $10 in lumber and an afternoon of painting can make!! We only have one tiny, little window in our bedroom, so I knew from the start of this makeover that I wanted to make it as big and beautiful as I could. After we planked our bedroom walls this summer, we quickly slapped the window trim back on the wall knowing that it would come down again soon anyway. Here’s what it looked like post-planking:

Learn how to bulk up the trim around your windows for a beautiful farmhouse look! Such an easy and inexpensive upgrade! | LoveGrowsWild.com

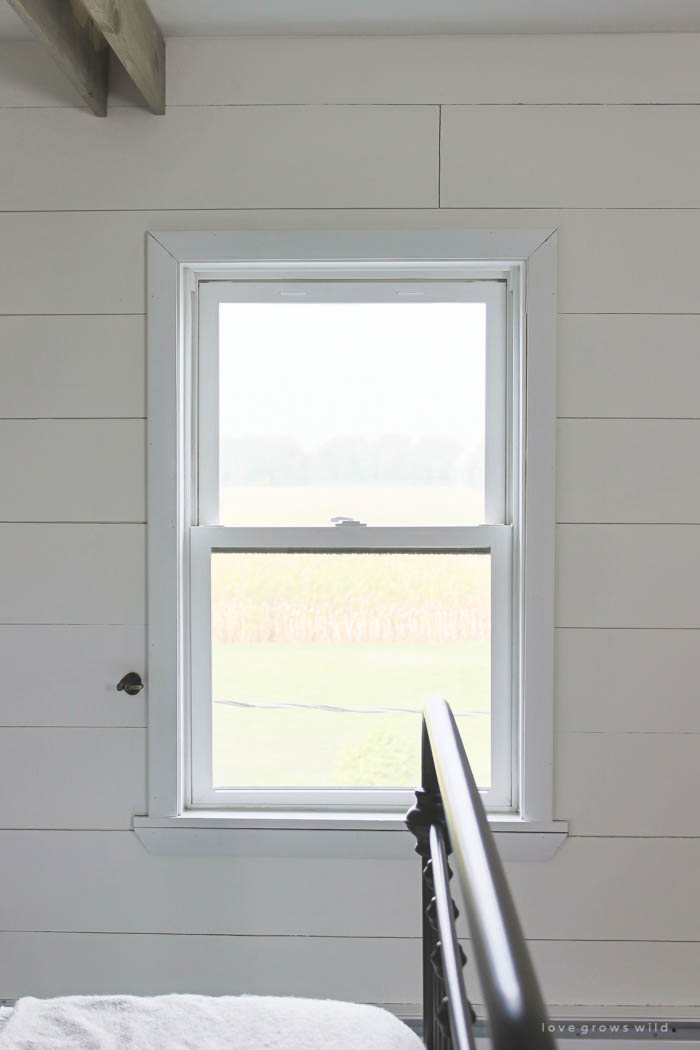
Pretty boring, right? I think I was going for clean and modern at the time we installed it originally, but now it just feels bland and cheap to me. Awhile back, I saw my sweet friend, Donna, beef up the trim in her bathroom, and she made it look super easy. As it turns out, it really IS that easy! Using her suggestions, I turned our tiny bedroom window into an extra large, super charming, farmhouse-style window that kicks the pants off our previous window trim.

Here’s why I love this project so much:
– cost less than $10 in lumber
– only took an afternoon to finish
– all simple straight cuts (no mitered edges!)

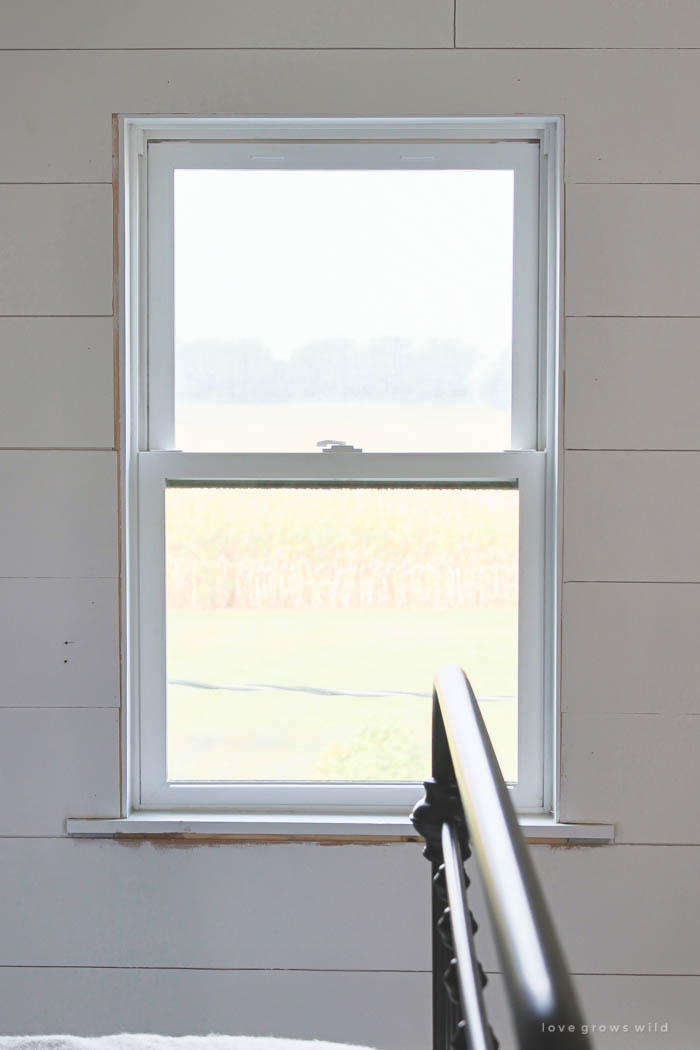
I started by removing the old trim around the window. I tried with all my might to get the existing window sill out, but it didn’t want to budge. After nearly smashing the window with a hammer while trying to pry the darn board out, I decided it could stay and I’d work around it. Not worth the price of a new window!

Learn how to bulk up the trim around your windows for a beautiful farmhouse look! Such an easy and inexpensive upgrade! | LoveGrowsWild.com

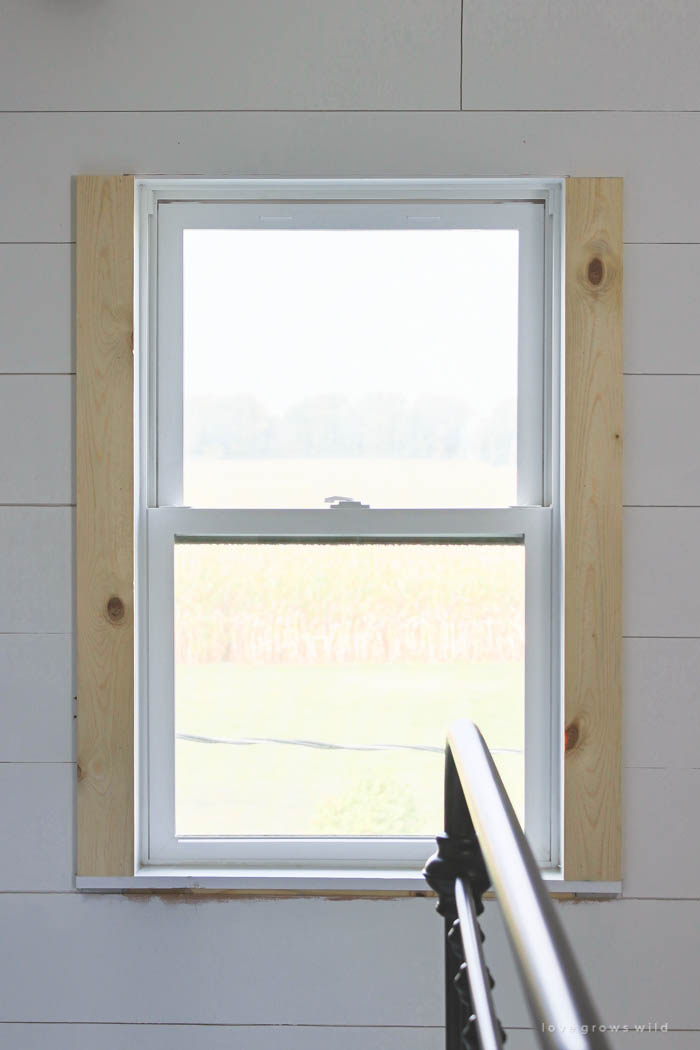
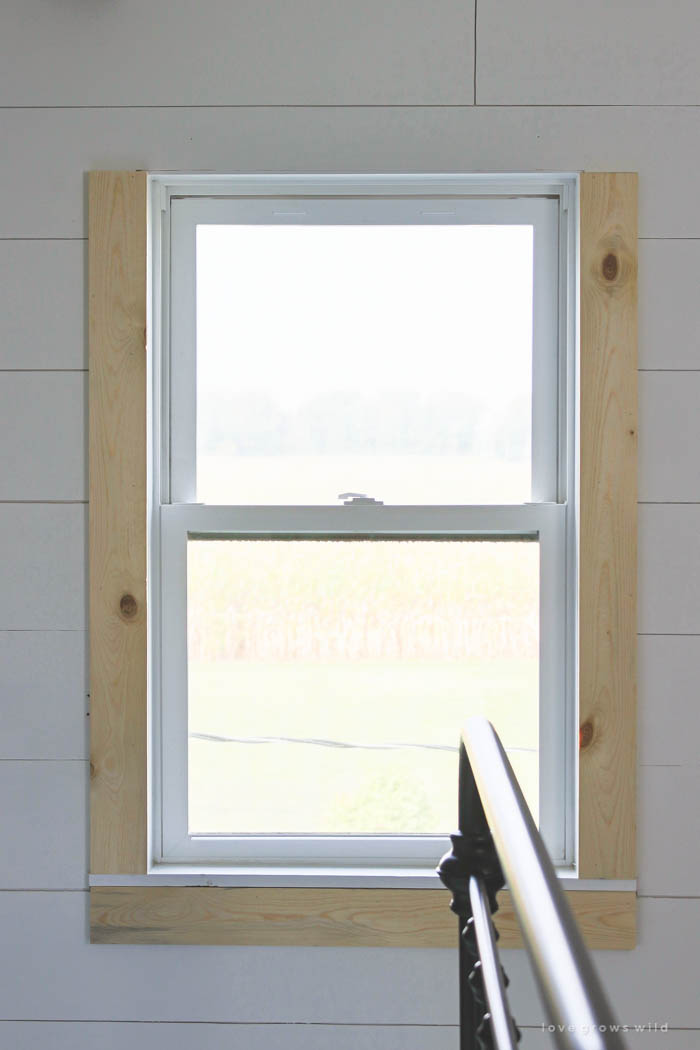
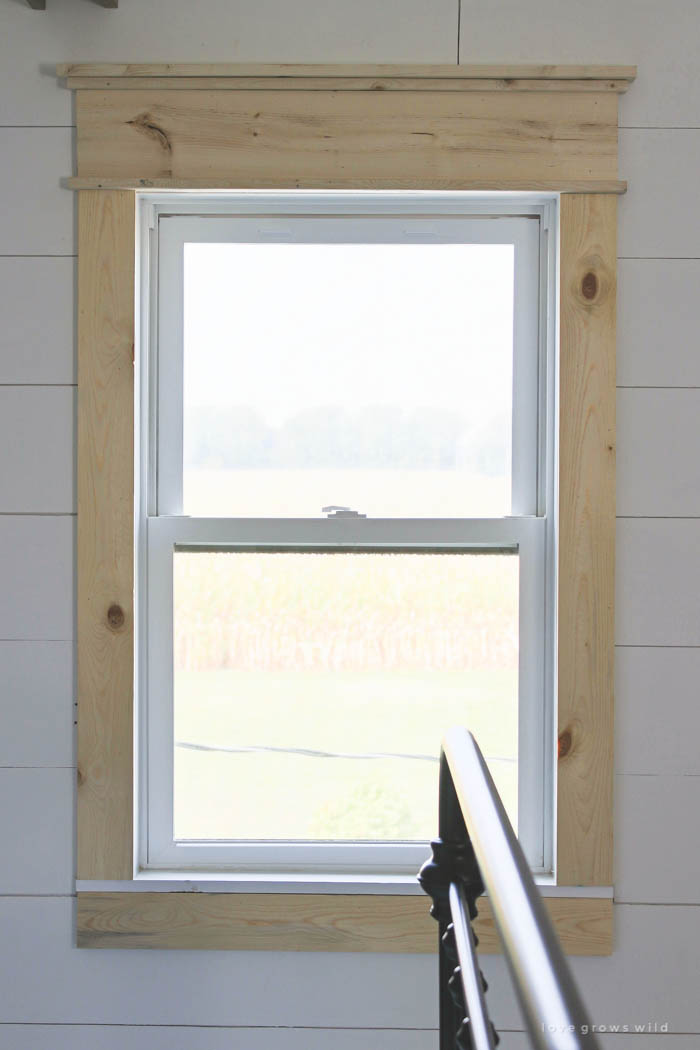
Next, I added side trim to the window using 1 x 4 boards. I measured the distance between the window sill and the top of the window (43″) and cut two 1 x 4 pieces to fit. I set the 1 x 4’s right on top of the sill and secured them to the wall with my brad nailer.

Learn how to bulk up the trim around your windows for a beautiful farmhouse look! Such an easy and inexpensive upgrade! | LoveGrowsWild.com

Then I cut another piece of 1 x 4 to sit under the window sill as an apron. I made this board even with the outer edge of the side trim pieces (33.5″) and nailed it into the wall.

Learn how to bulk up the trim around your windows for a beautiful farmhouse look! Such an easy and inexpensive upgrade! | LoveGrowsWild.com

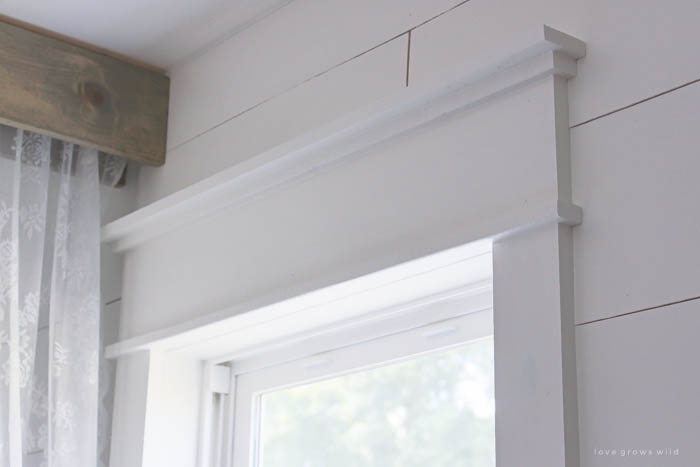
I added 1″ to the apron length (34.5″) and cut a 1 x 2 to sit on top of the side trim pieces. I nailed this piece into the 1 x 4 sides from the top of the 1 x 2.

Learn how to bulk up the trim around your windows for a beautiful farmhouse look! Such an easy and inexpensive upgrade! | LoveGrowsWild.com

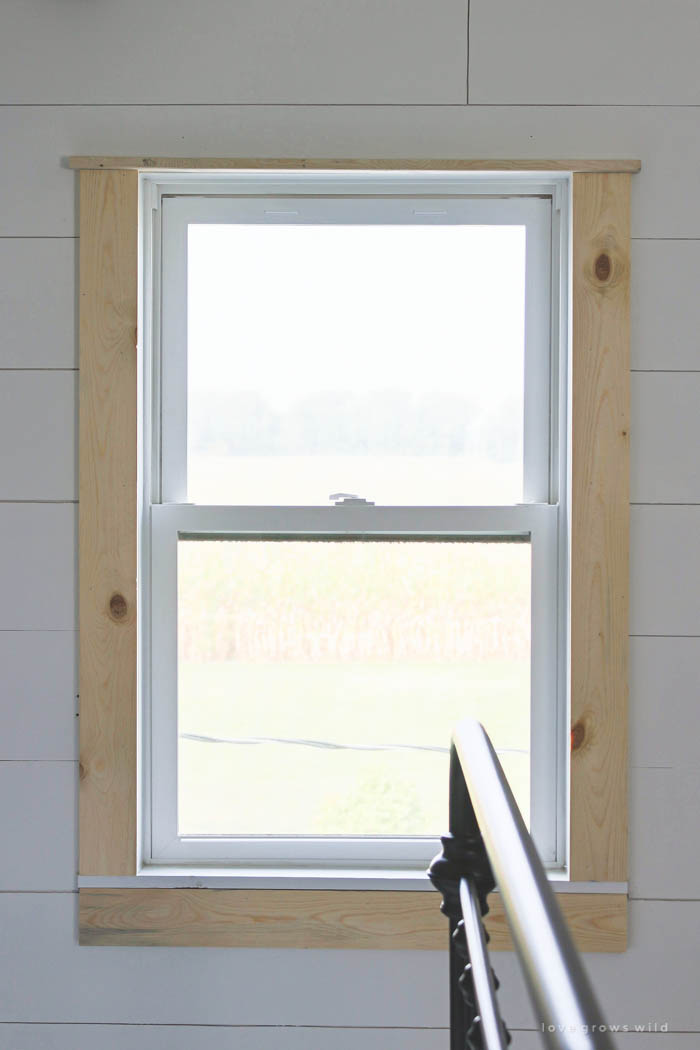
Next, I cut a 1 x 6 to the same length as the apron (33.5″) and nailed it into the wall on top of the 1 x 2.

Learn how to bulk up the trim around your windows for a beautiful farmhouse look! Such an easy and inexpensive upgrade! | LoveGrowsWild.com

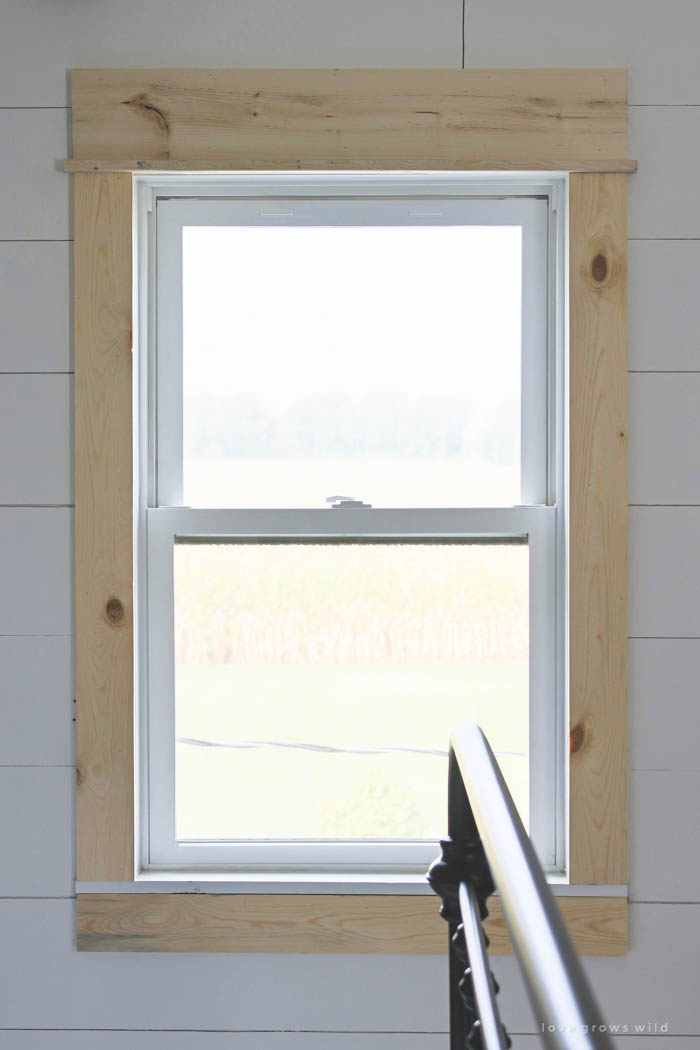
I cut another 1 x 2 piece the same length as the first 1 x 2 (34.5″) and nailed it from the top into the 1 x 6.

Learn how to bulk up the trim around your windows for a beautiful farmhouse look! Such an easy and inexpensive upgrade! | LoveGrowsWild.com

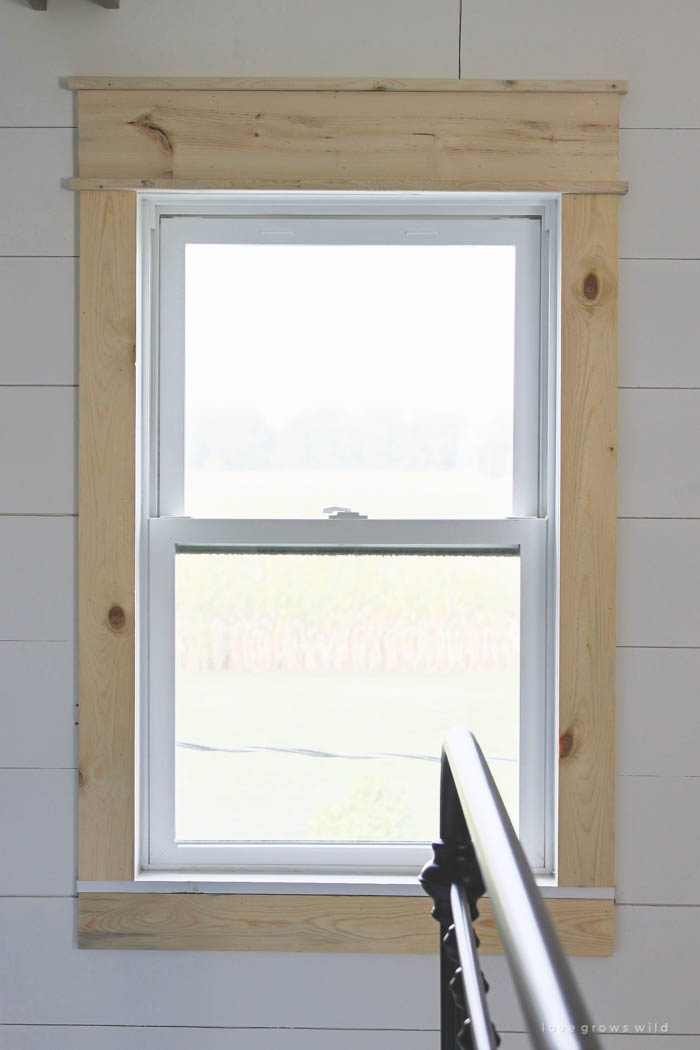
For the last board, I added 2″ to the apron length (35.5″) and cut a 1 x 3 to that length. I set the 1 x 3 on top of the previous 1 x 2 and toenailed it into the wall. This last board was too close to the ceiling for me to nail from the top, so I angled the brad nailer slightly to nail through the 1 x 3 and into the wall.

Learn how to bulk up the trim around your windows for a beautiful farmhouse look! Such an easy and inexpensive upgrade! | LoveGrowsWild.com

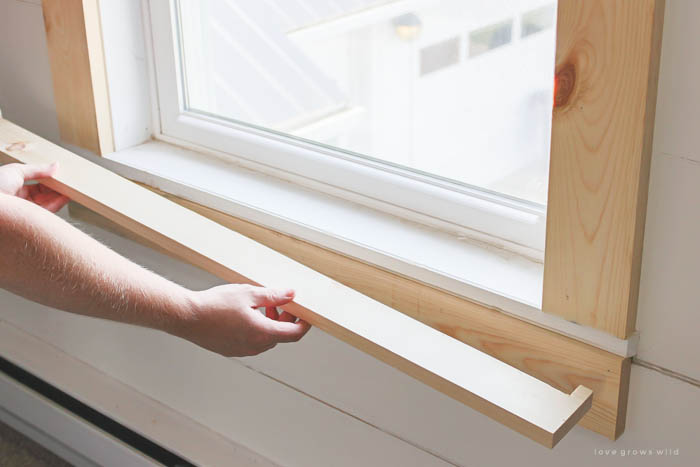
I wanted a nice, big ledge at the bottom of the window, but because I couldn’t remove the existing window sill, I had to improvise.

Learn how to bulk up the trim around your windows for a beautiful farmhouse look! Such an easy and inexpensive upgrade! | LoveGrowsWild.com

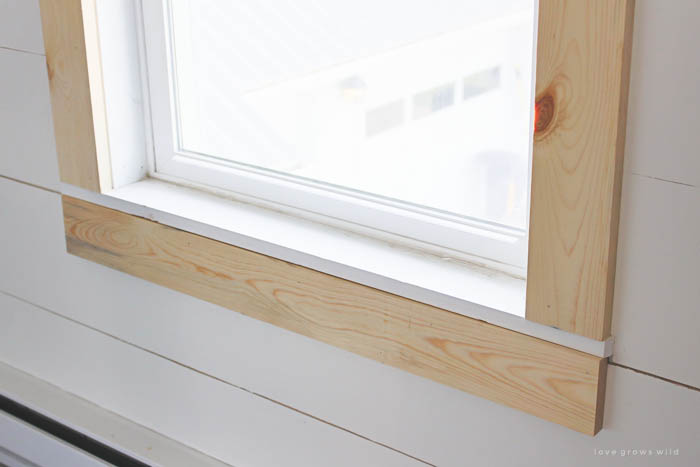
I cut a board to fit over and around the edges of the sill, adding about another 2″ of depth and 1″ of length. I secured it with a nail on both ends, then toenailed it in from underneath.

Learn how to bulk up the trim around your windows for a beautiful farmhouse look! Such an easy and inexpensive upgrade! | LoveGrowsWild.com

Learn how to bulk up the trim around your windows for a beautiful farmhouse look! Such an easy and inexpensive upgrade! | LoveGrowsWild.com

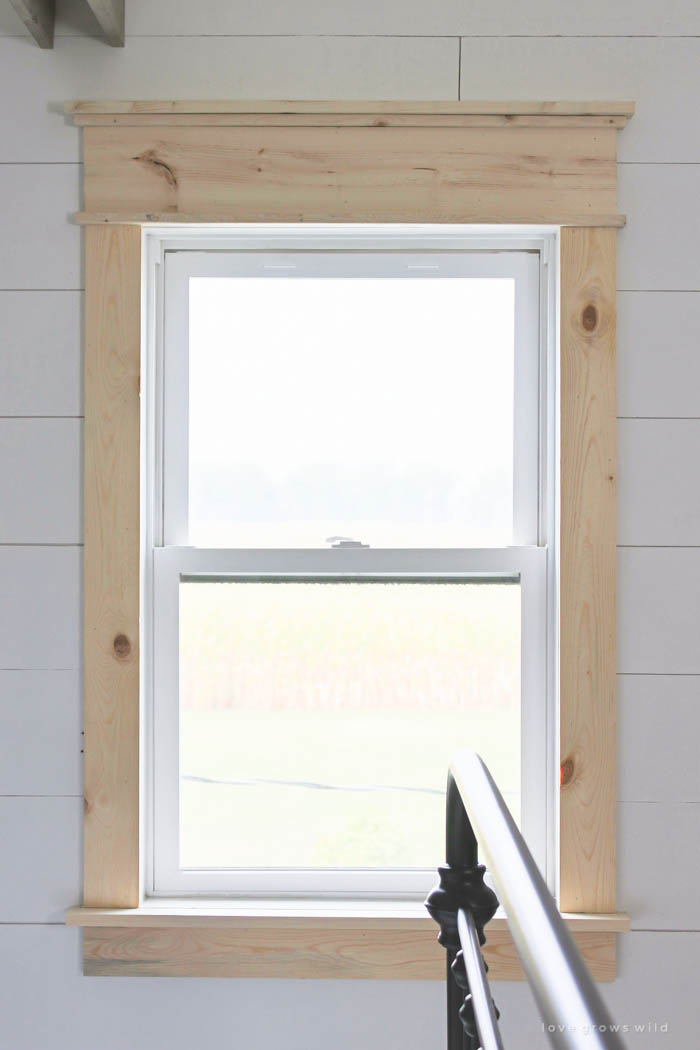
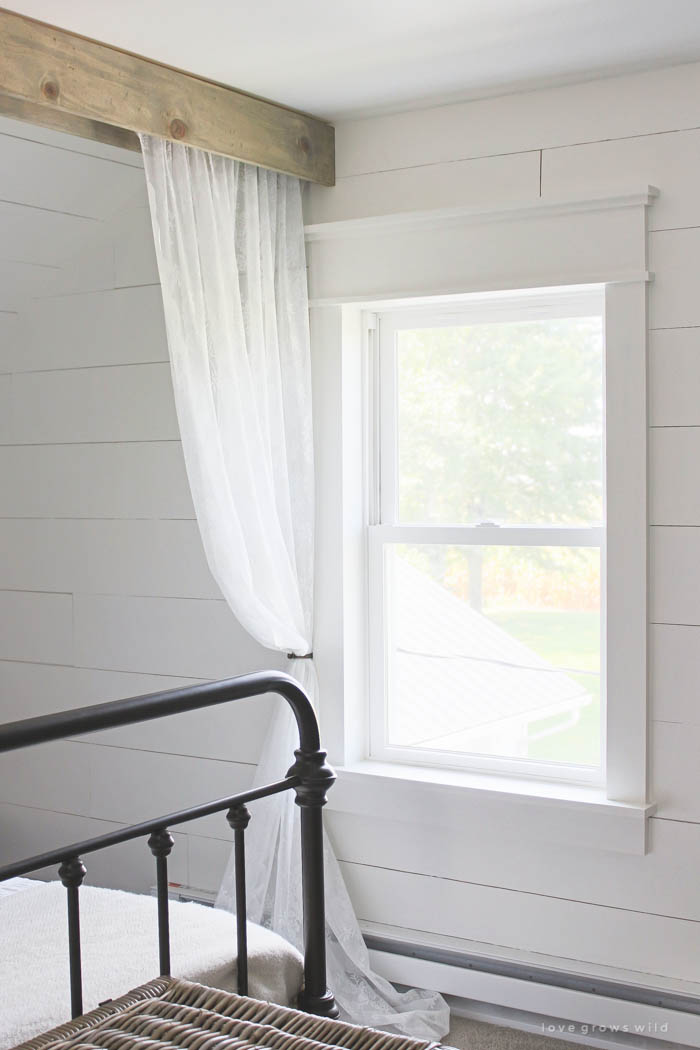
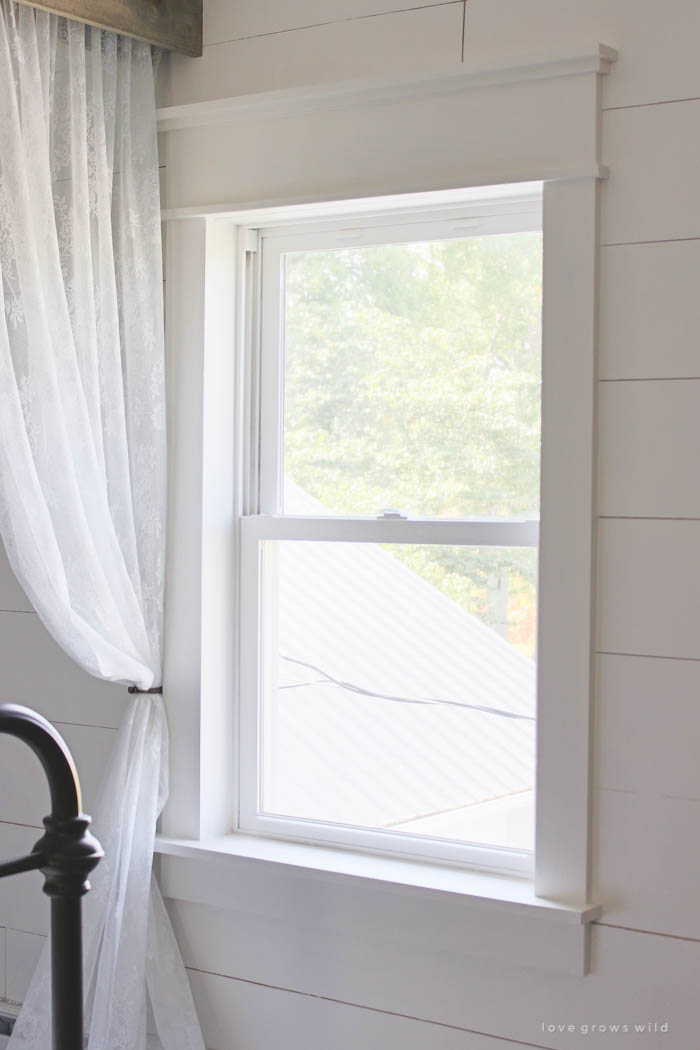
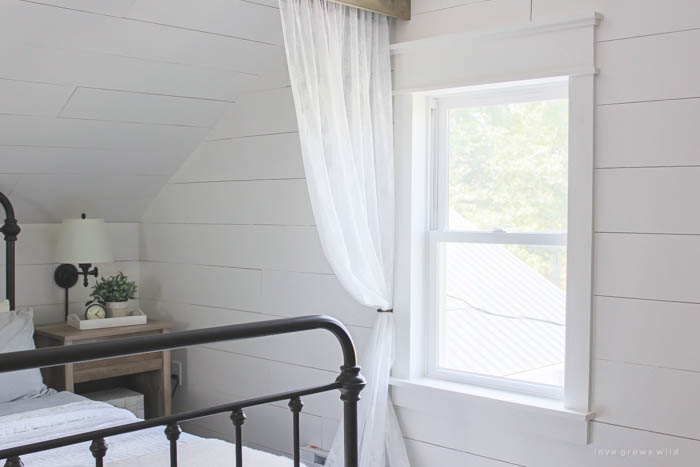
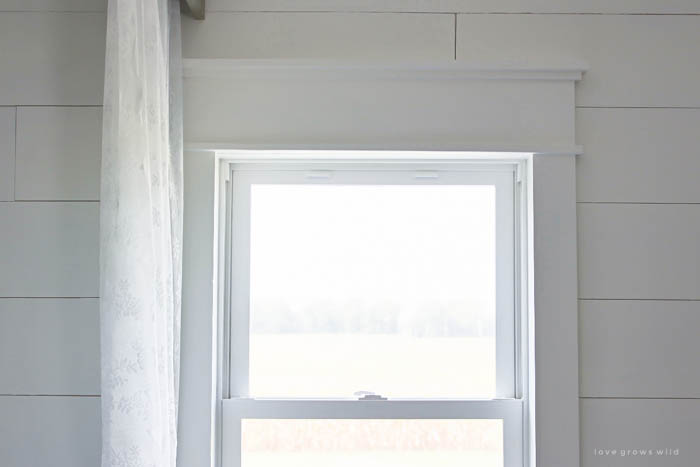
I caulked all the seams between each board and along the wall, then primed and painted the trim in Dove White to match our planked walls. WHAT a difference this $10 afternoon project made!!

Learn how to bulk up the trim around your windows for a beautiful farmhouse look! Such an easy and inexpensive upgrade! | LoveGrowsWild.com

Learn how to bulk up the trim around your windows for a beautiful farmhouse look! Such an easy and inexpensive upgrade! | LoveGrowsWild.com

I did have to remove and re-install the hook for our lace curtains about an inch over to the left, but that was no big deal. I just can’t get over how much more character this tiny, little window has now. Sorry Jeremy, but I’m pretty sure we’re going to have to do this to ALL our windows!

Learn how to bulk up the trim around your windows for a beautiful farmhouse look! Such an easy and inexpensive upgrade! | LoveGrowsWild.com

Learn how to bulk up the trim around your windows for a beautiful farmhouse look! Such an easy and inexpensive upgrade! | LoveGrowsWild.com

Learn how to bulk up the trim around your windows for a beautiful farmhouse look! Such an easy and inexpensive upgrade! | LoveGrowsWild.com

Learn how to bulk up the trim around your windows for a beautiful farmhouse look! Such an easy and inexpensive upgrade! | LoveGrowsWild.com

Learn how to bulk up the trim around your windows for a beautiful farmhouse look! Such an easy and inexpensive upgrade! | LoveGrowsWild.com

Soooo… what do you guys think of the new window trim?? What kind of trim do you have in your house? Does it need an upgrade? I’d love to hear your thoughts, so please leave a comment for me below!

xoxo Liz

Check out the rest of our bedroom makeover posts:
Master Bedroom Makeover Plans & Before Photos
Master Bedroom Planked Walls
Wood Beam and Lace Curtains


LET’S KEEP IN TOUCH!

 Subscribe to Blog | Browse my Shop | Follow on Facebook | Follow on Twitter
Follow on Google+ | Follow on Pinterest | Follow on Instagram

Pin
Share
Tweet
Email
Print
DIY Decor Master Bedroom Woodworking
by Liz Fourez 
52 Comments

About Liz Fourez

View all posts by Liz Fourez

Related Posts

  • Home blogger and interior decorator Liz Fourez shows how easy it is to add lighting to any bookcase for a sophisticated and elegant look!Living Room Bookcase Lighting
  • Interior decorator and home blogger Liz Fourez shares her beautiful mantel decorated for Christmas. Find out how you can build this exact mantel on LoveGrowsWild.comChristmas Mantel
  • Interior decorator and home blogger Liz Fourez shares how to make these beautiful winter planters for the holidays with fresh or faux greens!Christmas Front Porch & a Winter Planter Tutorial
  • A new rug, curtains, bedding and artwork in designer Liz Fourez's beautifully cozy master bedroomNew in the Master Bedroom: a Rug, Curtains, Bedding & Artwork
PREVIOUS: The Inspiration Gallery
NEXT: One Pot Spaghetti

Comments

  1. Marci says: September 4, 2015 at 4:58 pm

    Wow, what a difference the trim makes. It looks amazing. We did very similar trim during our renovation and I still haven’t painted them yet. For me thats the worst part but at least they are primed. Good for you for actually painting yours.

    Reply
  2. Julia at Home on 129 Acres says: September 4, 2015 at 8:36 pm

    I love this makeover. Trim is a small detail but has such an impact on the feel of a space. We’re slowly adding more farm character to our 60s rancher, and upgrading the trim is definitely on the list. I love that this is such a simple–but so impactful–design. No angled cuts! Well done.

    Reply
  3. Dorothy Bruner says: September 7, 2015 at 6:52 pm

    What is the beautiful color on your walls? We’re getting ready to paint our living and dining rooms and I love that color

    Reply
    • Liz Fourez says: September 14, 2015 at 5:27 pm

      Thank you so much, Dorothy! It is Dove White by Benjamin Moore.

      Reply
  4. CWirth says: September 7, 2015 at 8:07 pm

    Beautiful! You really have an eye for this! Absolutely love it!

    Reply
  5. Peter Michael Cardella says: September 8, 2015 at 12:03 am

    Looks fantastic!

    Reply
  6. Elizabeth says: September 12, 2015 at 8:16 am

    I just found your blog from AKA Design. I absolutely love your style! We have a huge attic with two small windows so I appreciated seeing the impact the window trim made in your space.

    Reply
    • Liz Fourez says: September 14, 2015 at 5:02 pm

      Hey Elizabeth! I’m so happy you found your way to Love Grows Wild! Welcome. 🙂

      Reply
  7. Elizabeth says: September 12, 2015 at 8:16 am

    Forgot to mention how much I love the lace curtain idea too!!

    Reply
  8. Mindy says: September 12, 2015 at 10:20 am

    It turned out amazing. I love me some chunky trim.

    Reply
  9. Cindy says: September 12, 2015 at 5:11 pm

    Beautiful! Perfect proportions.

    Reply
  10. Jamie Lockard says: September 13, 2015 at 3:42 pm

    Ooooooh…lovely transformation.

    Reply
  11. Sarah says: October 4, 2015 at 11:43 pm

    Just beautiful! What type of wood did you buy for this?

    Reply
    • Liz Fourez says: October 7, 2015 at 11:55 am

      Just regular white (or pine) wood!

      Reply
  12. Becky says: October 15, 2015 at 10:42 pm

    I’ve been planning to do the windows in my new addition along with the existing windows in this old house of mine. Thank you for posting the how-to with the pics and details! I’m definitely convinced to do it now!

    Reply
  13. Tarahlynn says: October 28, 2015 at 4:49 pm

    What a major transformation for sure! Love your wood walls too! We did something a lot simpler in our old farm house during the remodel but I’ve been considering going back and making it chunkier with more detail like this! Very cool!

    Reply
  14. Martha King says: November 4, 2015 at 3:44 pm

    I have a flat window surface – so would I do the same without the cuts in the flat ledge pieces on top and bottom? Will they be secure enough?

    Reply
  15. Susan Nenichka says: November 7, 2015 at 9:49 am

    Hello,
    Your room is beautiful in my eyes anyway.I would love to see the whole room because it looks like my second floor room and I have never seen one redone.Our room has never been touched and seriously needs attention this year. If you could help ,I am no decorator. Nice job.

    Reply
    • Liz Fourez says: December 30, 2015 at 3:47 pm

      Hi Susan! It has definitely been interesting decorating an attic space like this. I promise to show more photos soon!

      Reply
      • Susan Nenichka says: December 31, 2015 at 7:39 am

        I can,t wait! Thank you.

        Reply
  16. ann marie says: December 19, 2015 at 10:26 am

    Love it! Would you recommend doing the same size boards around a door frame?

    Reply
    • Liz Fourez says: December 30, 2015 at 3:14 pm

      Yes, that would look beautiful to match the window trim!

      Reply
  17. Karen Boutin says: January 5, 2016 at 10:57 am

    Very nice! My house is a 100 + year – old New England Colonial that my husband bought before I met him. He had 99 % of the architectural detail ripped out of it and actually paid for “improvements” such as drop ceilings and fake birch paneling. I am an avid DIYer who loves original detail. For lack of it, the style I chose for the house is Modern Rustic. Your window trim project would fit right in with the style of my home, and would look far better than the current 1 x 4 boards that serve as both doorway and window trim.

    Reply
    • Liz Fourez says: January 6, 2016 at 5:25 pm

      A woman after my own heart. 🙂 I bet this trim would look great in that Colonial!

      Reply
  18. Cassie says: January 27, 2016 at 9:24 am

    Can you list all the tools you needed for this project?

    Reply
    • Liz Fourez says: February 1, 2016 at 11:33 am

      Hey Cassie! Here’s a quick list for you: saw, brad nailer (or hammer and nails), caulk, nail filler, primer, paint, paint brush

      I hope this helps!
      Liz

      Reply
  19. Mark says: February 16, 2016 at 10:58 pm

    Showed this to my wife, and she and I both agree we want this for all the windows in our house. Course, that means I’ll be doing 99% of the work, but no biggy. One thing though, the reason why your window sill wouldn’t come out is because it is nailed in before the window was installed. I’m a home remodeler, and it’s always a pain to have to replace window sills.

    Reply
  20. Marilyn says: February 25, 2016 at 10:15 am

    Wow! Awesome and exactly what I want. But I have outside mount windows and want to make them inside mount windows. How can I do that?

    Reply
  21. Kelli says: February 29, 2016 at 7:45 pm

    Love the window frame. What a statement! You have inspired me to try this in my master bedroom. Right now I’ve created my inspiration board and plan it post. I linked my inspiration to your post. I hope that is okay.

    Reply
    • Liz Fourez says: March 9, 2016 at 12:18 pm

      Of course! Thank you!

      Reply
  22. Nicole says: March 4, 2016 at 12:32 pm

    Did you use matte paint on the trim or gloss?

    Reply
    • Liz Fourez says: March 9, 2016 at 12:05 pm

      Hey Nicole! I prefer more of a matte paint instead of glossy, but for trim I meet in the middle with a satin finish. It’s easier to clean than flat paint, but doesn’t have the sheen that gloss has. I hope this helps!

      Reply
  23. April says: March 15, 2016 at 8:51 pm

    Hello,
    Everything looks great! I will be able to use some of your tips for my room. I have a question that is not related to the window trim or decorating, but I feel as though it pulls the whole thing together. I am wondering where you go the bed and why brand it is. The right bed I feel completes the look of a bedroom? Thank you for your time!!

    Reply
  24. Meddena says: March 27, 2016 at 8:20 pm

    Love Love Love the window trim – we are in the process of renovating a 1925 home and are at the trim stage almost – so glad I found this site! We took the sheetrock off the walls, ceilings and carpet off the floors and found tongue and groove walls , beadboard ceilings and wood tongue and groove floors and best part was a FIREPLACE – so happy! Thanks for posting pics!

    Reply
  25. Casey Horner says: April 13, 2016 at 8:27 pm

    This project is beautiful! When you nailed the trim to the shiplap what size were the nails? We are doing this whole project in our dining room and am not sure if I should butt the shiplap up to the trim or nail the trim on top…we are using 1/4 inch plywood for the shiplap look. What are your thoughts? Thanks!

    Reply
    • Liz Fourez says: May 10, 2016 at 3:06 pm

      Hey Casey! If you are doing both the shiplap and new trim, I would install the trim over the shiplap. I think it has a more finished look!

      Reply
  26. Pam Fox says: April 13, 2016 at 11:09 pm

    I’ve been trying to decide what I wanted to do to frame out the big, basic contractor mirror in our bathroom. I think this will work great! Thanks!

    Reply
  27. Teresa Brause says: April 15, 2016 at 4:18 pm

    I love this! We live in an old 100 yr house and seems as if we are always doing something to it. 35 years ago we put in a new window to replace the old one in the dining room. The fad at the time was the plain narrow trim. Well it didn’t work out so the carpenter ended up putting up 1×6 trim around the window and he felt terrible! I loved it. Now we are again replacing windows and I want to do this to ALL the windows – Still love the look. Thank you for sharing!

    Reply
  28. KATE says: April 20, 2016 at 3:51 pm

    I could kiss you!! I have been trying to think of how to do our windows and didn’t love any of the things I came up with. This is fabulous!!! Thank you for the step by step process!

    Reply
  29. Jody says: June 18, 2016 at 11:40 pm

    Liz,
    I love this window! Question is the paint color you use dove white or white dove by Benjamin Moore? Wasn’t sure if they are the same.
    Also do you paint the walls a different sheen?
    So excited to add this trim to our windows! Thanks for the tutorial.

    Reply
    • Liz Fourez says: July 11, 2016 at 9:47 pm

      Hi Jody! Great question! The color I used in my bedroom is Dove White by Valspar, and I kept everything the same sheen for simplicity. I hope this helps! 🙂

      Reply
  30. Eliza says: July 13, 2016 at 11:09 pm

    Wow this looks like something I could actually do. A very finished and designer look though! Beautiful! What kind of saw did you use to cut the extra window sill?

    Reply
    • Liz Fourez says: August 20, 2016 at 11:53 am

      Hey Eliza! If I remember correctly, I used a circular saw to make those cuts. A jigsaw would work too! I hope this helps!

      Reply
  31. Shannon says: July 28, 2016 at 12:03 pm

    Love the look. Where did you nail the wood into the wall? Are the nails visible?

    Reply
    • Liz Fourez says: August 20, 2016 at 2:00 pm

      Hi Shannon! The brad nails aren’t very big, so you can’t see them in the pictures unless you look closely. But once you prime and paint over the boards, you can’t see the nail holes at all! If you do notice big holes that paint won’t fill in, go ahead and use spackling paste to fill the holes in before painting! I like to use this spackle by Dap. 🙂

      Reply
  32. Rob says: July 30, 2016 at 12:41 pm

    Wow, it looks great…but I find it hard to believe you spent under 10$ on the lumber. Which store did you purchase your materials from for this?

    Reply
    • Liz Fourez says: August 20, 2016 at 1:53 pm

      Hi Rob! The closest home improvement store to our house is Menard’s so I usually buy my lumber there, and I do find it to be slightly less expensive than other stores, but not by much. The big factor in keeping costs down for this project is which type of lumber you use. I opted to use standard pine boards that are less expensive because they will often times have some sort of irregularity to them like knots or bends. I sometimes have to sort through the stacks of lumber to find the straightest boards, but if you are looking at doing all the windows in your house, using these basic boards will definitely help keep costs down. You can certainly use the higher quality wood, but I find that since I am caulking and painting the trim anyway, you can’t tell that it isn’t the expensive stuff! 🙂

      Reply
  33. Mariele says: September 21, 2016 at 1:17 am

    Fantastic!! I’m definitely doing this to my window, too. <3 <3 Beautiful!! (I also buy at Menards and am familiar with the sifting through process, lol)

    Reply
  34. Rob Pyler says: October 20, 2016 at 11:31 am

    You did an amazing job. I am most impressed in how you worked around the window sill, the piece of wood you added is sheer genius. I wish the photos had shown a bit more of the way you placed the curtain, and how does it look from the head of the bed.

    Reply
  35. Kim says: January 8, 2017 at 9:58 pm

    I can probably figure it out, but do you have the dimensions for a door frame as well?

    Reply
  36. Jaime says: February 26, 2017 at 9:21 pm

    Did you sand down your boards after making the cuts?

    Reply
  37. Ruth Clark says: May 8, 2018 at 7:04 pm

    love your style and how well you put this together!

    Reply

Leave Your Comments Cancel reply

Your email address will not be published. Required fields are marked *

W E L C O M E

W E L C O M E

Welcome, sweet friends! My name is Liz, and I started Love Grows Wild in 2012 with a passion for interior design and homemaking and a dream to help others create a home they love.
Here you’ll find simple project tutorials, holiday and entertaining ideas, and my journey renovating a 1940’s farmhouse that I live in with my two boys and French bulldog.
Read more about Liz >>

LET’S CONNECT

FOLLOW ALONG

POPULAR POSTS

RECIPES

TUTORIALS

Categories

Recent Posts

  • Blogger Liz Fourez shares her One Pot Lasagna recipe, a quick and easy weeknight meal that is sure to become a dinner staple in your kitchen.
    Easy One Pot Lasagna
    Recipes
  • the hair, makeup & beauty supplies blogger & designer Liz Fourez can't live without!
    10 Things I’m Loving Lately
    Style + Beauty
  • Home blogger and interior decorator Liz Fourez shares her favorite finds for outdoor furniture and decor
    Best Outdoor Furniture and Decor from Target
    Decorating and Home, Seasonal, Tutorials
  • Home blogger and interior decorator Liz Fourez shares her home office that features antique furniture as the perfect storage pieces for her business.
    Office Updates for my Interior Decorating Business
    Decorating and Home, Our Home
  • Home blogger and interior decorator Liz Fourez shares a shopping haul from Tuesday Morning and shows ideas for styling her favorite finds.
    Tuesday Morning Shopping Haul
    Decorating and Home

Liz Fourez started Love Grows Wild in 2012 with a passion for interior design and homemaking and a dream to help others create a home they love.  From simple project tutorials, to holiday and entertaining ideas, to her journey renovating a 1940’s farmhouse, Liz demonstrates how to create a beautiful and inviting home with a handmade touch. She turned her signature cozy, neutral style into a best-selling book in 2016 and continues to inspire readers with her captivating photography and easy decorating ideas. Read more about Liz > > > >

  • contact
  • MEET LIZ
  • advertise
  • privacy policy/disclosure
  • Blog
You know that book about the horrible no good, ver You know that book about the horrible no good, very bad day? That was yesterday over here. 😂 I won’t go through the list of terrible bad things that ended with needing a generator at almost 11 pm, only to have power restored approximately 5 minutes after finally getting said generator... 🤦🏼‍♀️

because things always could have been worse & after a good night of sleep, my attitude for this new day is much better. I have a Spring Market to prepare for at @lovegrowswildmarket this weekend, some fun projects coming up next week, and I have POWER today so I can accomplish all the things. Life is good!

Tell me I’m not the only one who occasionally has one of those “I couldn’t make this up if I tried” horrible no good very bad days... 

Here’s something helpful 😂: 
The Best Way to Hang Curtains

https://lovegrowswild.com/2021/02/the-best-way-to-hang-curtains/
One Pot Lasagna. A quick & easy dinner recipe that One Pot Lasagna. A quick & easy dinner recipe that the whole family will love!

This dish has all the goodness of a classic lasagna, but with a much more simple cooking method. Instead of making separate layers and baking the lasagna in the oven, I add everything to a large pan and cook it right on the stove… meat, noodles, sauce, and all! The cheeses go in right at the end to give that creamy finish to the dish, and the whole meal is ready in under 30 minutes. I like to add a salad and some garlic bread to go with it!

Be sure to read my notes in the recipe for easy swaps to make this dish on the lighter side!

Recipe at: https://lovegrowswild.com/2021/04/easy-one-pot-lasagna/
It’s been a minute since I’ve posted any new r It’s been a minute since I’ve posted any new recipes I’ve been loving, and I know you’re mostly here for the decorating advice. ☺️ But I love to cook and want to share anything that can make your home life a little easier and more enjoyable. So let’s talk about this delicious Easy One Pot Lasagna!

This dish has all the goodness of a classic lasagna, but with a much more simple cooking method. Instead of making separate layers and baking the lasagna in the oven, I add everything to a large pan and cook it right on the stove… meat, noodles, sauce, and all! The cheeses go in right at the end to give that creamy finish to the dish, and the whole meal is ready in under 30 minutes. I like to add a salad and some garlic bread to go with it!

Be sure to read my notes in the recipe for easy swaps to make this dish on the lighter side!

EASY ONE POT LASAGNA
link in my profile:

https://lovegrowswild.com/2021/04/easy-one-pot-lasagna/
“Hey Alexa, add clean the deck cushions to my ca “Hey Alexa, add clean the deck cushions to my calendar this week...”

Just kidding, I don’t even have an Alexa. 😂 But I DO have a tutorial on my blog showing a really good method for cleaning all your outdoor cushions & pillows to keep them looking brand new!

Go check it out, and be sure to save & pin this post for easy reference next year! 
• link in my profile

https://lovegrowswild.com/2020/04/how-to-clean-your-outdoor-cushions-pillows/
It’s hard to believe how this kitchen looked jus It’s hard to believe how this kitchen looked just five years ago (swipe to see)

Taking out an old chimney to make room for a pantry cabinet and opening up the wall between the living room & kitchen were two of the biggest changes we made, and I’m so glad I committed to making those projects happen... despite concerns from my contractor that this would limit the space for a massive tv in the living room. 🤦🏼‍♀️

Classic case of a man’s design priorities vs. a woman’s. 😂 Tell me one thing in your home that you and your partner don’t agree on! This should be entertaining. 🤣

See full details of the kitchen makeover here: link in my profile

https://lovegrowswild.com/kitchen-makeover-series/
Did you have a good Easter weekend? The weather wa Did you have a good Easter weekend? The weather was absolutely perfect yesterday, and it has me so excited for sunny days planting flowers and evenings relaxing on the deck. But first, I have some projects in the boys’ bedrooms to finish up! 

Alright Monday... let’s do this. 🙌🏻

Speaking of outdoor projects, want to know the best way to paint your wicker furniture?

link in my profile:
https://lovegrowswild.com/2019/06/how-to-paint-wicker/
S E E M O R E F O L L O W O N I N S T A G R A M

Copyright © 2021 · Prima Donna theme by Georgia Lou Studios

COPYRIGHT © 2017 · DESIGN + BRAND: BLISS AND TELL BRANDING COMPANY