
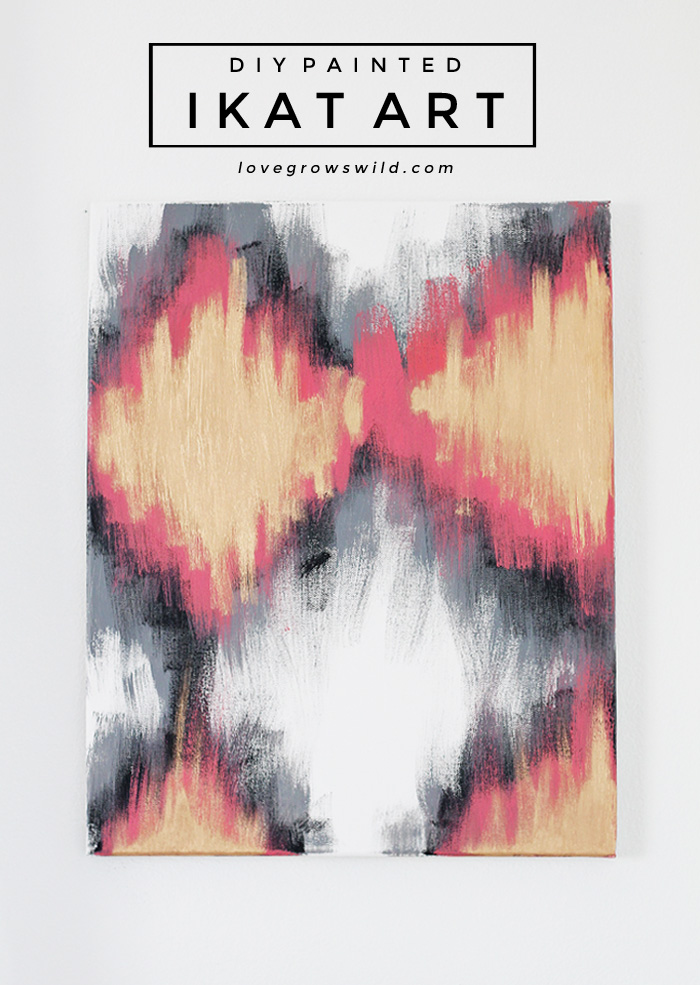
Forget spending top dollar on a fancy piece of art… creating your own custom artwork is easy! I’ll walk you through each step of painting this ikat-inspired canvas that can be personalized with your favorite colors.

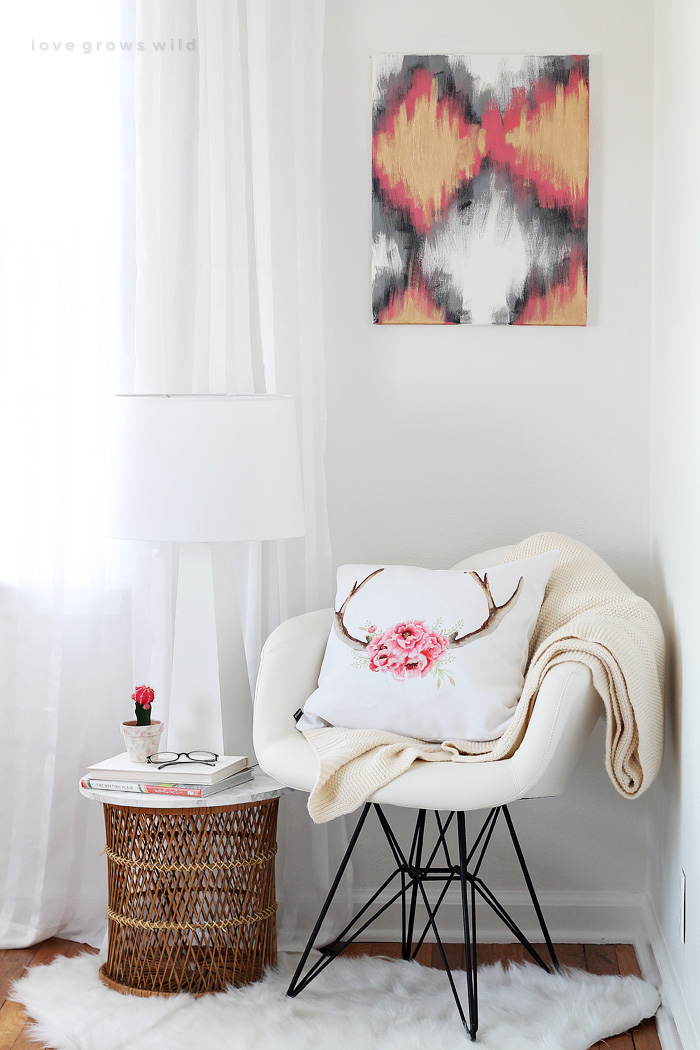
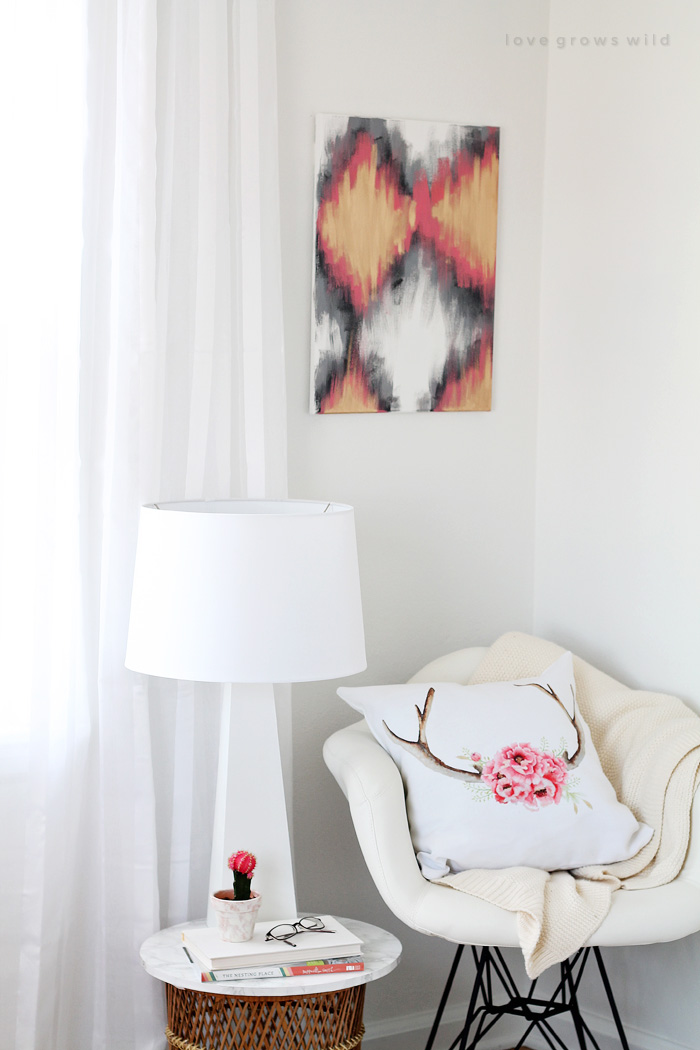
Now that a majority of the projects in my office have been finished (minus a giant cabinet that will be painted once the weather isn’t sub-zero), I’m having fun playing around with some finishing touches. All the walls have been painted white (best decision EVER!), which keeps the room feeling light, bright, and airy, but I do need to add some artwork to the walls to make it feel more like a decorated office vs. an insane asylum (as Jeremy so lovingly likes to call it).
As I mentioned the other day, my original vision for this space was modern and glam, but as all the puzzle pieces started falling into place, I realized the room was lacking that comfort and coziness that I love about rustic-style decor. The room was screaming, “I need a little shabby-chic up in here, Liz!” When a room speaks… you must listen.
So I’m making a few changes here and there… you’ll see more of them coming in the next few weeks. But today I want to show you what happened when I decided to play “artist” for a day. If I’m being totally honest, I was a little intimidated trying to create some super cool painting to go on my wall… art was NOT my strong suit back in my brace-face middle school days. But I managed to whip this ikat-inspired painting out in an afternoon, and I have step-by-step photos to show you exactly what I did.
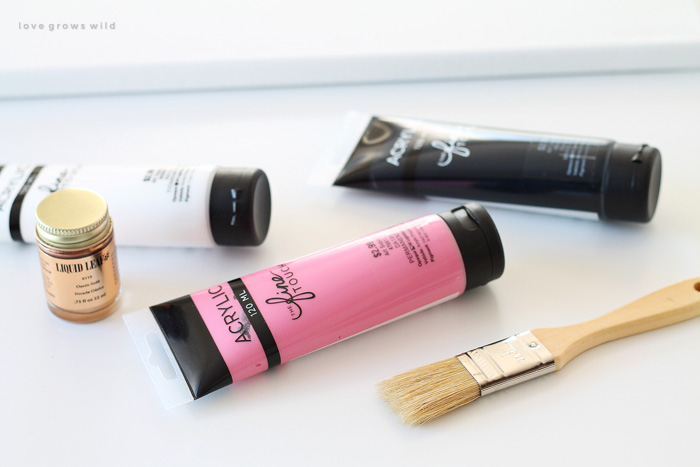
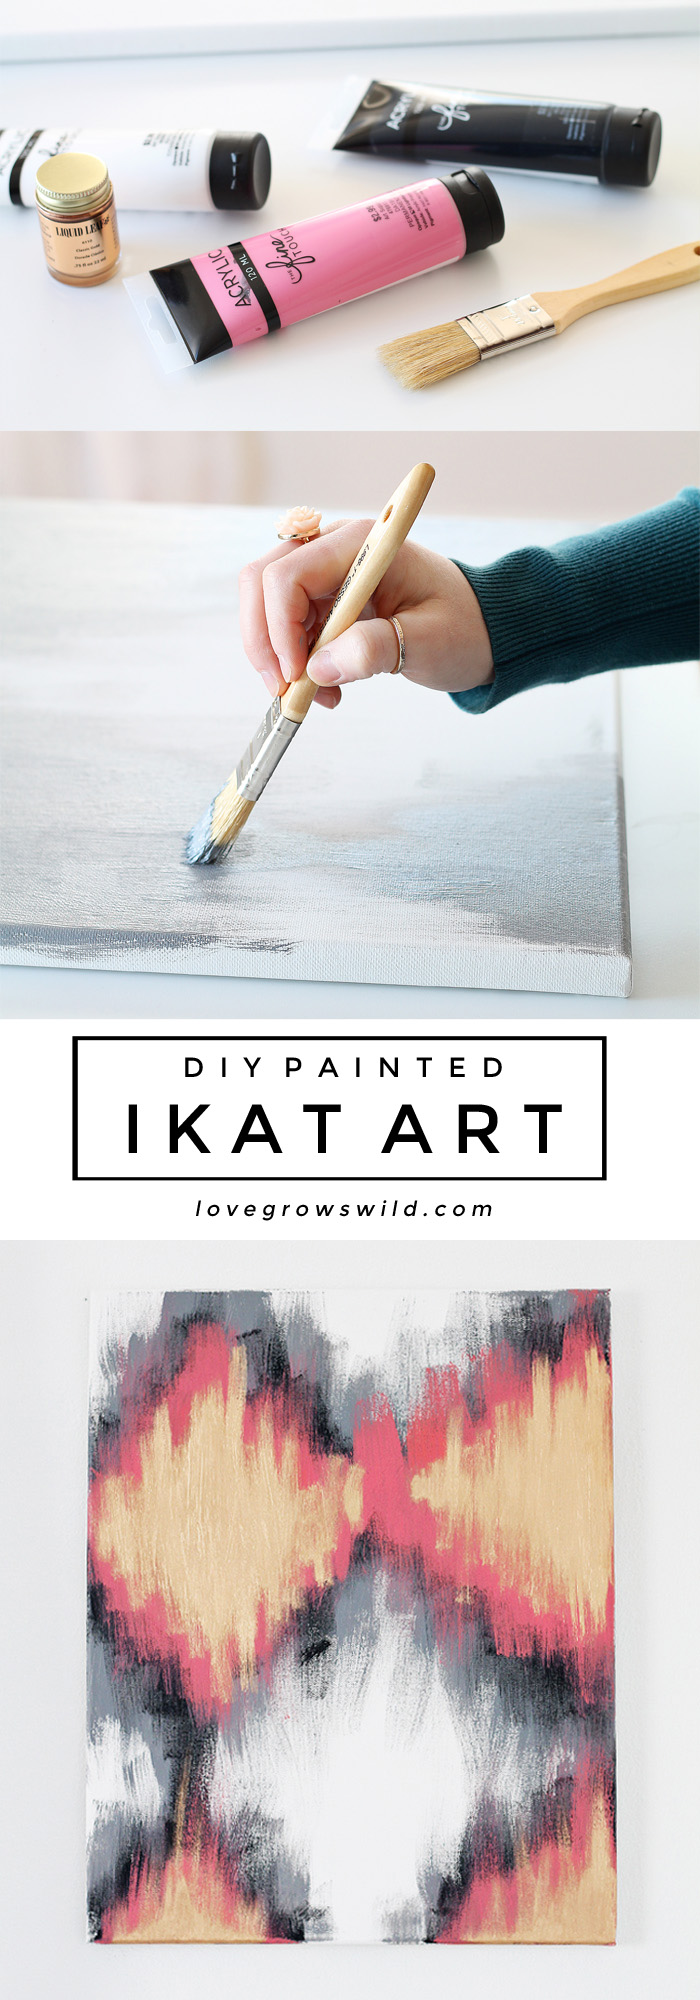
Supplies:
- canvas
- acrylic paint (I used The Fine Touch acrylic paint from Hobby Lobby)
- liquid gold leaf (like this one
from Plaid)
- paint brush
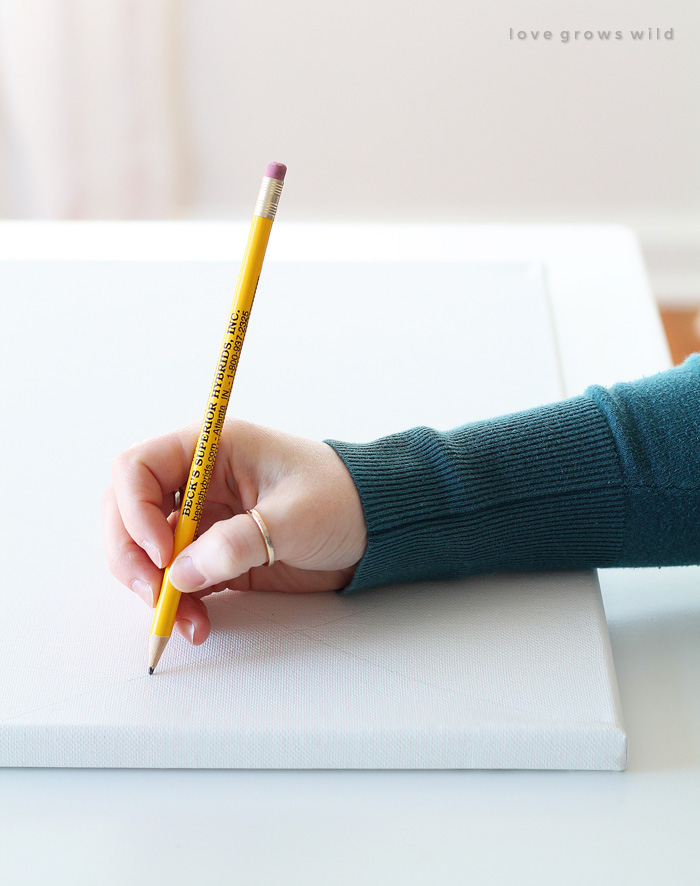
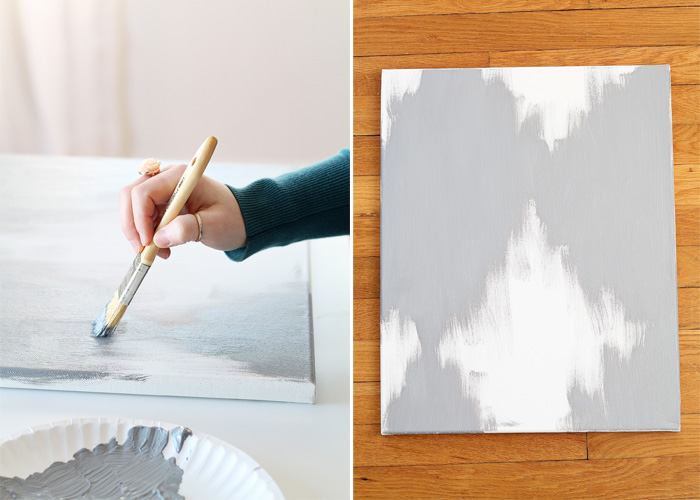
To mimic the look of ikat, I started by very lightly drawing a large diamond pattern on the canvas in pencil. It doesn’t have to be perfect… this just gives you a guide to start your painting.
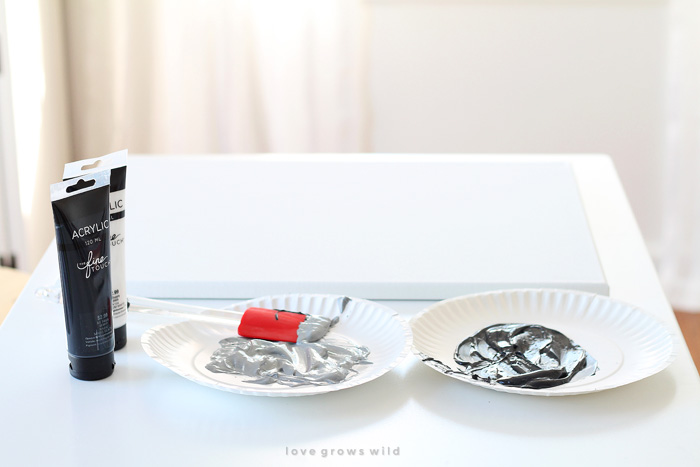
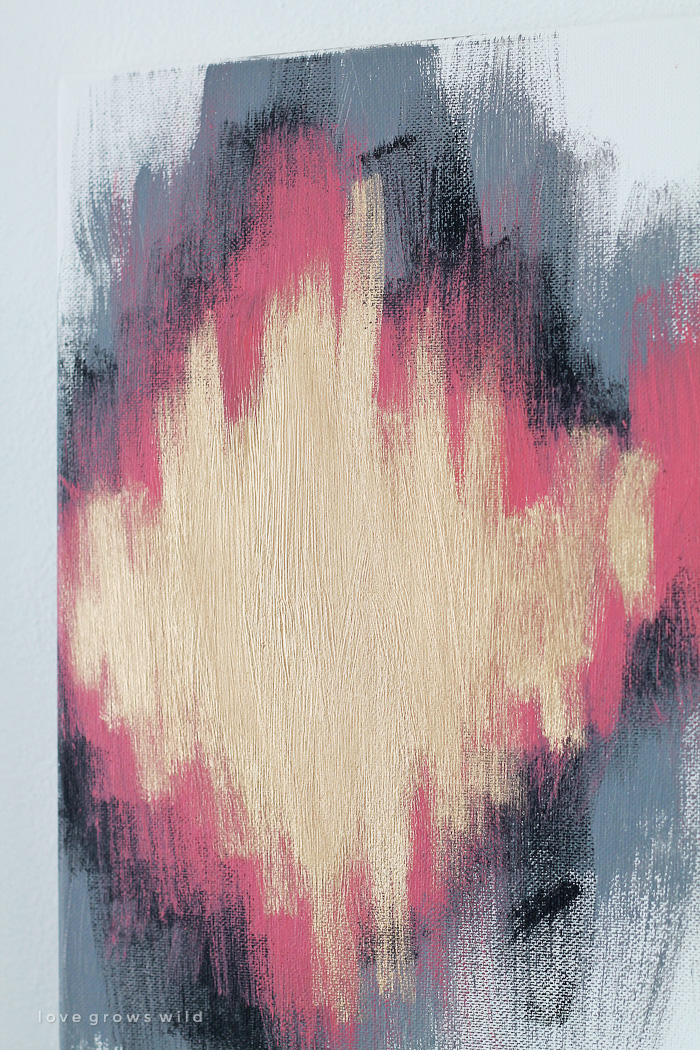
For my painting, I decided to go with 4 layers of color: light gray, dark gray, pink, and gold. I used a tube of black and white acrylic paint to custom mix my grays and used the liquid gold leaf for a bright, shiny, reflective gold layer. As far as painting tools go… look no further than your kitchen! I grabbed some cheap-o paper plates and used a rubber spatula to mix my paint colors. Keepin’ it classy up in here.
This painting is all about layering, so it’s done in 4 different stages. For my first layer, I chose the light gray. I wanted the painting to be a little more abstract than picture-perfect, so I painted the inside of the diamonds solid, then feathered some paint outside the edges to give it a messy look. I also made sure to feather a bit of paint around the sides of the canvas since I don’t plan on framing the piece. Again, do not stress over perfection! The messier it is, the better it looks.
I want the colors to layer, not blend together, so allowing a good amount of dry time in between layers is key. The first layer dried pretty quickly, but once you start stacking more and more paint, each layer will require a longer drying time.
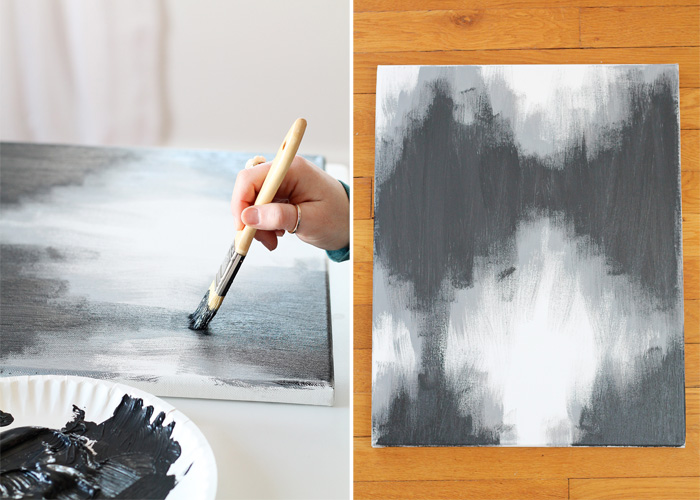
For the next layer, I used dark gray. Same technique as before, just layering the dark gray over the light gray in a slightly smaller diamond shape.
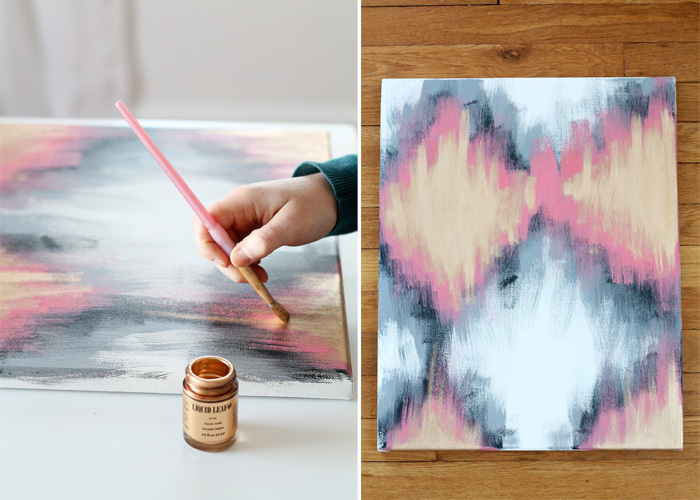
Next, the pink.

Then for the last layer, I switched to the liquid gold leaf. This stuff is AWESOME with a capital A! I used a slightly smaller paint brush this time and painted on the gold leaf in the same manner as the previous layers.
I could hardly wait for my masterpiece to dry before hanging it on this wall in my office!
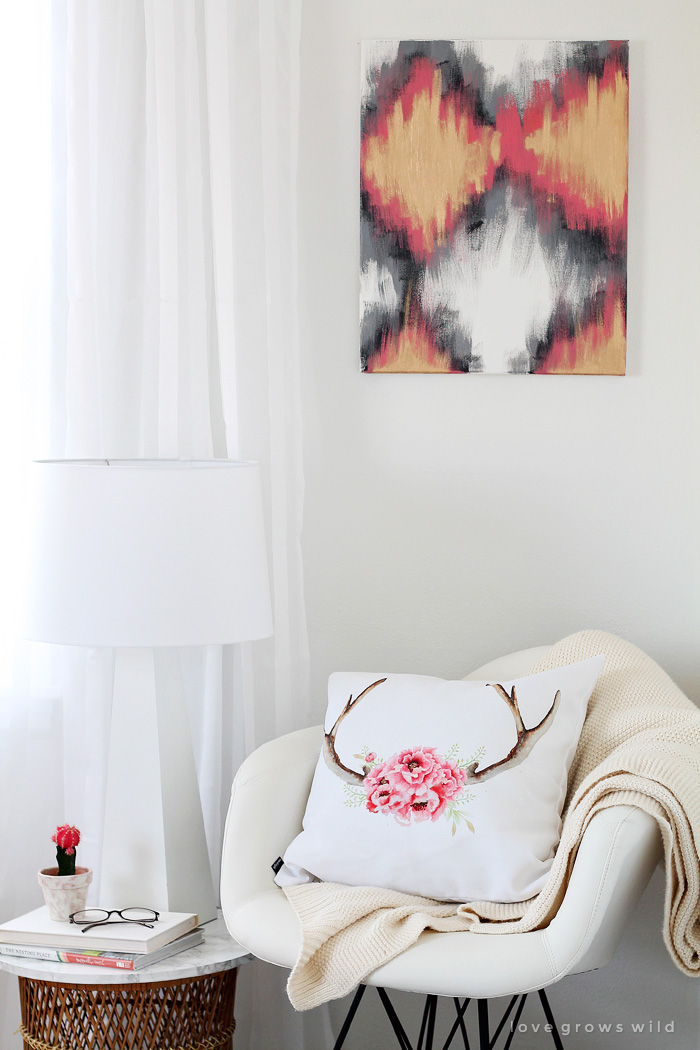
I love how it ties together the pink flowers in my favorite Society6 pillow and the black base of my reading chair.
As you paint on all the different layers, you start getting these little lines and ridges of paint built up that give the painting depth and dimension. You can’t get that from some cheap art replication from a big box store! And when the sun hits that shiny gold leaf paint… pure gorgeousness, my friends. I’m calling this project a success!
SHARE YOUR THOUGHTS!
So tell me, what do YOU think of the painting? Do you like the ikat look? What colors would you use? Do you want to see more do-it-yourself art ideas like this? I’d love to hear your feedback!
Like what you see? Subscribe to Love Grows Wild so you’ll never miss a post!
Follow along on Pinterest, Google+, Instagram, and Facebook for more fun!
Are you making this project? I’d LOVE to see it! Post a photo of your creation on Instagram and use the hashtag #MyLGWProject. It may just get featured!
Wait, there’s more! Check out these DIY decor ideas:
LET’S KEEP IN TOUCH!
Subscribe to Blog | Browse my Shop | Follow on Facebook | Follow on Twitter
Follow on Google+ | Follow on Pinterest | Follow on Instagram

Wow! As you said — pure gorgeousness! Hmmmmm… (Can you hear the wheels turning in my brain?) Wonder if I could add fabric paint medium to the paint and do an entire drop cloth? I have been looking for fabric in some kind of an ikat pattern to reupholster a little club chair for my bedroom — it will take about two large drop cloths, I think. About 10 yards of febric in 45″ width. And that much ikat is EXPENSIVE!! This pattern would definitely provide that touch of gorgeousness I’m looking for. (Okay, I’ll admit that I’ve got eyes bigger than my to-do list, but at least I can put it on the back burner and let it simmer, right?)
I do hear the wheels turning, and I am LOVING the way you think! I think that is a fantastic solution for finding an inexpensive ikat fabric for your chair. Especially when you need such a large amount! You MUST show me pictures if… no, not if… WHEN you decide to tackle this! I bet it will turn out fantastic. So glad you stopped by today! 🙂
Gorgeous! It inspires me to make one, too.
Thank you so much, Amy! It was super easy to do!
This is fabulous! I’m in need of some art for our family room and my son’s nursery needs are still bare because I haven’t found anything I wanted to commit to. This is giving me some great new ideas!
Thank you, Courtnee! Glad I could get those creative gears turning! You can use these basic techniques to create all kinds of gorgeous paintings that fit your style and favorite colors. Have fun playing with a little paint!
Clean and good tutorial. Thanks for sharing. My sister will be thrilled to try this one day.
Thank you so much, Karla! Glad you could stop by!
This. Is. AMAZING! I’m so glad I found you on the TT&J link party! Love your style and blog and excited to see more. I’m such a sucker for ikat print and have been looking for some inspiration to do my own art piece for our master bedroom, so thank you! Kind of bummed I didn’t think of it myself, though… lol 😉
You are too sweet, Rachel! Welcome to Love Grows Wild! I’m a sucker for ikat too… pillows, curtains, artwork… I want it all! 🙂
I am defiantly inspired! I was thinking about doing a chevron design because it seemed less intimidating to me but after seeing this I think I might be able to handle it!
Thank you!
Chevron would be cute too, and I definitely think you can handle this! Thank you so much for stopping by, Donna!
That came out great! And your office is beautiful, too!
Thank you so much, Amy! My office has come a LONG way over the last few months. It’s a space I actually WANT to work in now! 🙂
Fantastic! I love this! Pinning to the Monday Funday board. Thanks for linking!
Yay! Thank you, Katie!!
When I saw “Ikat”, I had to look further. Your tutorial is wonderful!!! I too have been looking for affordable ikat fabric to cover a chair!!! Thanks very much for sharing your talent with all of us “wannabe artists.”
This idea may just be a great solution for your chair! I’m totally smitten with Ikat as well. 🙂 Thank so much for stopping by to check out my painting!
This is AMAZING. I love your house, thank you for the inspiration! I definitely want to start a gallery wall and add a big canvas painting like this in my living room. Maybe someday when I get my new blog started I’ll come back to this post to give you my before and afters 🙂
I would LOVE to see that, Crystal!! Before and afters are always fun to check out. 🙂 So glad you found some inspiration here!
I LOVE DIY paintings and I am going to have to try this one. Painting is so relaxing and has become a hobby of mine. Is there a reason you used the liquid gold instead of gold paint? I wonder if one is better than the other? I have a few cool DIY paintings that I have made with alternating colors using medical tape to make various sized triangles. Fun!
Hey Crystal! That’s a great question. There are some fantastic gold paints out there, but the liquid gold has a beautiful metallic shimmer that other paints can’t compete with. It reflects light beautifully! Gold paint would certainly work just fine though. It sounds like you are quite the artist!
This is fabulous! We are so going to do this. Thanks so much for the inspiration!
Blessings,
Nici
You are so welcome, Nici! Thanks for checking out our project!!
You have talent, your painting is lovely! I could not make a painting by myself. I prefer to buy art. 🙂
You are too kind! And I really do think you could do this yourself! The beauty of these types of paintings is that there is no right or wrong brush strokes… you really can’t mess it up. 🙂
Just found this on Pinterest and I’m so excited to try it out this weekend. I’m super nervous that it won’t come out right, but if you promise it doesn’t have to be perfect, I might be able to figure it out. Can’t wait!!
Although I’m an artist, my primary strength is in drawing – brushes and I don’t always get along, so I love this idea of making a “deliberate” abstract, By “deliberate”, I mean you chose a design, (the diamonds), a color palette (the two grays and pink), an accent color (gold metallic!), a layered process, and allowed for “negative” space (the white between the diamonds), making for a sophisticated piece, rather than simply throwing paint onto the canvas and calling it “abstract” (which to me means, “I couldn’t be bothered”). Nicely, nicely done!