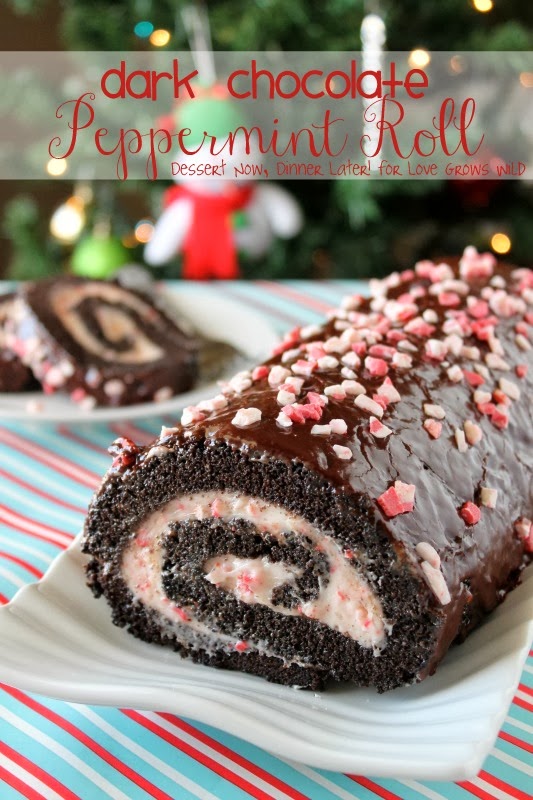
Looking for a great holiday dessert? This beautiful Dark Chocolate Peppermint Roll is sure to be a show-stopper!
Hello! It’s Amber from Dessert Now, Dinner Later! I am back with another fabulous recipe! I know Christmas is next week & you are in the thick of holiday parties galore. Just think about the “Ooh’s” & “Ahh’s” you will get if you serve this Dark Chocolate Peppermint Roll at your next party! It’s a plump, moist dark chocolate cake roll filled with peppermint chip buttercream frosting. Oh & did I mention there is a chocolate glaze & more peppermint chips on top? No? Okay, well there is!
The thing I like about this roll is that it’s not overpowering with peppermint flavor. It’s got just enough to pair well with the chocolate cake, without giving you that toothpaste feeling in your mouth. I mean, if you enjoy feeling like you just brushed your teeth as you eat your dessert, then by all means, throw some peppermint extract into the buttercream frosting. I myself, like my peppermint lighter in flavor. Enjoy!
Dark Chocolate Peppermint Roll
PREP TIME
COOK TIME
TOTAL TIME
Author: Amber of Dessert Now, Dinner Later
Recipe type: Dessert
Serves: 8-10
INGREDIENTS
- Dark Chocolate Cake:
- 6 eggs, room temperature
- 1 cup plus 2 Tbsp white granulated sugar
- ¾ tsp salt
- 6 Tbsp canola oil
- 9 Tbsp buttermilk (or milk with 2 tsp of lemon juice; let sit 10 minutes before using)
- 1 cup flour
- 8 Tbsp dark cocoa powder
- 2 tsp baking powder
- Peppermint Buttercream:
- 12 Tbsp butter, unsalted
- 5 Tbsp heavy cream
- 1 tsp vanilla
- 2-3 cups powdered sugar
- 1 cup Andes Peppermint Crunch Baking Chips, plus extra to sprinkle on top
- ¼ tsp salt
- Chocolate Glaze:
- ⅔ cup dark or semi-sweet chocolate chips
- 2 Tbsp heavy cream
- 1 tsp vanilla
- 4 Tbsp powdered sugar
- 1-2 Tbsp warm water
INSTRUCTIONS
- DARK CHOCOLATE CAKE: Pre-heat oven to 350˚F. Grease & flour a jelly roll pan. I like to grease & flour the edges & place a piece of parchment on the bottom. Prepare a kitchen towel to roll the cake in, by heavily dusting it with powdered sugar.
- In the bowl of a stand mixer, with the whisk attachment, beat eggs, sugar & salt until frothy & pale. Add the oil & buttermilk until combined.
- In a separate bowl sift the flour, cocoa, & baking powder, twice. Add to wet ingredients & mix until just incorporated. Pour batter into the prepared jelly roll pan. Bake for 15 minutes or until the cake springs back when touched; alternately check doneness with a toothpick, that when inserted in the center, comes out clean.
- Let the cake cool for 2 minutes. Then flip it out onto the powdered sugar dusted towel, remove the parchment (if you used some), & then roll it up in the towel while it's still hot. Allow to cool completely.
- PEPPERMINT BUTTERCREAM: Combine all ingredients & beat until you reach a smooth, spreadable consistency. Set aside until ready to use.
- CHOCOLATE GLAZE: Heat chocolate chips, heavy cream & vanilla in a bowl in the microwave until melted & smooth when stirred, about 30-45 seconds. Don't let it burn though! Add powdered sugar. Stir. Add warm water until desired pouring consistency (I like to keep mine semi-thick still.) Set aside until ready to use.
- Unroll the cooled cake. Spread Peppermint Buttercream on the inside of the cake, leaving a light coat where the end of the roll will be.
- Tightly roll cake into a spiral. The tighter you can get it, the better it will look. Place filled cake roll onto a wire cooling rack that has been placed inside of a baking sheet. Pour Chocolate Glaze over the top of the cake. I start on one end, & let it gather up & naturally drip over the edges as I slowly work my way towards the other end. Sprinkle extra peppermint chips on top while the glaze is still wet.
- Allow the chocolate to set before slicing & serving. You can store this at room temperature or in the fridge, whichever is your preference.

Recipe altered from Bakers Royale
Want more peppermint recipes? Try these cookies!


oh man! yum!!
I agree!! 🙂
Would this be ok to freeze? If so, before or after (that would be an even better time saver) after the glaze?
Hey Pam! I haven’t tried freezing this recipe, so I’m not sure. Maybe another reader who’s tried it has an answer? Sorry I can’t be more help!
Which side/end of the cake do you roll? I assume the long side?
Thanks!