• Home
  • MEET LIZ
  • contact
  • Blog
  • E-DESIGN SERVICE

Love Grows Wild

  • Home
  • Liz Fourez Interiors
  • Our Home
    • bathroom
    • dining room
    • entryway
    • exterior
    • kids bedroom
    • kitchen
    • living room
    • master bedroom
    • office
    • playroom
  • Project Gallery
    • diy decor
    • decorating advice + inspiration
    • furniture makeover
    • woodworking
    • crafts
  • Seasonal
    • spring
    • summer
    • fall
    • winter
  • Recipes
    • appetizers/snacks
    • beverages
    • breakfast
    • dessert
    • meal ideas
    • side dishes
  • SHOP
    • My Book
    • Shop LGW Style
    • love grows wild market
Decorating and Home, Tutorials

Fabric Covered Roller Shades with Handmade Tassel

November 1, 2013

Pin
Share
Tweet
Email
Print
Fabric Covered Roller Shade with Handmade Tassel
If you have roller shades anywhere in your home, you are about to become one very happy person! We currently live in a rental home that has roller shades on many of the windows, and you may have seen on Instagram last week when I said I’m working on special project for them! Well that mission was accomplished, and today I’m sharing the awesome transformation from plain white roller shades, to custom fabric covered roller shades complete with a handmade tassel! This easy DIY project is a great way to add color and pattern and give your home a beautiful custom look on a budget!
How to make a Fabric Covered Roller Shade with Handmade Tassel
So here’s what I started with… plain, white, boring roller shades with clearance sheer curtains from Target. We are very lucky to have tons of windows in our home, and most of them already had roller shades in them. I caught a big clearance sale at Target right before we moved in and picked up tons of packages of white sheers for $5 or less because frankly, I would go broke trying to buy nice curtains for all these windows! Oh yeah, and I used my super cheap DIY curtain rod trick on these windows too! Seriously, that trick is life-changing!
We have two big windows on the side of our living room, and I’ve been wanting to do something fun with them forever. I pinned a few ideas from Martha Stewart awhile back, (okay, like 2 years ago!) and I’m so excited to finally check this off my list! YAY for progress 🙂
How to make a Fabric Covered Roller Shade with Handmade Tassel
I started by pulling my roller shade down to the bottom of the window and measuring… I used the width of the shade plus 1 inch and the length plus about 4 inches. I wanted to leave a half inch on each side to hem the loose edges, and I wanted the fabric to cover all of the shade that is exposed when pulled down. Make sense? I hope so!
I picked up this pretty fabric from Hobby Lobby that is the perfect mix of pattern, neutrals, and a little pop of color. I am seriously smitten with this fabric! I cut it to my measurements and hemmed each edge, only folding once, 1/2 inch in. The width of the fabric is now the exact width of the shade. Take care to make a very straight hem, or it won’t line up with the straight edge of your shade! Then I ironed the fabric until I got every wrinkle out that I possibly could. Projects like this are the only time my poor iron gets used, so I tried to give it a little extra love that day 🙂
How to make a Fabric Covered Roller Shade with Handmade Tassel
Okay, now to the fun part! I took down my roller shade and opened it up on a plastic drop cloth. I taped down the bottom edge that holds the pull bar because I didn’t want that part covered in fabric. Then I laid my hemmed fabric over the shade, making sure to line up the edges starting at the bottom.
Working quickly, I applied a good amount of spray adhesive (I used Elmer’s) onto the bottom 1′ of the shade and carefully smoothed the fabric over the glue, pressing out any air bubbles. Make sure you keep an eye on the sides of the shade so you stay in line with the edges! And the glue holds best when you quickly apply the fabric, so make sure you’re all ready to go before you spray!
How to make a Fabric Covered Roller Shade with Handmade Tassel
After I applied fabric to the first bottom section, I flipped the fabric backwards over the glued part and continued spraying and smoothing fabric up to the top of the shade in 1′ sections. You’ll notice the very top of my shade isn’t covered, but I don’t pull the shade down far enough to see that part. Save your pennies on the extra fabric!
How to make a Fabric Covered Roller Shade with Handmade Tassel
I found a few things to embellish the shade with at Hobby Lobby also, so while the adhesive was setting I added those to the shade. I hot glued some rope trim to the bottom of the fabric, which gives the shade a finished look and helps hide the fact that I can’t make a straight hem 🙂
How to make a Fabric Covered Roller Shade with Handmade Tassel
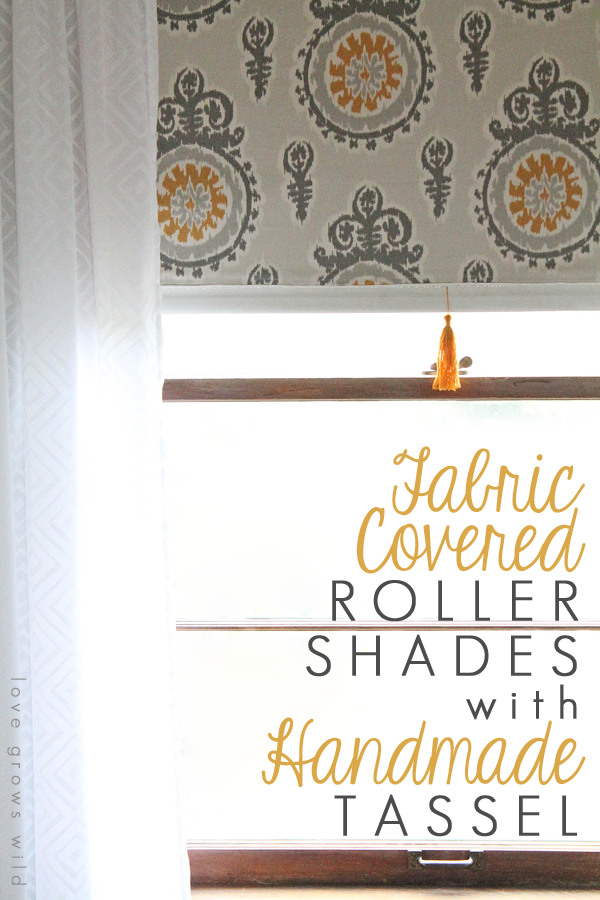
I also made my own tassel out of embroidery thread to match the yellow in the fabric. It only took one package of thread for 40 cents to make the perfect finishing touch for the shade! I seriously want to make tassels for everything in my house now… so cute!
How to make a Fabric Covered Roller Shade with Handmade Tassel
I used a small amount of embroidery thread to attach the tassel and hung my beautiful new shade back in the window! I so so so wish I could take better window photos because these just do not show how gorgeous they are in person!
How to make a Fabric Covered Roller Shade with Handmade Tassel
I love the pop of yellow from the fabric and tassel, and the fabric ties in the wall color perfectly! Do you ever finish a project and feel like you’ve conquered Mount Everest or something? That’s how I feel with this project!! I used our existing shades, spent only $16 on fabric for TWO windows, added some gorgeous pattern to the room, and I can rip the fabric off and replace it with something different whenever the mood strikes!  Not that I’ll ever get tired of this dreamy fabric 🙂
How to make a Fabric Covered Roller Shade with Handmade Tassel
Tassels. I love em. The end.
How to make a Fabric Covered Roller Shade with Handmade Tassel
HUGE improvement right?? Aside from the old windows and ugly heater underneath, I say this is perfection! Now I just need to find a cute little chair to sit next to the window and some fun pillows. Uh oh… I see a living room makeover in the works!
How to make a Fabric Covered Roller Shade with Handmade Tassel
Do you have roller shades in your home? Love em or hate em? 
Let’s Keep In Touch!
Subscribe to Blog | Browse my Shop | Follow on Facebook | Follow on Twitter Follow on Google+ | Follow on Pinterest | Follow on Instagram | Subscribe to Newsletter
P.S. I’m sharing this post at some awesome link parties… Check them out HERE!
Pin
Share
Tweet
Email
Print
DIY Decor
by Liz Fourez 
38 Comments

About Liz Fourez

View all posts by Liz Fourez

Related Posts

  • Home blogger and interior decorator Liz Fourez shows how easy it is to add lighting to any bookcase for a sophisticated and elegant look!Living Room Bookcase Lighting
  • Interior decorator and home blogger Liz Fourez shares how to make these beautiful winter planters for the holidays with fresh or faux greens!Christmas Front Porch & a Winter Planter Tutorial
  • Decorating tip: Frame a scrap piece of fabric for a simple and inexpensive piece of artwork. Home + lifestyle blogger Liz Fourez shares her advice for the best fabric options to use.Fabric: A Simple Idea for Inexpensive Framed Wall Art
  • Learn how to make beautiful floral-inspired artwork on a budget with this simple Paper Mache Pressed Flower tutorialPaper Mache Pressed Flower Art
PREVIOUS: Crispy Onion Strings
NEXT: Pecan Pie Muffins

Comments

  1. The Hartland says: November 1, 2013 at 9:28 pm

    Pretty!! 🙂

    Reply
  2. anu says: November 1, 2013 at 11:28 pm

    I have been meaning to do this with our roller shades. Love how yours turned out!

    Reply
  3. Rhonda says: November 1, 2013 at 11:47 pm

    Looks great! I love that fabric from Hobby Lobby, too! Thanks for giving such detailed instructions. Rhonda

    Reply
  4. shelley says: November 2, 2013 at 4:49 am

    i think i love just about everything you do! lol 😉 thank you for sharing this!

    Reply
  5. Tanya Runkle says: November 2, 2013 at 5:51 am

    We have a few windows with blinds, I think they need a gorgeous upgrade like this!! xo

    Reply
  6. marty (A Stroll Thru Life) says: November 2, 2013 at 3:06 pm

    Oh my word, this is gorgeous and I love your fabric. Great tutorial. I would love to have you link up to my Inspire Me party that goes live on Monday at 2:30 PT. http://www.astrollthrulife.net Hope to see you there. Hugs, Marty

    Reply
  7. Sarah Vanderkooy says: November 2, 2013 at 6:22 pm

    What a transformation, and on a budget too! Great job. I don’t have roller shades but I will be pinning this just in case 🙂

    Reply
  8. Emily says: November 4, 2013 at 12:03 am

    I just bought a home that came with roller shades in the master bedroom. I hate them…with the most passionate hate but we don’t have the funds to really do the windows the way I want with other more important projects to get done first. This is definitely a solution for the time being.

    Reply
  9. Shannah @ Just Us Four says: November 4, 2013 at 10:06 pm

    this looks great! you did an amazing job! this would be perfect for my kids baby sitter to do to her dorm blinds!

    Reply
  10. Kristin @ My Uncommon Slice of Suburbia says: November 5, 2013 at 2:57 am

    this is gorgeous

    Reply
  11. Lisa at Mabey She Made It says: November 5, 2013 at 3:07 pm

    These are so beautiful, Liz! What a great idea for updating something so plain.

    Reply
  12. Christy James says: November 8, 2013 at 2:49 am

    Love this!! The fabric is gorgeous! XO

    Reply
  13. Erin at dispassion says: November 8, 2013 at 1:21 pm

    I really love this! We had those roller shades in our old condo – I wish I had seen this earlier 🙂

    Reply
  14. Bonnie @ Our Secondhand House says: November 8, 2013 at 1:32 pm

    So cute! Thanks for sharing this. I have window shades in almost every window in my house.

    Reply
  15. the cape on the corner says: November 8, 2013 at 4:14 pm

    this looks gorgeous, but i’m still too intimidated to try this on my windows. I would probably somehow ruin the fabric.

    Reply
  16. Lyuba @ Will Cook For Smiles says: November 9, 2013 at 2:45 pm

    I just love coming to see what you’ve been up to! I bet your house is so nicely decorated 🙂 Great job, Liz!

    Reply
  17. Jocelyn says: November 9, 2013 at 3:46 pm

    Girl, you are so talented! Love the fun shade makeover!! And seriously so easy!!!

    Reply
  18. Cheryl @ The Creative Me and My McG says: November 10, 2013 at 2:40 pm

    found you over @ Roadkill Rescue – LOVE this idea! – can’t wait to take a look around your blog! I am your newest follower!

    Reply
  19. Angela Conley says: November 11, 2013 at 6:37 am

    Hopped over from the Wow Me Wednesday link party… This is a great idea for when you want the look of sheer curtains, but need to block light (like for a bedroom). Thanks for sharing!

    Reply
  20. Mary Vitullo says: November 12, 2013 at 12:35 pm

    You’ve motivated me to try this. Great tutorial.

    Mary @ Orphans With Makeup

    Reply
  21. Kristen Duke says: November 13, 2013 at 3:01 am

    Love this tutorial! The pop of color looks fabulous!

    Reply
  22. Meredith Wouters says: November 16, 2013 at 1:48 pm

    These look amazing – love the before and afters. Great tutorial!

    Reply
  23. N Young says: March 1, 2014 at 1:33 am

    Looks so great! I love it. What fabric from Hobby Lobby is that?

    Reply
    • Liz Fourez says: March 3, 2014 at 9:11 am

      Thank you! I just love those colors together. I found it in the home decor fabrics at Hobby Lobby.

      Reply
  24. JaneEllen says: April 11, 2014 at 1:34 am

    HI Liz Thanks to you, I’ve just saved $100 I was going to spend for new roman shades for our bedroom windows. Think I hadn’t ordered them yet cause I was hoping to come across a better, much less expensive idea I could do. Don’t think roller shades are $100. I love the cotton duck fabric at HL, makes so many gorgeous projects for lot less. It’s $8.99 per yard at our HL so with 40% off will be $5.39 a yard, whoooohooo. Lovin’ that. Now to decide which fabric I want to use. So many pretty ones. Think one with aqua, would love an IKAT print but not sure they have one with aqua. So glad you shared this awesome project cause I’ll be shopping for roller shades and cotton duck fabric. Happy Spring days

    Reply
    • Liz Fourez says: April 14, 2014 at 11:32 pm

      I’m so glad that worked out for you, JaneEllen! A teal Ikat fabric sounds perfect! I hope you have fun working on this little project just like I did! 🙂

      Reply
  25. Jen says: May 30, 2014 at 1:33 pm

    Any issues with them rolling up & down after this gorgeous transformation?? I am worried that since we open & close ours all the time, that the spring mechanism may not want to handle the extra weight/ bulk? Thanks Liz!

    Reply
    • Liz Fourez says: May 30, 2014 at 11:18 pm

      Hey Jen! With ours, I do have to be a little careful rolling them up and down. I used a pretty thick home decor fabric, but the shades still hold the weight just fine. Maybe try using a lighter-weight fabric if that’s something you’re worried about. You’ll have to let me know how it turns out!

      Thanks for stopping by! xoxo Liz

      Reply
      • Linda says: September 19, 2014 at 2:40 pm

        Material is beautiful, but is on wrong side of shade. Should not be able to see original shade at top.

        Reply
        • Tiffany says: November 11, 2014 at 8:59 pm

          There are two ways to do a roller shade. The first is the standard way, which is what Liz did. Typically, the roll is covered by a valance or cornice. Rolling it in this manner keeps the fabric closer to the glass.

          The second method is a reverse roll, which is what you are thinking of, Linda. It’s ideal for windows that won’t have a valance and although it would be more appropriate for Liz’s application, I think her roller shade looks absolutely awesome.

          I made some roller shades like these a few years ago and made a little gimp-trimmed valance to match using velcro to attach it to the top of the window frame. Hid the roll beautifully.

          Reply
  26. Linda says: September 18, 2014 at 12:39 pm

    Sorry but you put the fabric on the wrong side of the shade. The shade should be turned around so when the shade is DOWN, you do not see the white roll of the shade at the top. I just did one this morning with ticking and when it is pulled down you will see ONLT fabric on the shade.

    Reply
    • Liz Fourez says: September 22, 2014 at 3:17 pm

      Thank you for the tip, Linda! I’m always learning something new. 🙂 I’ve since taken down the fabric, but I appreciate the note!

      Reply
  27. Kelly says: October 24, 2014 at 7:34 pm

    Hmm…wondering if this idea would work on my scalloped shades? Has anyone tried this?

    Reply
  28. Jeaneene says: January 21, 2015 at 7:09 pm

    I love these, but have a question: Did you hem the sides of the fabric before gluing as well as the end? I can’t tell from the pictures. Also, how did you keep the whole thing straight? Did you use a square to begin with? Thanks!

    Reply
    • Liz Fourez says: January 21, 2015 at 9:44 pm

      Hi Jeaneene! I didn’t hem the sides of the fabric (out of sheer laziness). When it was time to glue the fabric down, I just started with a straight edge on the bottom and worked my way to the top. It was pretty easy to keep everything in line. I hope this helps!

      Reply
  29. Mary says: March 4, 2015 at 3:24 pm

    Switch the brackets around and rehang the shade. Your shade will now unroll over the top of the roller eliminating the problem.

    Reply
  30. Mah says: January 11, 2016 at 8:25 pm

    Hi Liz, I love this tutorial, it is so thorough. Does the shade roll up and down easily??? Would you know if this method is ideal for windows as wide as 45-46 inches? I love this project and would love to try it for my windows.

    Thanks.

    Reply
    • Liz Fourez says: January 13, 2016 at 8:46 am

      Yes, ours did! You’ll want to pick a fabric that is heavy enough to cover the roller shade, but not so heavy that it stops the shade from rolling easily.

      Reply

Leave Your Comments Cancel reply

Your email address will not be published. Required fields are marked *

W E L C O M E

W E L C O M E

Welcome, sweet friends! My name is Liz, and I started Love Grows Wild in 2012 with a passion for interior design and homemaking and a dream to help others create a home they love.
Here you’ll find simple project tutorials, holiday and entertaining ideas, and my journey renovating a 1940’s farmhouse that I live in with my two boys and French bulldog.
Read more about Liz >>

LET’S CONNECT

FOLLOW ALONG

POPULAR POSTS

RECIPES

TUTORIALS

Categories

Recent Posts

  • Blogger Liz Fourez shares her One Pot Lasagna recipe, a quick and easy weeknight meal that is sure to become a dinner staple in your kitchen.
    Easy One Pot Lasagna
    Recipes
  • the hair, makeup & beauty supplies blogger & designer Liz Fourez can't live without!
    10 Things I’m Loving Lately
    Style + Beauty
  • Home blogger and interior decorator Liz Fourez shares her favorite finds for outdoor furniture and decor
    Best Outdoor Furniture and Decor from Target
    Decorating and Home, Seasonal, Tutorials
  • Home blogger and interior decorator Liz Fourez shares her home office that features antique furniture as the perfect storage pieces for her business.
    Office Updates for my Interior Decorating Business
    Decorating and Home, Our Home
  • Home blogger and interior decorator Liz Fourez shares a shopping haul from Tuesday Morning and shows ideas for styling her favorite finds.
    Tuesday Morning Shopping Haul
    Decorating and Home

Liz Fourez started Love Grows Wild in 2012 with a passion for interior design and homemaking and a dream to help others create a home they love.  From simple project tutorials, to holiday and entertaining ideas, to her journey renovating a 1940’s farmhouse, Liz demonstrates how to create a beautiful and inviting home with a handmade touch. She turned her signature cozy, neutral style into a best-selling book in 2016 and continues to inspire readers with her captivating photography and easy decorating ideas. Read more about Liz > > > >

  • contact
  • MEET LIZ
  • advertise
  • privacy policy/disclosure
  • Blog
You know that book about the horrible no good, ver You know that book about the horrible no good, very bad day? That was yesterday over here. 😂 I won’t go through the list of terrible bad things that ended with needing a generator at almost 11 pm, only to have power restored approximately 5 minutes after finally getting said generator... 🤦🏼‍♀️

because things always could have been worse & after a good night of sleep, my attitude for this new day is much better. I have a Spring Market to prepare for at @lovegrowswildmarket this weekend, some fun projects coming up next week, and I have POWER today so I can accomplish all the things. Life is good!

Tell me I’m not the only one who occasionally has one of those “I couldn’t make this up if I tried” horrible no good very bad days... 

Here’s something helpful 😂: 
The Best Way to Hang Curtains

https://lovegrowswild.com/2021/02/the-best-way-to-hang-curtains/
One Pot Lasagna. A quick & easy dinner recipe that One Pot Lasagna. A quick & easy dinner recipe that the whole family will love!

This dish has all the goodness of a classic lasagna, but with a much more simple cooking method. Instead of making separate layers and baking the lasagna in the oven, I add everything to a large pan and cook it right on the stove… meat, noodles, sauce, and all! The cheeses go in right at the end to give that creamy finish to the dish, and the whole meal is ready in under 30 minutes. I like to add a salad and some garlic bread to go with it!

Be sure to read my notes in the recipe for easy swaps to make this dish on the lighter side!

Recipe at: https://lovegrowswild.com/2021/04/easy-one-pot-lasagna/
It’s been a minute since I’ve posted any new r It’s been a minute since I’ve posted any new recipes I’ve been loving, and I know you’re mostly here for the decorating advice. ☺️ But I love to cook and want to share anything that can make your home life a little easier and more enjoyable. So let’s talk about this delicious Easy One Pot Lasagna!

This dish has all the goodness of a classic lasagna, but with a much more simple cooking method. Instead of making separate layers and baking the lasagna in the oven, I add everything to a large pan and cook it right on the stove… meat, noodles, sauce, and all! The cheeses go in right at the end to give that creamy finish to the dish, and the whole meal is ready in under 30 minutes. I like to add a salad and some garlic bread to go with it!

Be sure to read my notes in the recipe for easy swaps to make this dish on the lighter side!

EASY ONE POT LASAGNA
link in my profile:

https://lovegrowswild.com/2021/04/easy-one-pot-lasagna/
“Hey Alexa, add clean the deck cushions to my ca “Hey Alexa, add clean the deck cushions to my calendar this week...”

Just kidding, I don’t even have an Alexa. 😂 But I DO have a tutorial on my blog showing a really good method for cleaning all your outdoor cushions & pillows to keep them looking brand new!

Go check it out, and be sure to save & pin this post for easy reference next year! 
• link in my profile

https://lovegrowswild.com/2020/04/how-to-clean-your-outdoor-cushions-pillows/
It’s hard to believe how this kitchen looked jus It’s hard to believe how this kitchen looked just five years ago (swipe to see)

Taking out an old chimney to make room for a pantry cabinet and opening up the wall between the living room & kitchen were two of the biggest changes we made, and I’m so glad I committed to making those projects happen... despite concerns from my contractor that this would limit the space for a massive tv in the living room. 🤦🏼‍♀️

Classic case of a man’s design priorities vs. a woman’s. 😂 Tell me one thing in your home that you and your partner don’t agree on! This should be entertaining. 🤣

See full details of the kitchen makeover here: link in my profile

https://lovegrowswild.com/kitchen-makeover-series/
Did you have a good Easter weekend? The weather wa Did you have a good Easter weekend? The weather was absolutely perfect yesterday, and it has me so excited for sunny days planting flowers and evenings relaxing on the deck. But first, I have some projects in the boys’ bedrooms to finish up! 

Alright Monday... let’s do this. 🙌🏻

Speaking of outdoor projects, want to know the best way to paint your wicker furniture?

link in my profile:
https://lovegrowswild.com/2019/06/how-to-paint-wicker/
S E E M O R E F O L L O W O N I N S T A G R A M

Copyright © 2021 · Prima Donna theme by Georgia Lou Studios

COPYRIGHT © 2017 · DESIGN + BRAND: BLISS AND TELL BRANDING COMPANY