
This post brought to you by Elmer’s ProBond Advanced. All opinions are 100% mine.
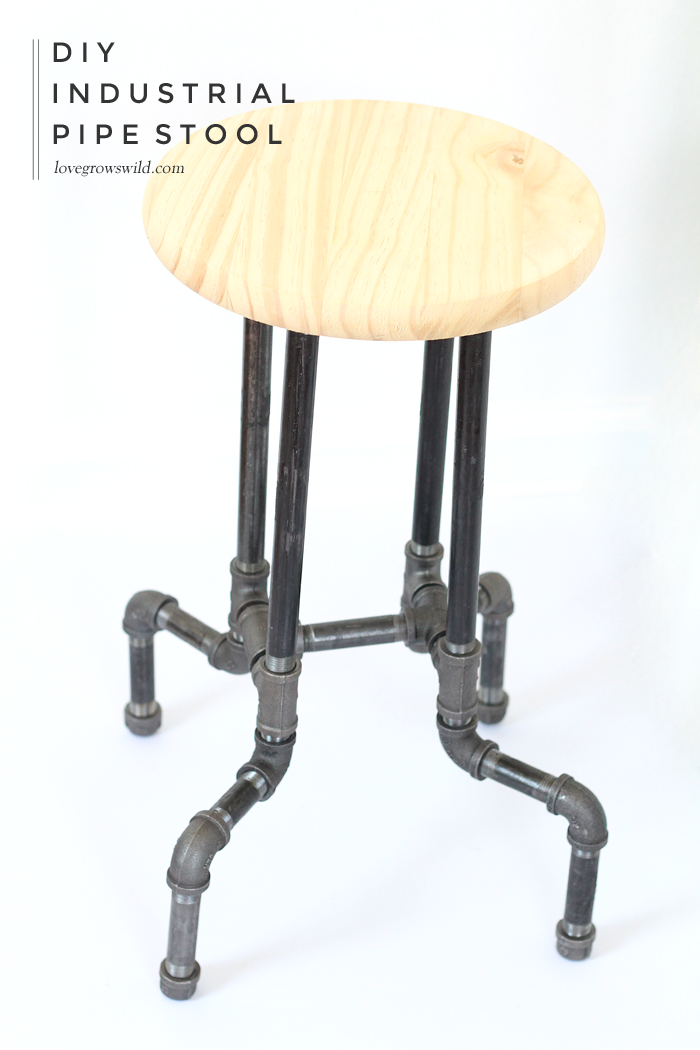
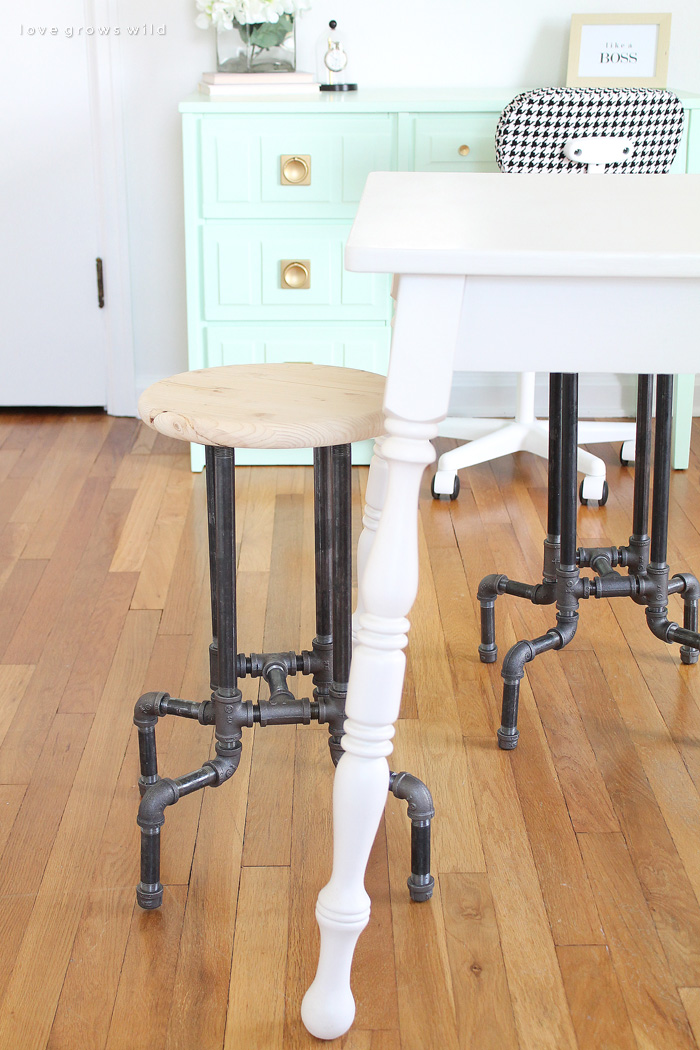
Another project checked off the office makeover to-do list, and guys… this one is really fun! I’m sure you’ve seen all the industrial pipe projects that are trending right now, and I couldn’t help but jump on the bandwagon. I don’t have room in my office for a lot of the larger projects I’ve seen like shelving units or tables, but I found a way to add a bit of that cool industrial look in a smaller size, and I promise you this is a project that ANYONE can do! I created 4 DIY Industrial Pipe Stools for my work table using plumbing pipe and wood rounds, and I am so excited with how they turned out!

So one day I got this crazy idea to build pipe stools and showed my husband a chicken scratch drawing of how I thought they could be built. After playing around with the pipes for awhile, we came up with this design that flares out at the bottom, adding extra stability and support for the stools. They stand about 21-22″ tall and about 11 1/2 – 12″ wide at the bottom (sizes will vary depending on how tight pipes are fitted), and I have all the parts, building instructions, and tips and tricks you need to whip out a couple of these babies in no time! Don’t you just love when the hard part is done for you? 🙂
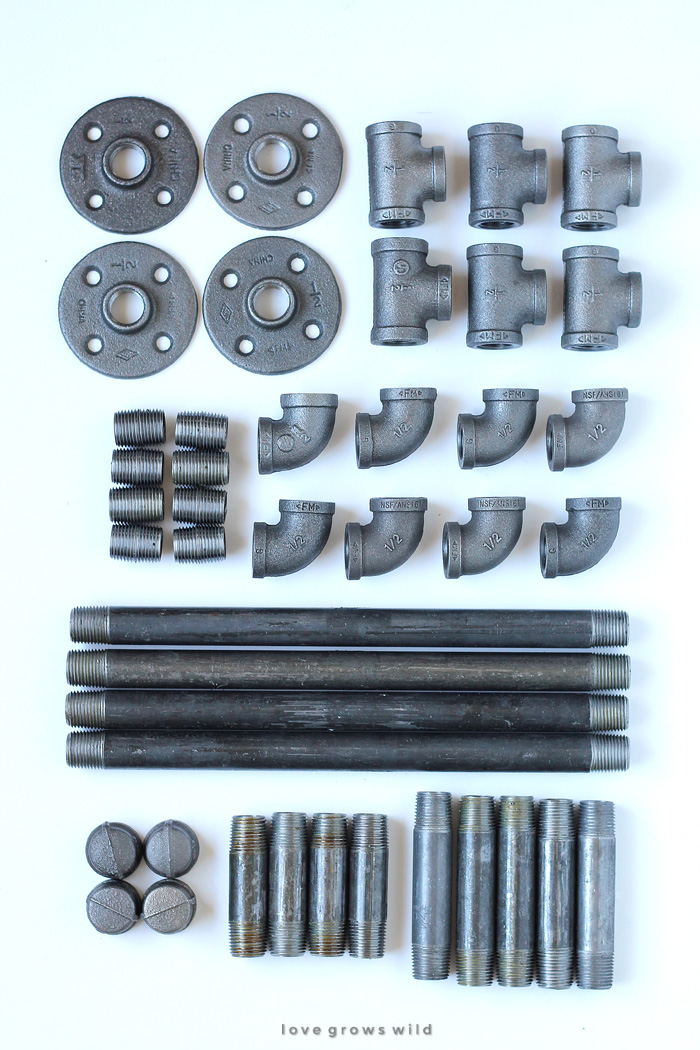
Here is what you’ll need to buy to make 1 stool:
- 1 – 12″ round wood seat (found near the lumber section in hardware stores)
- 4 – 1/2″ floor flanges
- 4 – 1/2″ x 12″ pipes
- 4 – 1/2″ x 3″ pipes
- 5 – 1/2″ x 4″ pipes
- 6 – 1/2″ tees
- 8 – 1/2″ 90° elbows
- 8 – 1/2″ close nipples
- 4 – 1/2″ caps
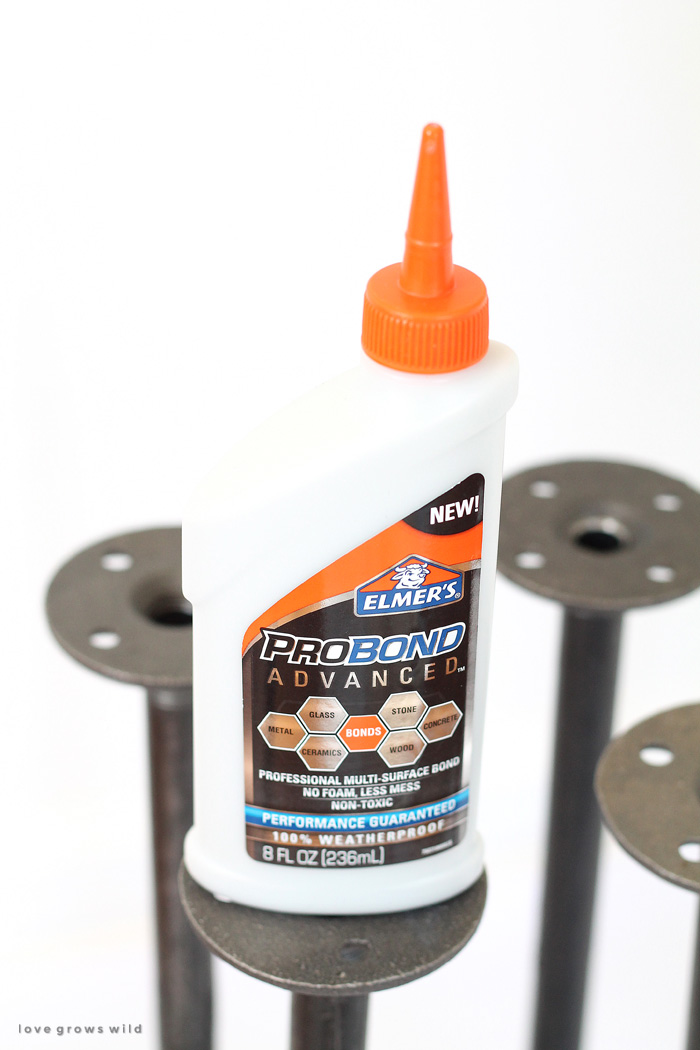
- Elmer’s ProBond Advanced
Before I show you how to build these super cool stools, I have a few tips that I learned along the way. These will help you with any kind of pipe project you’d like to tackle:
- If your pipes have price stickers on them, I highly recommend removing them BEFORE you start building. It’s much easier! Mine came off pretty easily by peeling off the top layer and using some adhesive remover for the sticky part. You can carefully use the edge of a blade to scrape the sticker off, if necessary.
- It’s a good idea to price out the pipes you need at a few different hardware stores before buying. I found one store to be almost double the price of another, so it definitely pays to do some research first! Also, the black steel pipes I picked are generally less expensive, so that’s something to keep in mind when making your decision.
- All you’re doing to build these stools is screwing one pipe onto another. Some will go on easier than others, and leverage is important when tightening the pipes. These stools technically don’t require any tools to build them, but we found that a pair of vice grips are helpful to give you better leverage.
- We recommend waiting to tighten the caps on the bottom of the legs right away. You can loosen or tighten them at the end to help level the stool, if necessary.
Instructions:
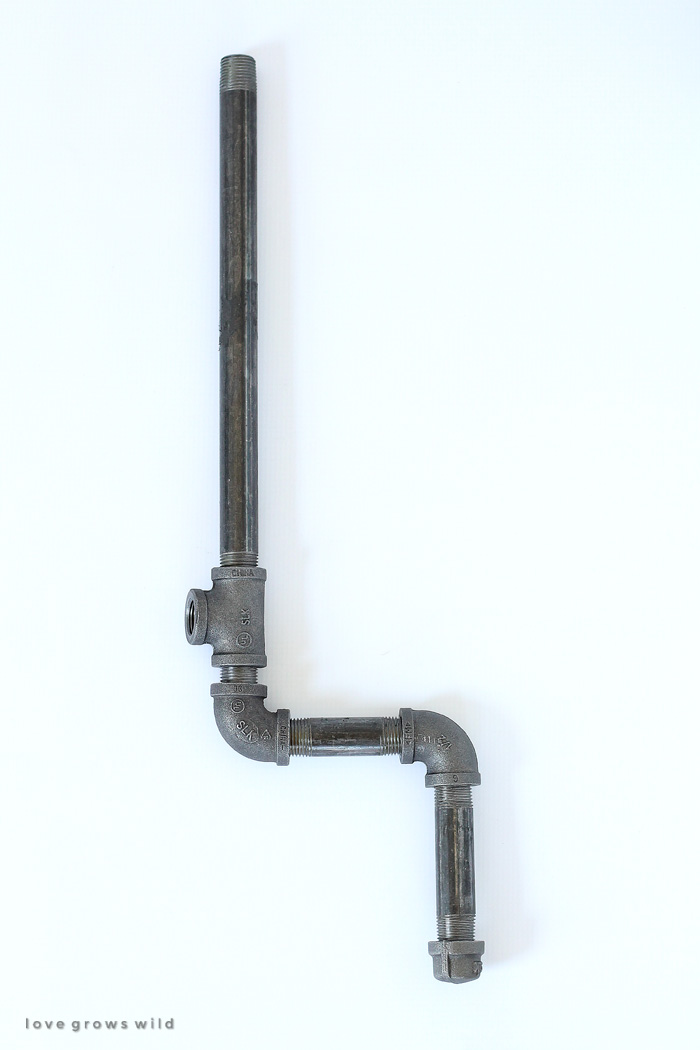
Step 1: To build one leg: Attach a 12″ pipe to a tee. Add a close nipple to the end of the tee opposite the 12″ pipe. Add a 90° elbow to the close nipple. Add a 3″ pipe. Add another 90° elbow. Add a 4″ pipe. Add a cap.
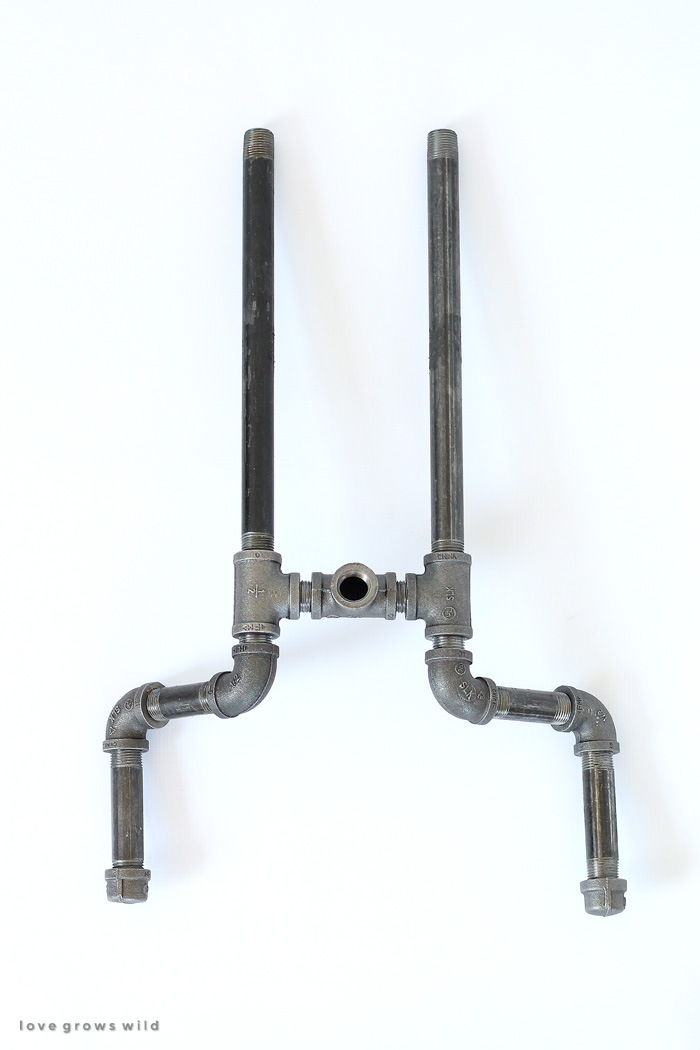
Step 2: Build a second leg using the same steps as the first.
Step 3: Add a close nipple to the open end of the tee in each leg. Connect both legs with a tee in the middle of the close nipples you just added.
Step 4: Build a third and fourth leg (same as first and second).
Step 5: Connect the third and fourth legs using the same steps you did to connect legs one and two.
Step 6: Use a 4″ pipe to connect the open tee ends on legs 1,2 and 3,4.
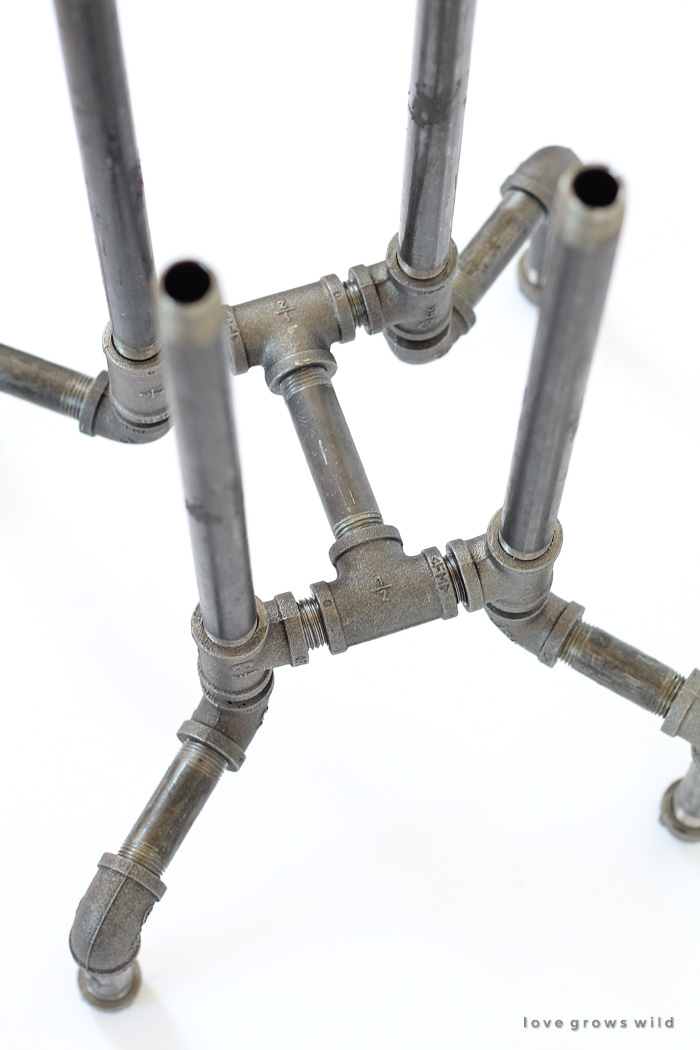

Step 7: Add a floor flange to the top of each leg.
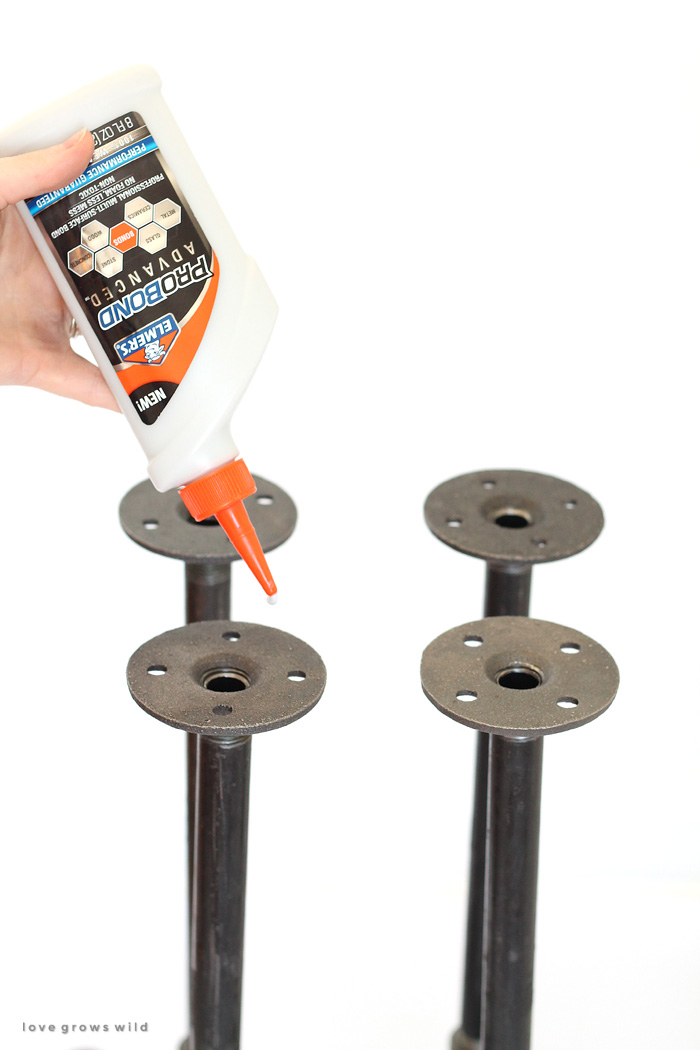
After the pipe frame of the stool is built, all that’s left is to add the wood round to the top. I used Elmer’s ProBond Advanced, which is designed specifically for bonding Mixed Materials that can’t be bonded with regular glue, such as wood to metal or ceramic to drywall. I seem to come across projects all the time that need this special type of glue, and I’m so excited to have finally found something that fits the bill! It was extremely easy to work with and didn’t leave any kind of messy foam residue. ProBond also has a translucent, paintable finish and a 100% waterproof and performance guarantee.
I just applied a good amount of glue to the top of the floor flanges (after making sure they were level first) and centered the wood round on top. I used a couple of heavy paint cans on top of the wood to clamp the stool together while drying, and after 12 hours the heavy-duty glue had a solid bond, and I had an awesome new stool!
Now I know some of you are probably saying… “Uh… why don’t you just screw the floor flanges into the wood round?” You could definitely take that route as well, but I really wanted to show you this method because I get emails everyday from women (and some men!) who don’t have a giant array of tools at their disposal, but want to be able to do some of these DIY projects too. Picking up a bottle of glue that you can use on all kinds of different projects and materials allows this to be a tool-free project that anyone can tackle!
You can choose to paint or stain your wood round any color you like, but I kept mine the original pine to go with the color scheme in my office. Make any final adjustments needed to level the stool by tightening or loosening the caps at the bottom. Since I have hardwood floors, I purchased some adhesive felt pads to keep the caps from scratching the floors.
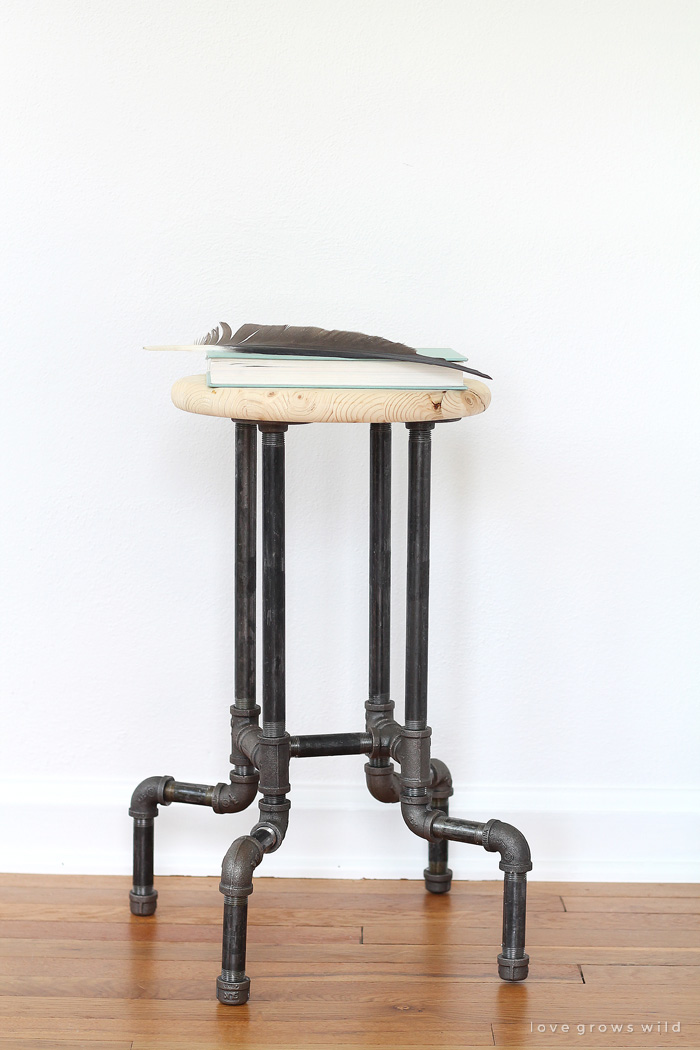
I still have a lot of projects left to go to finish up my office makeover, but I am so happy to have these cool industrial stools for my work table now!
So the question you’re all asking right now… How much do these awesome pipe stools cost? While they’re not the cheapest project I’ve ever done, the total price of these stools was far less that what I was going to spend buying the ones I wanted from the store. The total for one stool came out to $53.96 for the wood round and all the pipes. How many unique stools do you see in stores like this though? I certainly haven’t seen many!
Now it’s your turn… tell me what YOU think! Do you like the industrial pipe trend? How would you use ProBond Advanced in your home?
LET’S KEEP IN TOUCH!
Subscribe to Blog | Browse my Shop | Follow on Facebook | Follow on Twitter
Follow on Google+ | Follow on Pinterest | Follow on Instagram

LOVE< LOVE<LOVE these stools! Thanks so much for the instructions. And since I already have some wooden rounds, I think I'll give this project a go. 🙂
Yay!! Have fun creating your stools, Beth! I hope you love them as much as I do. 🙂
Wow, your stools look great! The design is super impressive! I have loved seeing all the industrial pipe DIYs around the blogosphere!
Me too! Pipe shelves, bar carts, tables… I love it all! Thanks so much for stopping by, Tamara!
LOVE!
Thank you SO much, Bethany!!
OMG!!! This is AWESOME!!!!! I have to make a few of them. When we move we want the industrial look and this will be absolutely perfect. TFS I really can’t express how thankful I am for this tutorial. Oh, I can’t wait to try the Elmer’s pro bond glue, I haven’t even heard about it. I’m new here and I’m so glad that I signed up. *squealing*
Thank you
I love the industrial look too, Michelle! I bet these will look amazing in your new house! Oh, and the ProBond glue… awesome! Thanks so much for stopping by!
My pleasure 😀
Absolutely awesome, Liz! Seriously, so amazing! They’re perfect for your office! Enjoy! 🙂
You’ve made my day, Shayna! Thank you SO much! I’m having a lot of fun with this office makeover!!
Wow! These stools are about the coolest thing I’ve seen yet! I am thinking they would look really good in my kitchen!! Pinning!! 🙂
xox, Crystelle
CrystelleBoutique
I’ve been thinking how awesome these would look in a kitchen! Thanks so much for the pin, Crystelle!
These are so cool! I am seriously impressed that you designed these:)
Thank you so much, Ginnie! I love when projects fall into place better than you even imagined! Because that definitely doesn’t always happen… 😉
OMG this is fabulous. I love pipework in the home and I plan on adding more. This is totally out of the box!
I love all the pipe projects I’m seeing too! Thank you so much for the compliment… I really appreciate it!
These are amazing and I love how you showed how to use glue vs. screwing them in. Now I definitely want to try out some of that glue! Pinned!
Seriously, that glue went straight into my tool box! It’s such a great product! Thanks so much for stopping by and for you sweet compliment! 🙂
What an amazing project! I’d love for you to link this up to my weekly link party! Hope to see you there! http://www.thelifeofjenniferdawn.com/2014/08/a-little-bird-told-me-link-party-105.html
Thank you so much, Jennifer Dawn!
OMGosh! You are a genius! I love love love the stools! I think it’s probably one of the coolest DIY projects I’ve seen!! Can ya tell I’m in love??! LOVE!
You are too sweet, Laurie! Thank you so much!!
Liz, I have to admit that I don’t comment all that often on blogs, but I just had to here. These stools are pretty fantastic! I love the industrial look and this is an awesome way to incorporate it into your decor without it taking over. Totally pinned and following you now!
~Jenise
Wow, thank you so much, Jenise! Welcome to Love Grows Wild! 🙂
Can you say “GENIUS” !!!!!!! LOVE!!!!! You knocked it Outta the park Gurl!!!!!!!!
You are too sweet!! Thank you, Deidre!
I love, love, love these! I have seen many DIY’s with black pipe book shelves but never bar stools! Maybe I haven’t been paying attention but I never noticed bar stool seats at the hardware store either. Thanks so much for sharing!
Thank you SO much, Ashley! It was really fun coming up with the design for these!
Yes, I have the wooden tops, too, so I hope that will help to reduce the cost! I love, love, love these, and even tho’ I’m 73, I know I can make them with such wonderful instructions! Thank you! My one question is, tho’….. do the rounded caps on the bottoms of the legs, make indentations in your floor, or are they flat enough to avoid that?
Great question! The caps I used are pretty flat on the bottom. I have hardwood floors, so I just added some felt pads to help glide on the hardwood without scratching it. I hope this helps! Have fun making these!
I’ve had my eye out for an interesting, not-crazy-expensive seating option for my husband’s man cave out back…these are PERFECT!!!!
These stools have “man cave” written all over them! Perfection!!
Thank you so much for a marvelous plan. I was wondering where did you get the pipes I went to home depot but the prices are double to what you paid for. Can you please tell me where to buy it. I don’t mind paying a shipping fee if it cost a lot less. I’m making 4 chairs. Again thank you.
You’re welcome! I purchased the majority of my pipes from Menard’s and had to buy a few at Lowe’s, which was double the price. I hope this helps!
Liz,
These are cool stools and your instructions are fantastic. Although I have not yet built these I have a suggestion. The pipe caps on the ends of the legs may damage flooring. Placing felt pads on the bottom would help but the felt would likely fall off quickly due to the rounded bottom and small surface area of the cap. A possible alternative design would be to use floor flanges on the bottoms of the legs. Larger felt pads would adhere to the flat bottom of the floor flange better and prevent damage to flooring. Just a thought.
That’s a great tip, Chad! Thank you!
Love these!! About how much did they cost you??
Thank you, Lauren! They definitely were not the cheapest project I’ve ever done, but I love the look and think it was totally worth the price. I think they ran about $90-$100 per stool. It really depends on where you get your pipes from… I’d recommend checking around on pricing!
I am amazed at your design and tutorial…Amazing!!! Since you have experience with the stool, how do you think it would work with three legs instead of four? Do you think it would still be stable for adults? These stools are exactly what I am looking for…currently in the middle of family room remodel…love that I can make them myself.
I would personally recommend using 4 legs. If you used a larger seat on top of the stool, you might be able to get away with 3 legs spaced further apart, but for the stools I made, I think they need 4. I hope this helps! Best of luck with your family room remodel!
Thank you Liz I appreciate your input…I believe I will stick with your design…it is a great tutorial.
Thank you, Kathy! Best of luck!
As soon as I saw this stool, I took off for Home Depot and bought all the fittings before the snow blew in and spent the afternoon building one. It worked really well, but Home Depot is definitely too expensive on the fittings. This one will cost about $110 which I knew I could improve upon. If you have a Menard’s, their prices are really good on the fittings, but by the time I added in handling and postage, still would be about $85. So, I got online and found ZORO. I will probably do the next one for about $67 which is an improvement!
Had to use 15″ seat which worked fine. Good idea to wipe pipes off before starting as you will end up with the black residue on everything. I’m 70 yrs old and didn’t have any problems with any part of the instructions. I also screwed the top on. Wonder if we could make it a little taller?
I will definitely have to check out that online store you mentioned! Great find! Thank you for sharing, and I hope you enjoy your new stools! 🙂
Awesome tutorial, where did you find the wooden seats at? Take care,
-Arlan
Hi Arlan! The wooden seats I used came from Menards, but I’m pretty sure I’ve seen them in other hardware stores as well. Hope this helps!
I love it, great idea!!! Where did you get the pipes and fittings from?
I got the majority of mine from Menards because they are generally cheaper than anywhere else, but I did buy some from Lowe’s as well.
I buy my pipe online, I found the prices are much less. I am about to build out my bathroom vanity, I am super excited. Have fun with your project I feel like a kid with new toys!
Well… you got me salivating. We needed stools for a breakfast bar that you can see from our steampunk feel living room… and now I’m now imagining a steam punk desk with attached shelving, using slightly larger pipe. Flanged feet, with felted bottoms… my brain is just a goin’. 😀
The stools are muy industrial chic- do you think it would have been possible to put wheels on the bottoms to make them easier to move around? I’m an amateur so I don’t know if it would be a good idea or not if I tried to diy some stools myself.
That would be really cute! I’m not sure how easy it would be to find wheels that can screw onto the bottom of the legs, but I think it’s a fantastic idea!
These are amazing! This is exactly what I have been looking for. Do you mind sharing approximately how much each stool cost you? Trying to plan an estimate. Thank you so much for this!
Of course! The total came out to be just under $54 per stool. Not the cheapest project we’ve done, but certainly a good price for this fun industrial look!
I’m going to try in copper. What was the finished height of the stool?
Just a heads up to anyone looking to make these and any other industrial pipe project, which I plan on doing just spent about $500 on all kinds of goodies. Can’t wait to get started. Check out national building supply and zoro websites. You can find these parts for super cheap!!!
Just seen these . Fantastic we must all be asleep , not to have seen these Befor , well done . Me thinks maybe a table next or even garden chairs , possibilities are endless thanks to you. London uk
wow realy amazing
i love these stools!!!!!! But i need them in bar stool height. Do pipes come in 18″ ? That would make the perfect height. Do you think that would be sturdy enough? Or try a 4″ at the top connected with tees and close nipples and 4″ pipe…. then add the 12″ pipe and finish with elbows etc. thanks.
Hey Sheila! Pipes come in all different lengths, but you’ll have to see what your store carries. You can always have a long pipe cut and threaded to the size you need if they don’t sell the exact length you need. I hope this helps!
all I can ” muster” up right now is WOW!!
Excellent work!
Any suggestions on where to get the supplies at a lower cost?
Hey Dan! I would check around at different hardware store, because I found that some were definitely higher priced than others.
READERS: Have you found parts cheaper anywhere else?
Very interested in this topic. Closest I could find all of the equipment for was well over $100 per stool.
Hi, do you use tools to tighten the tubes? If the answer is yes i appreciate you telling me which tools, Thanks
Hi Enrique! For most of the pipes, we were able to tighten them pretty well without tools, but for the stubborn ones, my husband used his vice grips. I hope this helps!
Love these!!! I have tile floors. Do you think it would Leave marks? Maybe felt?
I would definitely add felt or something underneath to protect your floors. I used the little felt pads from the hardware store to protect our hardwood floors, and they worked like a charm!
I’m building a stand alone bare from reclaimed barn beams. I am using pipe for foot rails and support for the bar top. The pipes are dirty and oily. I want keep the natural look. What do you use to clean them
Hey Doug! I usually fill bucket up with a mixture of hot water, dish soap, and vinegar to scrub pipes down before using them. Having a wire brush on hand to scrub the hard-to-reach areas helps too!
Liz I just saw this on face book on making stools and you were linked ti it. I love this and of course I have a question. Are these stools ok for desk height or would I need pipes shorter than the 12″ length? I want to do this in Jan. for my grandson. I am making him a desk for his room and this would work great but I don’t know much about heights for such things..
Thanks for all the great things you make and I love,did I say love your sweet farmhouse.
Glenna
Hi Glenna! These come out to be regular chair height, which would be perfect for a desk. Best of luck!
Thank you Liz. I can’t wait to get started. He is so excited that nanny is doing his new room and this is just great to go with his desk. Glenna
Definitely want to make some of these! I’m thinking they would fit better under the table than bulky chairs, which are always sticking out and in the way. My husband is a plumber, so fitting the pipe together will be super fast and easy for him =) Now I just need to find the best prices on parts!!
How much $ did each stool end up being?
Look on supplyhouse.com under imported black iron fittings and nipples for the items in the list Liz put together above. Imported black pipe iron is almost 75% cheaper than domestic. You can make the chair for around $25.00. I made 20 stools and 6 benches for under $18.00 each and i used reclaimed cedar for the seat. I changed the length in the horizontal pipe; the one that joins the two sections together from 4″ to 36″ and viola you now have a bench. I also used black plastic pvc caps rather than the iron as Liz did. The benefit from the swap? They slide gracefully on my wood floors while the metal caps did not.
Have you seen anyway to add wheels or casters??
http://www.webstaurantstore.com/5-rubber-swivel-stem-shelving-casters-4-set/460EC25.html
or with brakes?
http://www.harborfreight.com/3-inch-x-3-4-quarter-inch-stem-swivel-caster-90997.html
hope that helps
Why on earth why wouldn’t you put wheels on them?
Where can I get those pipes??
Few month ago I bought these ones https://www.tractorstool.com/ and they are gorgeous actually, but now I’m obsessed with these pipe stools!!!
LOVE this project! How do you clean the piping to get the greasy residue off? Thanks!
So interesting works ! If possible I would like to know the price of each pipe for making one stool. Thanks
I can help with a few tips and a plug (hope you don’t mind Liz:)
First of all as Liz says, DO shop around, there is a crazy variation in prices. Big box hardware stores tend to be medium expensive and plumbing specialists go from cheap and chips to astronomical.
Next, buy ‘black pipe’ thats the trade name for the cheaper than galvanized and it’s much cheaper. Some will come fairly clean, most is oily and greasy and sticky and… you get the picture. It’s anything that a few household solvents won’t tackle but it’s messy.
If you are outside the USA beware that the threads on US parts may not match your local supply, so try not to mix and match.
Do paint or varnish or lacquer the pipe or it WILL rust (and not prettily).
Lastly, if you need a hand, advice or parts, I have it all in abundance. My black pipe parts are cleaned, degreased, deburred, electrostatically painted and stove hardened (yet strangely cheaper than the big box guys!). Still building up the website so if you don’t see what you need, just ask Jethro!
https://www.blackfriarsironworks.com
or
https://www.etsy.com/shop/BlackfriarsIronworks
Thank you for the tips! Super helpful!
I’m going to build everything like this, where do you buy the pipe tho and do you need to cut the pipe and put the thread on the pipes yourself, any advice will be helpful
Nice article, I think it would be a much better connection with screws vs glue and if someone doesn’t have an electric drill I would recommend getting one. The are a must have around the house and you can purchase one for under $100. Just use some of the money you saved from the bar stools.
Hi Liz, This stool is beautiful, congratulations. Could you tell me what the wall thickness of these pipes is? thanks