You may remember from a few weeks back that I decided to put together a team of contributors here at Love Grows Wild…. Well, I’ve come up with a FABULOUS creative team, and I cannot wait for you to see how talented they are! They’ll be posting here once a week, so get ready for even more inspiration from LGW! The ladies on the team are so excited to share their recipes and projects with you, and today marks the first one! Let’s give Ashley a very warm welcome:
———————————————-
Hi Everyone! It’s Ashley here from Cherished Bliss! I am so excited to be a contributor here at Love Grows Wild, I just love Liz! If you’ve been to my blog you might know that we have finally bought a house (in August) after moving 4 times in less than 2 years. It is super exciting to finally be decorating again! While I haven’t had a chance to redo my kitchen in the last 2 months (cause that’s totally doable right?) I am rather excited to start decorating it!
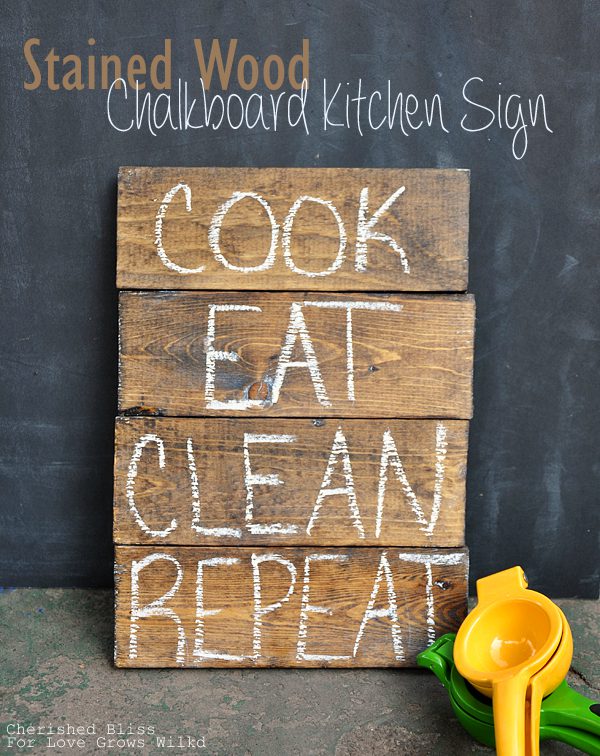
I might not have painted cabinets or a new butcher block counter top, but I have an adorable sign! : ) This is my first official decoration for the new kitchen so it might forever be my favorite! Did you notice it’s chalk written on stained wood? Yes, it’s true. You can literally now make ANYTHING a chalkboard! This could be scary. My husband now things that anything I don’t paint white, will now be a chalkboard…. maybe both! Can’t say that he isn’t right ; ) I love white and I love chalkboard. I’m ok with admitting this! You will be amazed how easy this is to make! Here is what you will need:
Supplies
Wood scraps
Stain & Lint Free Cloth
FolkArt’s Chalk Anything Paint
Foam Brush
Chalk
Mending Plates and Screws
Something to hang it with.
Let’s get started making this now.
Tutorial
First you will just stain your wood and let it dry fully. Once it’s dry we will put a coat of the chalk anything over the wood stain (I didn’t seal my wood after the stain. It’s up to you though). Once you put your first coat of chalk anything let it dry for one hour and apply another coat. After the second let it cure for 24 hours.
Now that it has cured, just condition the chalk surface following the instructions on the bottle. Now it’s ready to use! Before you start writing though (I know you’re ready!) Let’s attach the wood. I just used some basic mending plates. I was short 1 so I just kinda had to make it work. But it’s not very heavy and it’s still sturdy. Trip to the hardware store with 3 kids avoided! lol. I also attached that picture hanging plate (not sure what those are really called) to hang it with.
That’s it. Now you just write on it. You will notice I chose to write “Cook.Eat.Clean.Repeat” Because well… it is just so fitting right? With now having 3 kids I feel like I live in that room! I can never get caught up on the dishes, and it seems everyone just wants to eat around the clock!
So there you have it! A simple Chalkboard Kitchen Sign! I hope you enjoyed this little project and will stop by to see me over at Cherished Bliss!
So tell me… where is your favorite place to put chalkboard paint? : )
Connect with Ashley:
Let’s Keep In Touch!
P.S. I’m sharing this post at some awesome link parties… Check them out HERE!


Great tutorial, Ashley! What a cute sign and awesome product. I think you’re right…no surface is safe from chalk now! 😉
I love signs like these! You did such a great job with you craftsmanship!
I saw your sign somewhere the other day and pinned it for inspiration for my office makeover. In fact, it will be one of the elements in a collage I made to show what my plans are for the room that I’m sharing on my blog tomorrow. I had no idea about that Folk Art product. Total game changer! Nothing is safe now! 😉 Angela @ Number Fifty-Three
I am a chalkboard fanatic too! So how in the world have I not ever heard of this ‘Chalk Anything’ miracle in a bottle?!!? Thank you so much for this fun tutorial….my mind is racing! Pin’ing too =) Marcy @ day2day SuperMom
This is awesome I love how rustic and natural it looks, and the cheeky words on it too 🙂 great job
I did not know you could do that, so cool! Love the sign.
Any chance you remember what stain you used? I am trying to get a similarly weathered look on a project of mine.
It looks similar to a dark walnut stain. I would try that!
That is super cute!! I’m in love. I saw your kitchen reveal at your blog and was tickled at how similar our design tastes are. I have every single one of those cutesy touches…the rolling pins, the scales, the antique blue mason jars, the wire basket. Everything but this fascinating new chalkboard and that is being made tomorrow as soon as I find the Chalk Anything. Haven’t seen it or heard about it until your tutorial. Which is ahhh-mazing!! Thank you so much!