
Hi friends! Do you remember last week when I showed you my kitchen all decorated for Fall? I have received so many sweet, lovely comments on that post, and I just want to say thank you! You guys ROCK! Many of you were interested in how I created the wood pallet for my kitchen shelf, so as promised, today I’m going to deliver the easy, cheap, awesome tutorial for creating a DIY Mini Wood Pallet! This is a really simple project to make if you are new to working with wood, and you will love all the different ways you can use it in your home! So let’s get to it…


I have a confession to make. Ever since the pallet craze hit the DIY world I’ve been kicking myself for not realizing the gold mine I had at my fingertips… My husband owned a livestock feed mill when I met him, and at any given time we probably had 50-100 pallets just sitting in our warehouse collecting dust. Apparently childbearing had taken over my brain during that time period, because the very last thing I thought to do was drag a pile of pallets home to pull apart and create something awesome with the wood! It just wasn’t in my thought process at the time between all the diapers, bottles, and lack of sleep. We ended up leaving the feed mill to move to our new home in Indiana, so my days of unlimited pallet wood are gone, and I now have to do what probably the majority of sane people would do… drive to the hardware store and buy the wood!
I considered a couple of options on how to recreate the wood pallet look, and after stumbling across Infarrantly Creative’s valentine pallet art, I decided to go with this simple, inexpensive solution: Furring strips! I had honestly never heard of them before, but I am SO glad I discovered them! You can find them in the lumber section at your hardware store and pick up an 8 foot 1×2 furring strip for only 75 cents! Not only are they super cheap, but their small size makes them easy to handle, especially when you have an over-zealous 4 year old wanting to help carry them through the store like I did!
I wanted my pallet sign to be 16″ wide by 24″ tall, so I picked up 4 – 8 foot 1×2 furring strips from Lowe’s for only $3. You just can’t beat that! I used my miter saw to cut them into 16 – 16″ pieces for the front and 2 – 23″ pieces for the back. If you have any rough edges, just give them a quick sanding to smooth everything out.

I lined up my 16″ furring strips on a flat surface with the better-looking sides facing down. Then I ran some wood glue along the 23″ furring strips and placed them on the sides of my shorter strips, about 2-3 inches in from the edge. I let the glue dry about 15-20 minutes and hammered nails along the 23″ furring strips into each short strip. If you have a nail gun, this would be a great time to use it! It really didn’t take more than a few minutes to hammer the whole pallet together, but it would have been really handy for this project!
P.S. Make sure you pay attention to your nail size… You want the nails long enough to go through both furring strips, but not long enough to poke through the front!

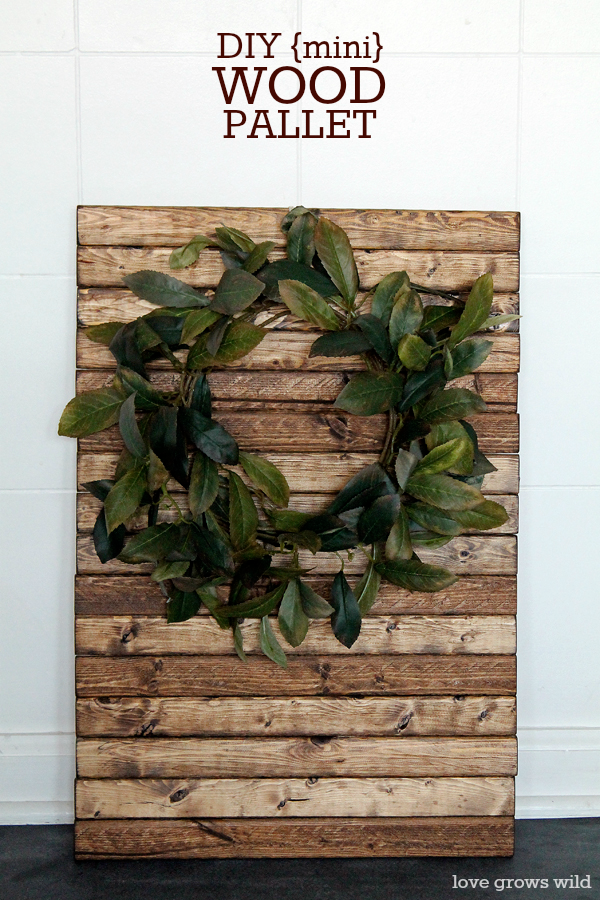
Now you can paint or stain your pallet however you choose… I’m a firm believer in a good, dark walnut stain, so that’s what I went with! Just LOOK at all that gorgeous wood grain showing through! I was too excited about adding this to my Fall kitchen that I haven’t sealed it yet, but I’m going to use either a finishing paste or my favorite matte polyurethane to protect the gorgeous color on my pallet.

You can use a simple pallet like this in SO many different ways: create a focal point on your mantel, hang a wreath on it, paint some artwork on it, etc. The stained wood is a great piece of rustic decor and will bring a ton of warmth and texture to your space!

I added my wood pallet to a shelf in my kitchen, and it instantly warmed up the cool gray and white walls. I paired it with some mini pumpkins, my cinnamon stick photo, and a leaf wreath for an easy, layered look. It makes such a statement in my kitchen! And the furring strips are so lightweight that this whole 16″ x 24″ sign weighs hardly anything. I LOVE IT!

So there you go! My secret weapon for creating these awesome wood pallets is furring strips! I wonder what else I can do with them… : )
Would you love a wood pallet like this in your home? Where would you use it?
More DIY Wood Projects:


I’ve been thinking of what I’ll use for another subway art idea, and this is definitely it. Thanks so much for sharing! 🙂
Love it! I’m kinda intimidated by all the awesome pallet art out there but this is pretty simple to pull off. I love how it looks with the green wreath on it!
Elizabeth @ Real Inspired
Your pallet is beautifully rustic, Liz, and I love how versatile it is! Plus, your step-by-step directions make the project seem totally doable. I think of lots of uses in my house for this little guy!
So pretty, Liz! I love your fall mantel, too!
What an adorable little pallet! I love the stain – so pretty!
Would love for you to link this to my Friday Favorites! I love the wood! http://imnotatrophywife.com Love! laura
The woodwork is stunning— and to “paint” it, even better. Incredible!
PackageMaxx.com
Love the pallet! Plus it’s mini… and I have a thing for anything mini : ) I think i might need one of these on my wall!
Loved it last week in your post, love it again! Pinned!
This is such a fun idea Liz and it turned out so lovely! Loving the walnut stain 🙂
Oh my goodness, Liz! Loving this!! I can think of a hundred places I need one. Awesome.
This is awesome! I love how it came out!
Love it! It looks so rustic and is the perfect size to stick on a shelf, mantel, or wherever! What a great idea! Found you through TT&J today! 🙂
This is fabulous!!
This looks wonderful! I love the color of the stain!
I’m not sure how I missed this before, but I love it! I definitely need to go out to the wood pile and get started. 🙂
I was impressed by Infarrantly Creative’s Valentine Pallet too! I’ve been wanting to try the furring strip pallet ever since. It was so refreshing to see your version. I feel inspired to give it a try as well. Thanks for sharing!!
adds just the right amount of warmth. great job!
You are a genius. Wood pallet may FINALLY make its way into my home. THANK YOU!
I love this! What brand or type of stain did you use for this pallet? All the dark walnut stains I’m finding look a lot darker than what this looks like. I really like the color of yours so I would like to use the same. I love the rustic look of this and can’t wait to finish it!
Hey Lindsey! I did use a dark walnut stain from Minwax, but if you want a lighter look, start by applying one coat of stain and wiping it off right away. If it’s too light, go ahead and apply another coat, leaving it on a few minutes longer this time before wiping off. You can always go darker and add more coats, but it’s not as easy to take them away! Hope this helps! 🙂